- グループ名ボタンをクリックで各グループ一覧にジャンプします。
- 左にあるA~Cは重要度で、Aが一番重要度の高いコンポーネントになります。
- 「詳しい機能を見る」をクリックで詳細説明が開きます。
- *は書籍『Rhino×Grasshopper All in 1 パーフェクトリファレンス』に記載しているコンポーネントです。

Analysis
Deconstruct Face
C
Mesh>Analysis
メッシュフェイスデータを入力し、各頂点は何番の点を使用しているかを出力する。
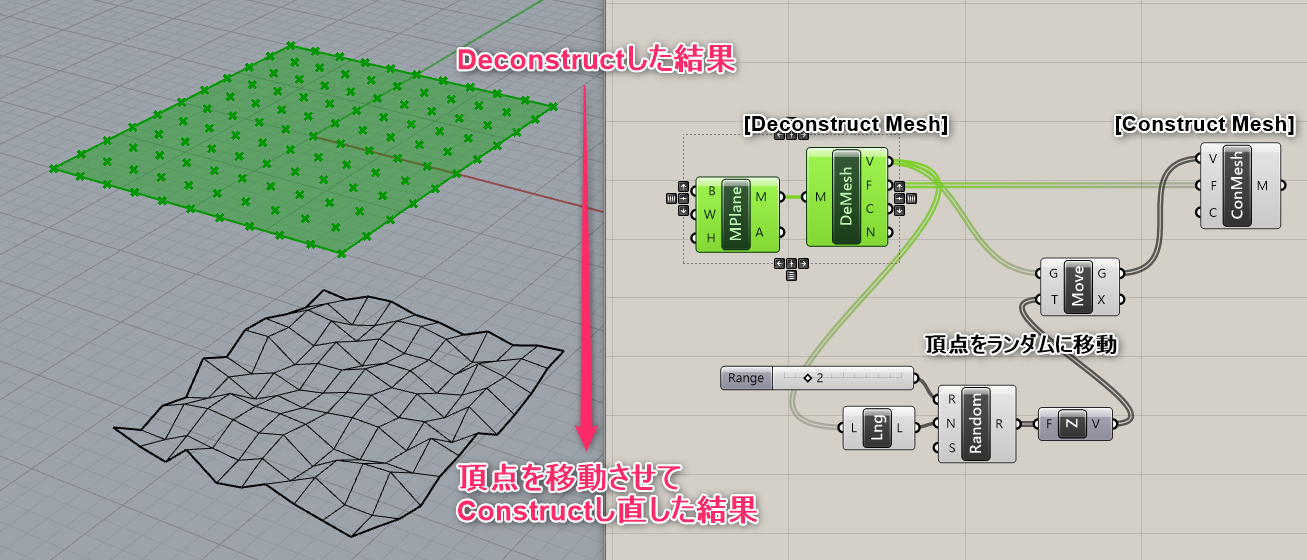
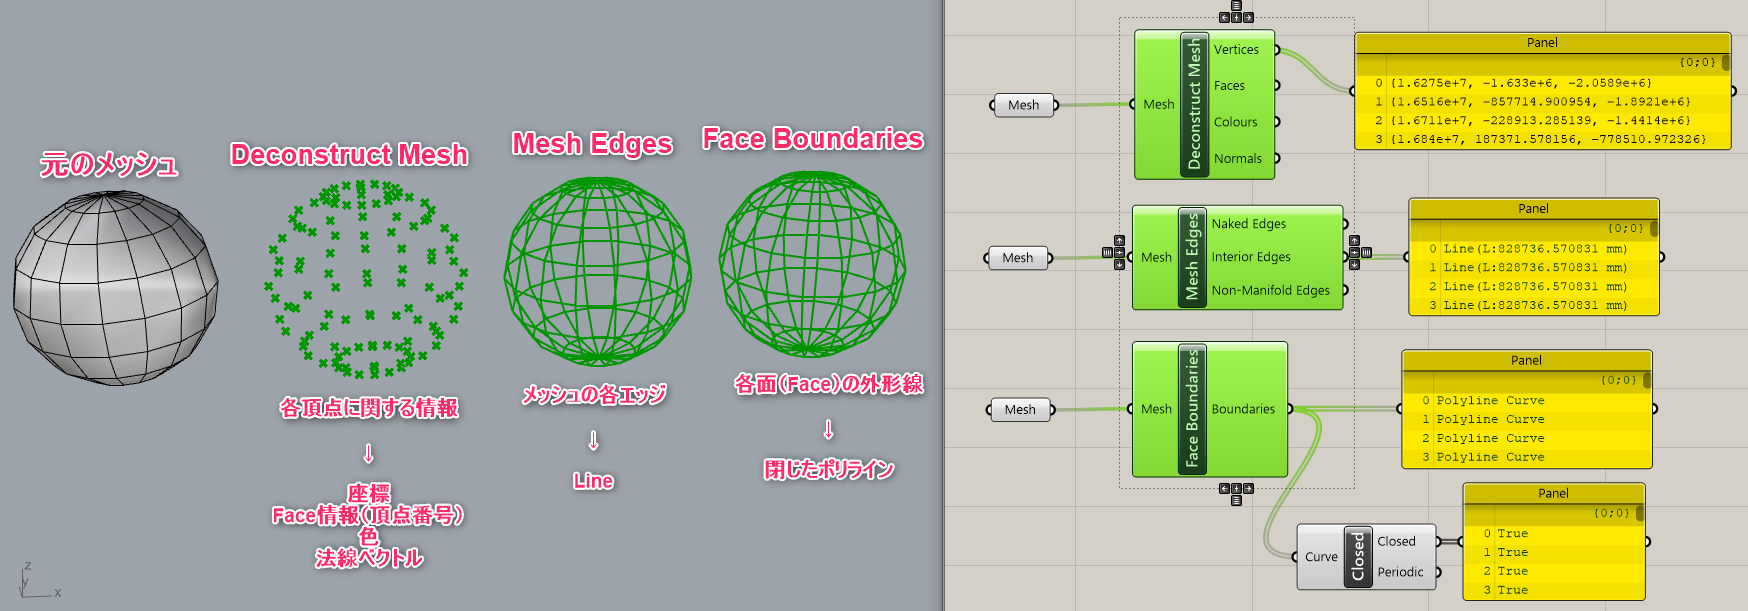
Deconstruct Mesh*
B
Mesh>Analysis
メッシュデータを入力し、頂点座標(Verticles)、メッシュフェイス(Faces)、色(Colour)、法線ベクトル(Normal)を出力する。フェイスデータは、何番の頂点を使用しているかというデータになる。
詳細1:メッシュの構成要素を取り出すコンポーネントはいくつかあるが、
[Deconstruct Mesh] は頂点に関する情報を抽出する。
その他、各エッジを抽出したい場合は [Mesh Edges] を、
各Faceの外形線(閉じたポリライン)を抽出したい場合は [Face Boundaries] を用いると良い。

詳細2:[Deconstruct Mesh]したメッシュは、[Construct Mesh]すれば元のメッシュに戻せる。
これを利用すれば、Faceや頂点の構成はそのままで、頂点だけを移動したり、
色を変更したりといった使い方が可能。
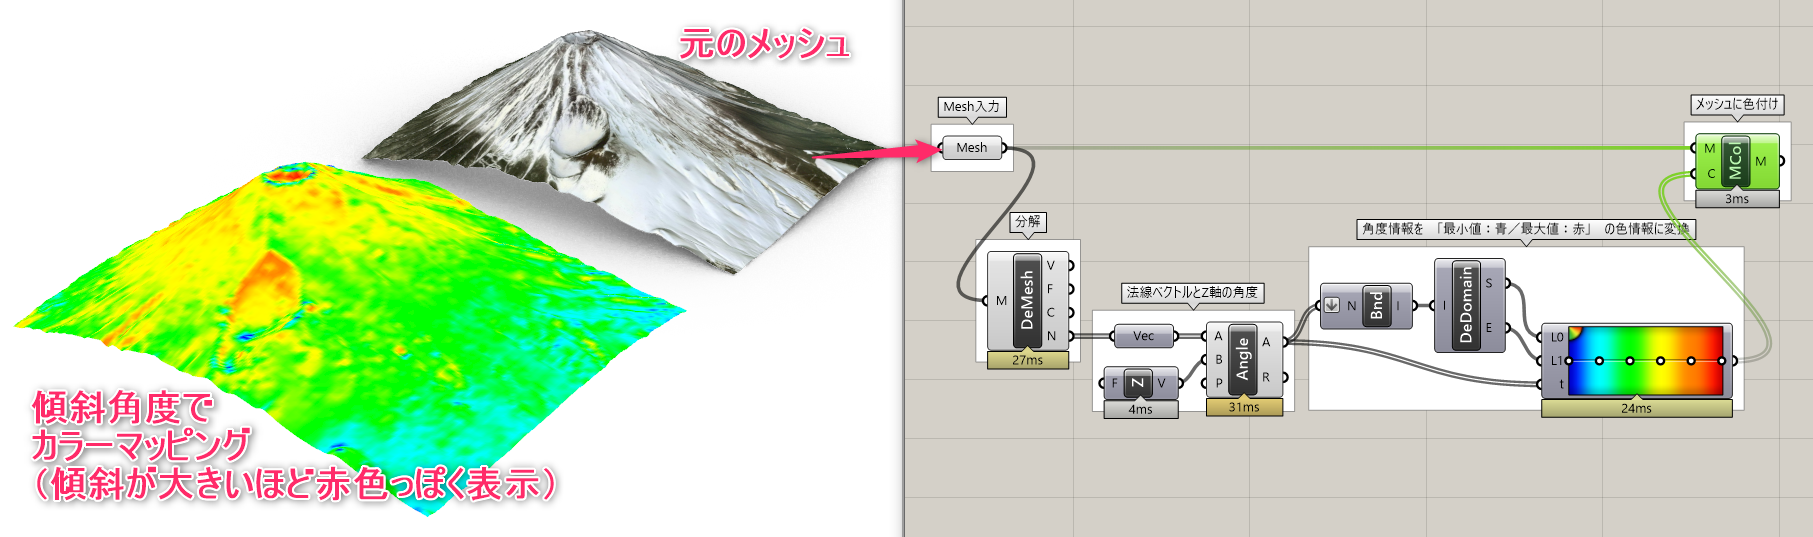
詳細3:メッシュの情報を抽出し、色付けした例。
画像は傾斜角度(Z軸と法線ベクトルの差)に応じて色付けしたもの。

Face Normals*
C


Mesh>Analysis
メッシュデータを入力し、各フェイスの中心点(Centers)と法線ベクトル(Normals)を出力する。
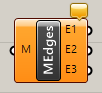
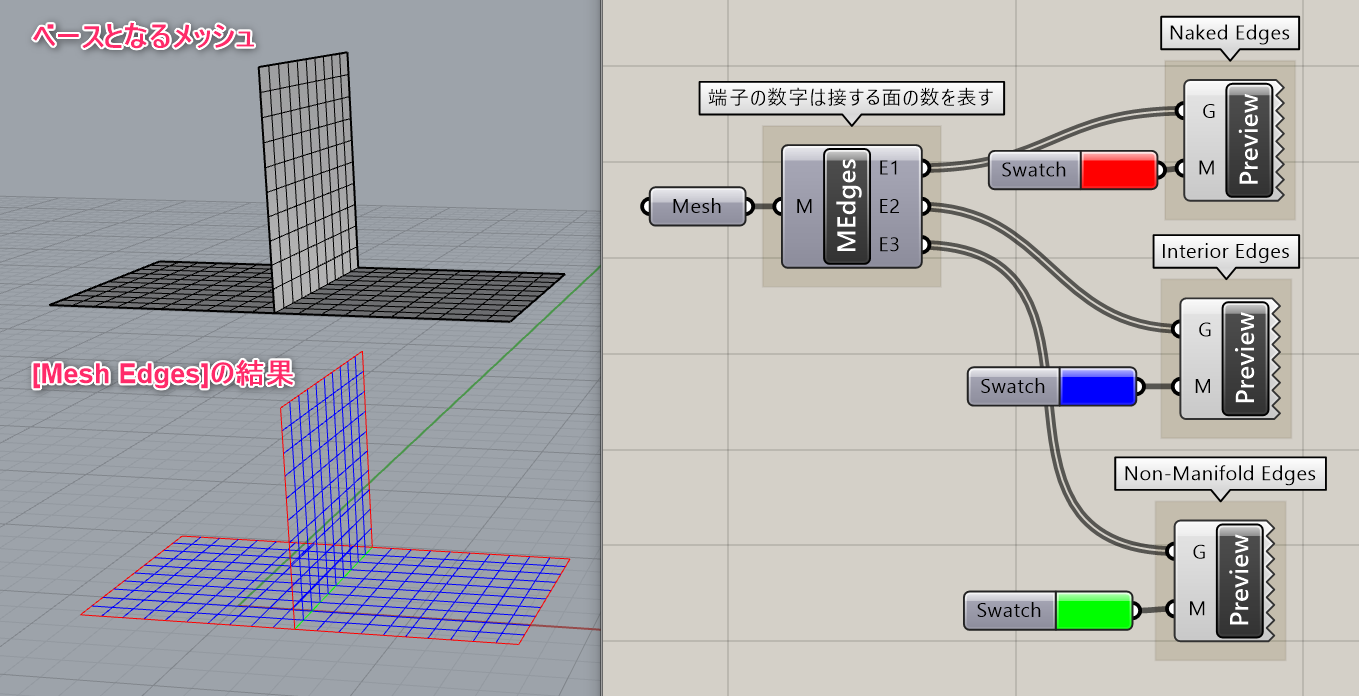
Mesh Edges*
B
Mesh>Analysis
メッシュのエッジを抽出する。E1、E2、E3はそれぞれ接している面の数を指す。なので、E1であればNakedEdgeの抽出が可能。
詳細1:メッシュの構成要素を取り出すコンポーネントはいくつかあるが、
[Mesh Edges] はメッシュのエッジ要素をカーブとして抽出する。
その他、メッシュの頂点情報を抽出したい場合は [Deconstruct Mesh] を、
各Faceの外形線(閉じたポリライン)を抽出したい場合は [Face Boundaries] を用いると良い。
詳細2:メッシュ上の接する面の数に応じて結果が出力される。
E1(Naked Edges)は、接する面の数が1つ、すなわち端部に相当するエッジが出力される。
E2(Interior Edges)は、接する面の数が2つ、すなわち内部のエッジが出力される。
E3(Non-Manifold Edges)は、接する面の数が3つ以上のエッジが出力される。
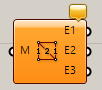
Face Boundaries*
C


Mesh>Analysis
メッシュを入力し、それぞれのフェイスの境界曲線を抽出する。
Face Circles
C


Mesh>Analysis
三角形のメッシュを入力し、その頂点を通る円を作成する。四角形のメッシュは無視される。
Mesh Inclusion
C


Mesh>Analysis
メッシュと点(Point)を入力し、点がメッシュの内側に含まれるかどうかを、TrueやFalseで出力する。内側はTrue,メッシュ上と外側はFalseで出力。
Mesh Closest Point
C


Mesh>Analysis
メッシュと点(Point)を入力し、メッシュ上の最も近い点を出力する。出力される値は、点(Point)、フェイスの番号(Index)とそのフェイスでの位置(Parameter)である。
Mesh Eval
C

Mesh>Analysis
メッシュとフェイス上の位置(Parameter)を入力し、点(Point)と法線ベクトル(Normal)と色(Colour)を出力する。Mesh Closest Point と合わせて使用することが多い。
Primitive
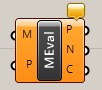
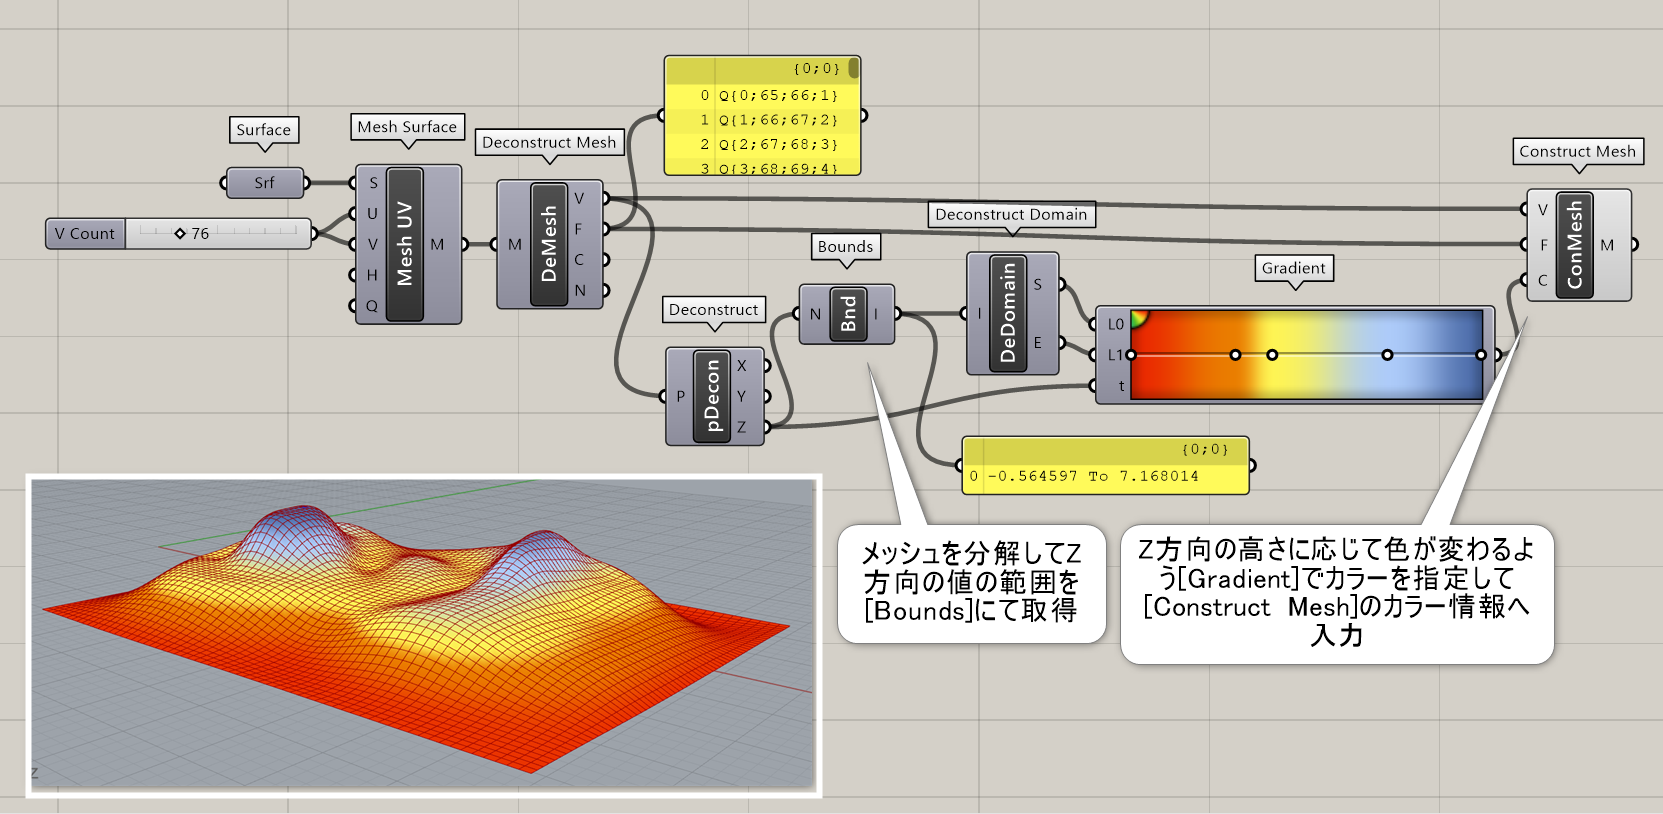
Construct Mesh*
B


Mesh>Primitive
頂点(Verticles)、面(Faces)、色(Colours)を決め、メッシュを作成する。
詳細1:頂点(Verticles)、面(Faces)、色(Colours)を決め、メッシュを直接作成する。四角メッシュはQ{0;1;2;3}、三角メッシュはT{0;1;2}のように面のコーナーとなる頂点のインデックスを指定する。
詳細2:メッシュ全体を手動で作成するのは大変なので、実際は既存のメッシュから[Deconstruct Mesh]で抽出した面や頂点のリストを編集して戻す作業が多くなる。図は、メッシュの高さに応じて色が変わるよう指定した例。
Mesh Colours*
B


Mesh>Primitive
メッシュと適用したい色(Colour)を指定し、メッシュに色を付ける。
詳細1:メッシュの頂点に色付けするコンポーネント。C端子にはカラー情報(「R,G,B」の形式)を入力する。
頂点毎に色付けされるため、入力する色が1つの場合は単色に、
複数の場合は入力パターンが繰り返されて画像のような繰り返しパターンが生成される。
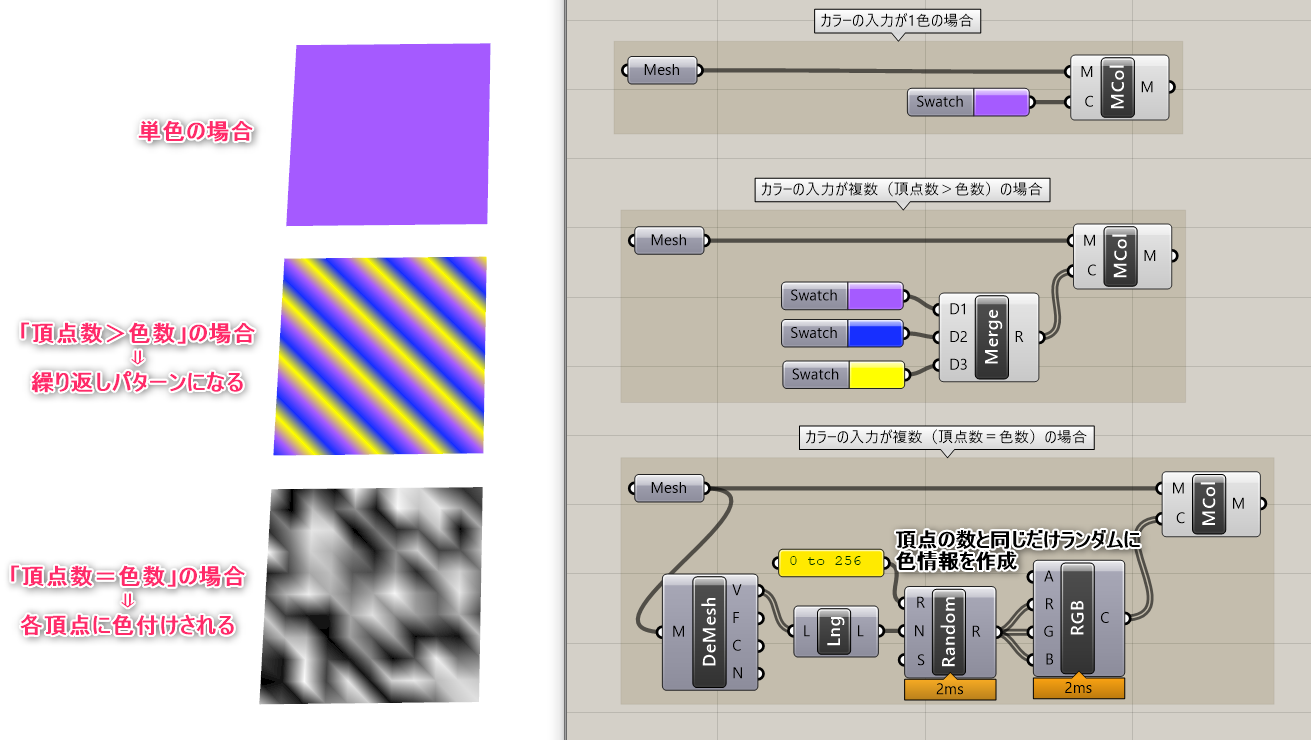
詳細2:頂点と同じ数だけ順番通りに色情報を入力すれば、それぞれの頂点に色付けされるため、
高さや傾斜などの解析結果を色情報に変換できれば、解析結果の可視化手段としても用いることができる。
Mesh Quad
C
Mesh>Primitive
頂点を入力し、四角形メッシュを作成する。
Mesh Spray
C
Mesh>Primitive
メッシュと複数の点(Points)、それに対応した色(Colours)を入力することで、メッシュに対してグラデーションで色を付けることが出来る。コンポーネントを右クリックから、グラデーションの掛け方も変更できる。
Mesh Triangle
C


Mesh>Primitive
頂点を入力し、三角形メッシュを作成する。
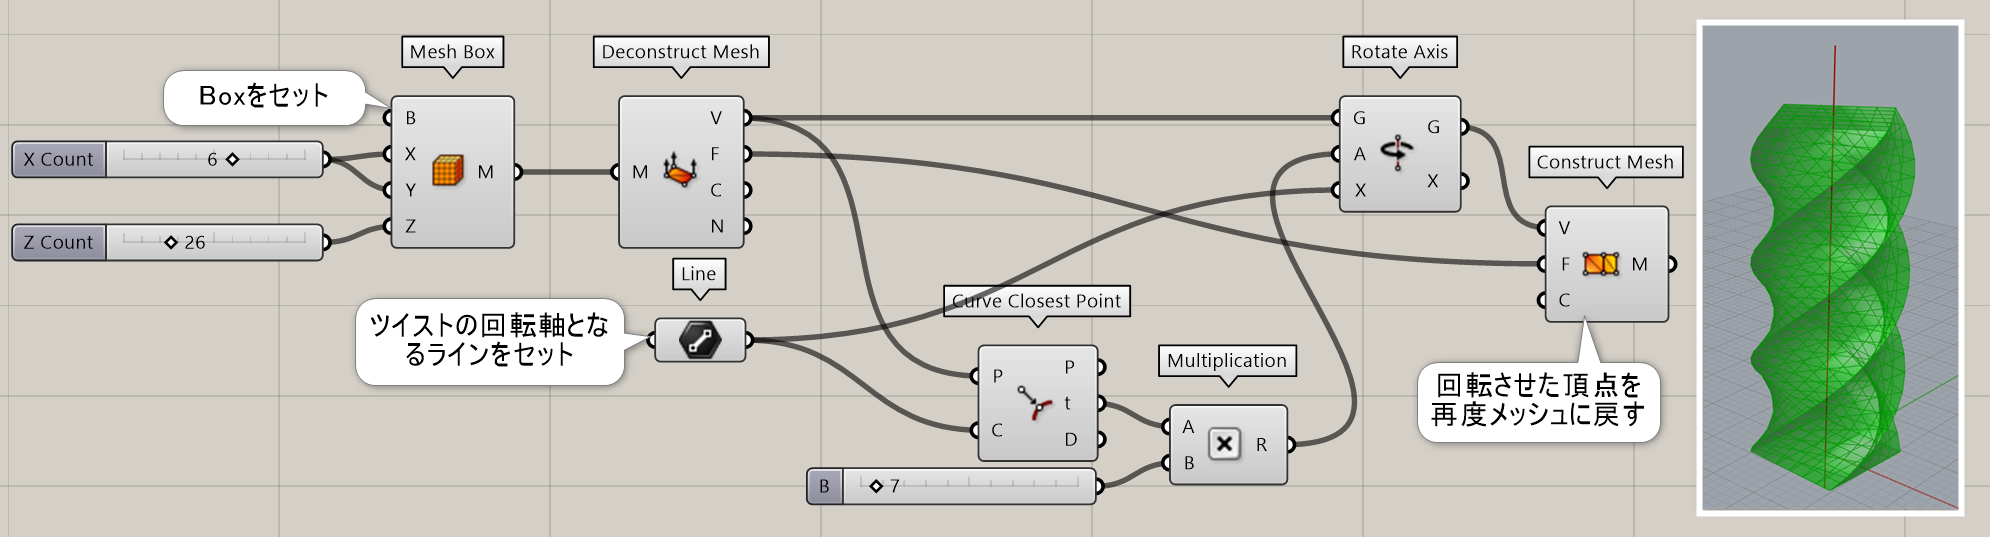
Mesh Box
C

Mesh>Primitive
基準となるBoxデータを入力し、そのBoxをXYZに指定した数で分割する直方体のメッシュを作成する。
詳細1:基準となるBoxデータを入力し、そのBoxをXYZに指定した数で分割する直方体のメッシュを作成する。図は[MeshBox]を一度[Deconstruct Mesh]で頂点に分解し、[Curve Closest Point]と[Rotate Axis]で回転させた頂点を[Construct Mesh]に戻して、ツイストしたボックスを作成した例。
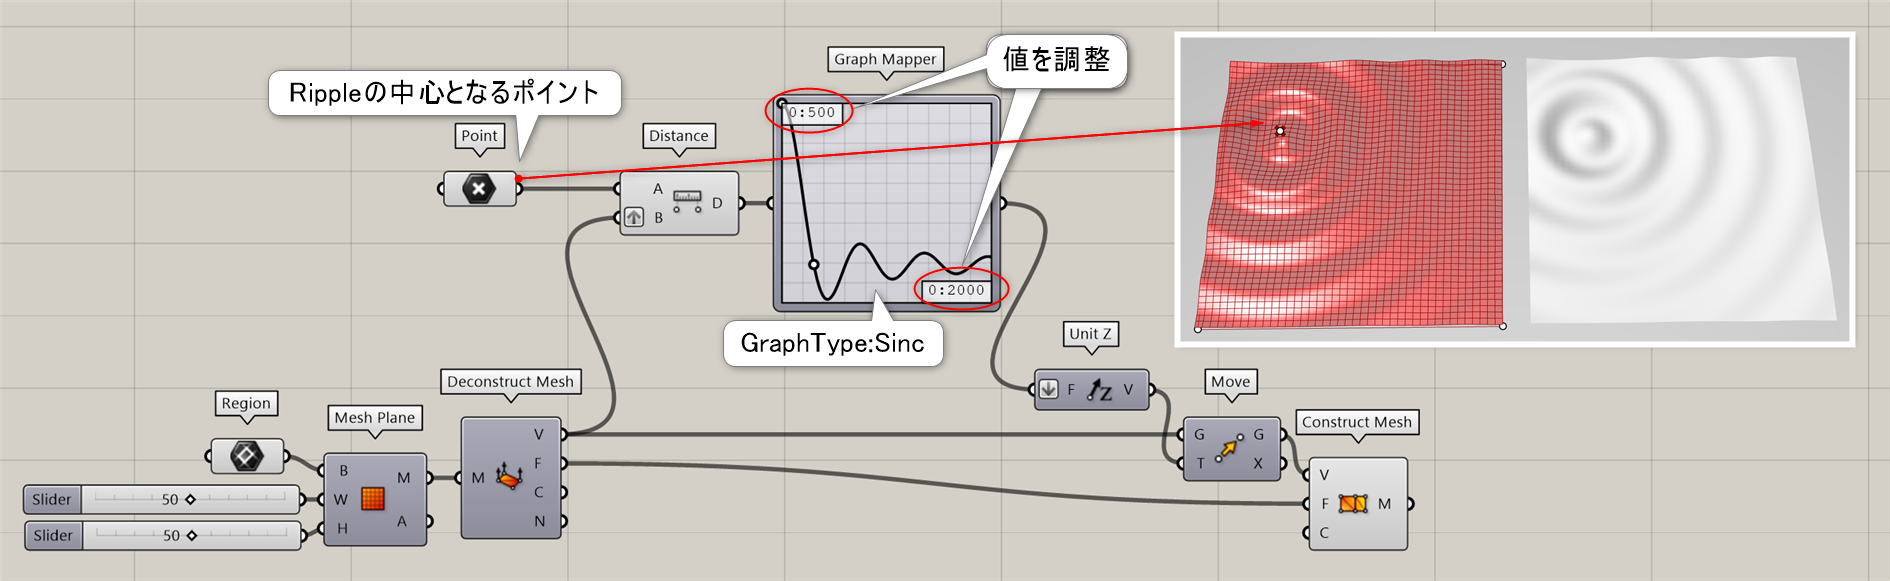
Mesh Plane*
C


Mesh>Primitive
基準となる長方形の曲線(Boundary)、横(Width)と縦(Height)の分割数を指定して、平面メッシュを作成する。
詳細1:基準となる長方形の曲線(Boundary)、横(Width)と縦(Height)の分割数を指定して、平面メッシュを作成する。図は、分割した[Mesh Plane]上にポイントを指定し、そこからRipple状に頂点が移動するよう[Graph Mapper]で編集した後[Construct Mesh]に戻した例。
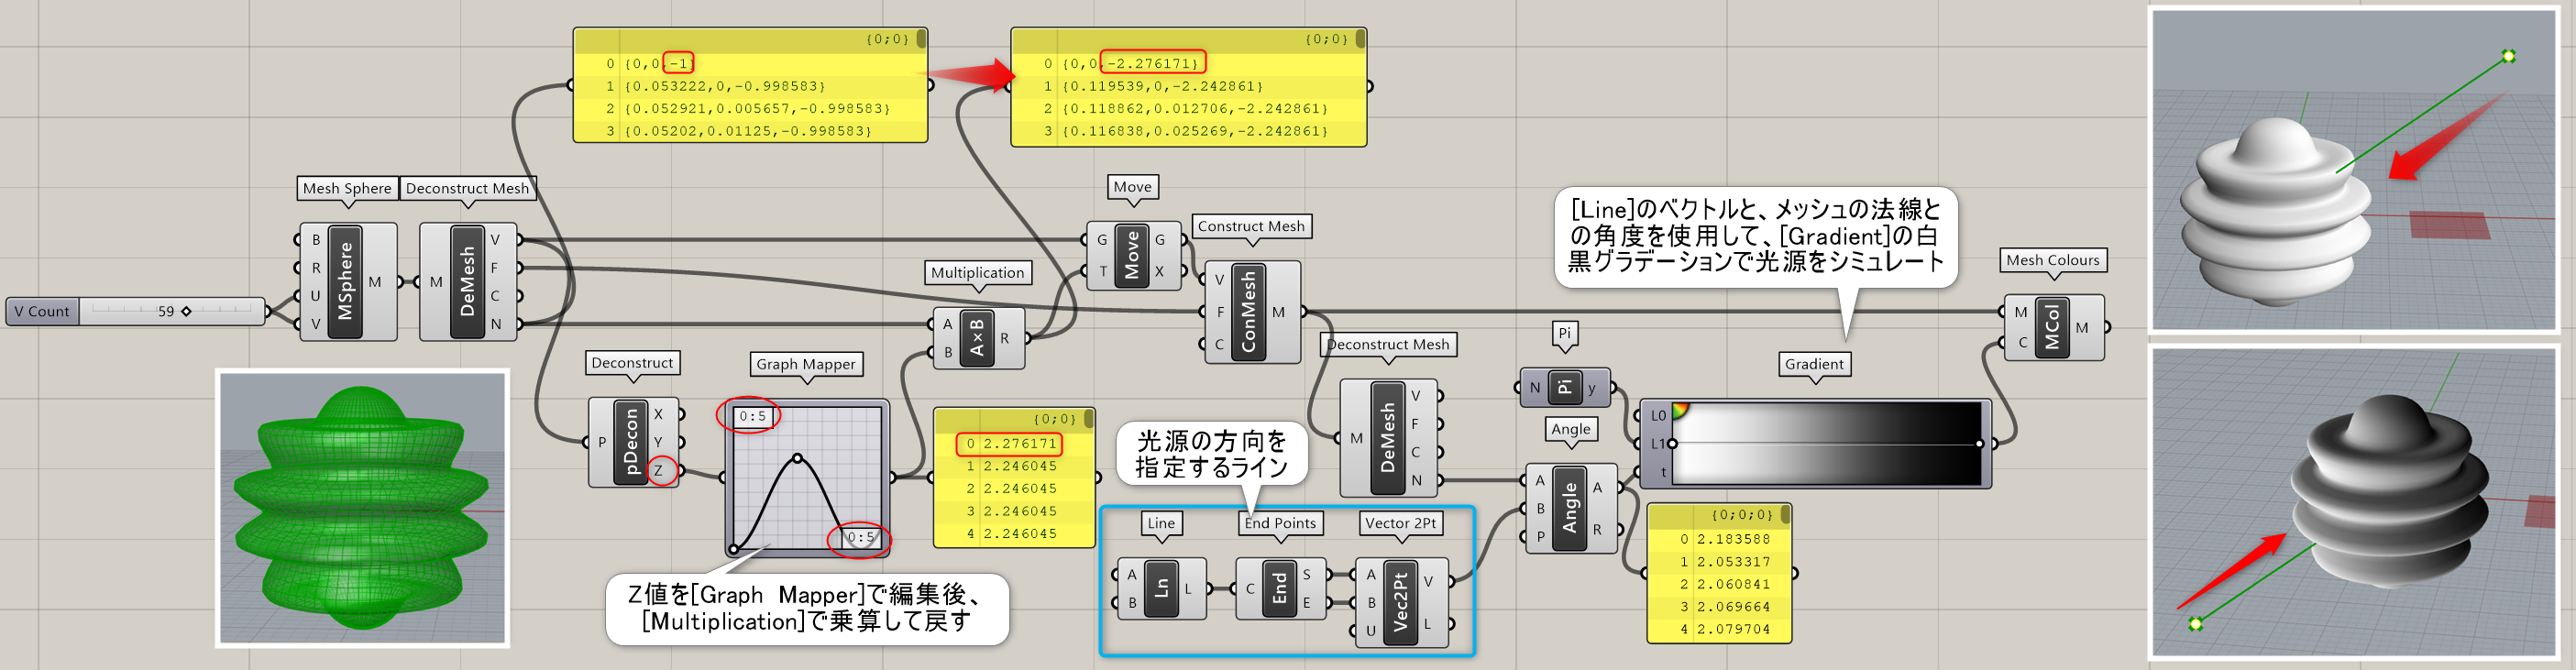
Mesh Sphere
C

Mesh>Primitive
作成する平面(Base)と半径(Radius)、UとVの分割数を決めて、球体メッシュを作成する。 作成されるメッシュは、極にメッシュが集まるデータとなる。
詳細1:作成する平面(Base)と半径(Radius)、UとVの分割数を決めて、球体メッシュを作成する。 図は、[MeshSphere]を[Deconstruct Mesh]で分解し、Z値を[Graph Mapper]で編集した後再構築した例。続けて変形後の法線ベクトルを再取得し、光源に見立てたラインとの角度によって簡易ライトシミュレーションを行っている。作成されるメッシュは、極にメッシュが集まるデータとなる。
Mesh Sphere Ex
C


Mesh>Primitive
作成する平面(Base)と半径(Radius)、分割数(Count)を決めて、球体メッシュを作成する。 作成されるメッシュは、Quad Sphere をメッシュ化したものとなる。
Triangulation
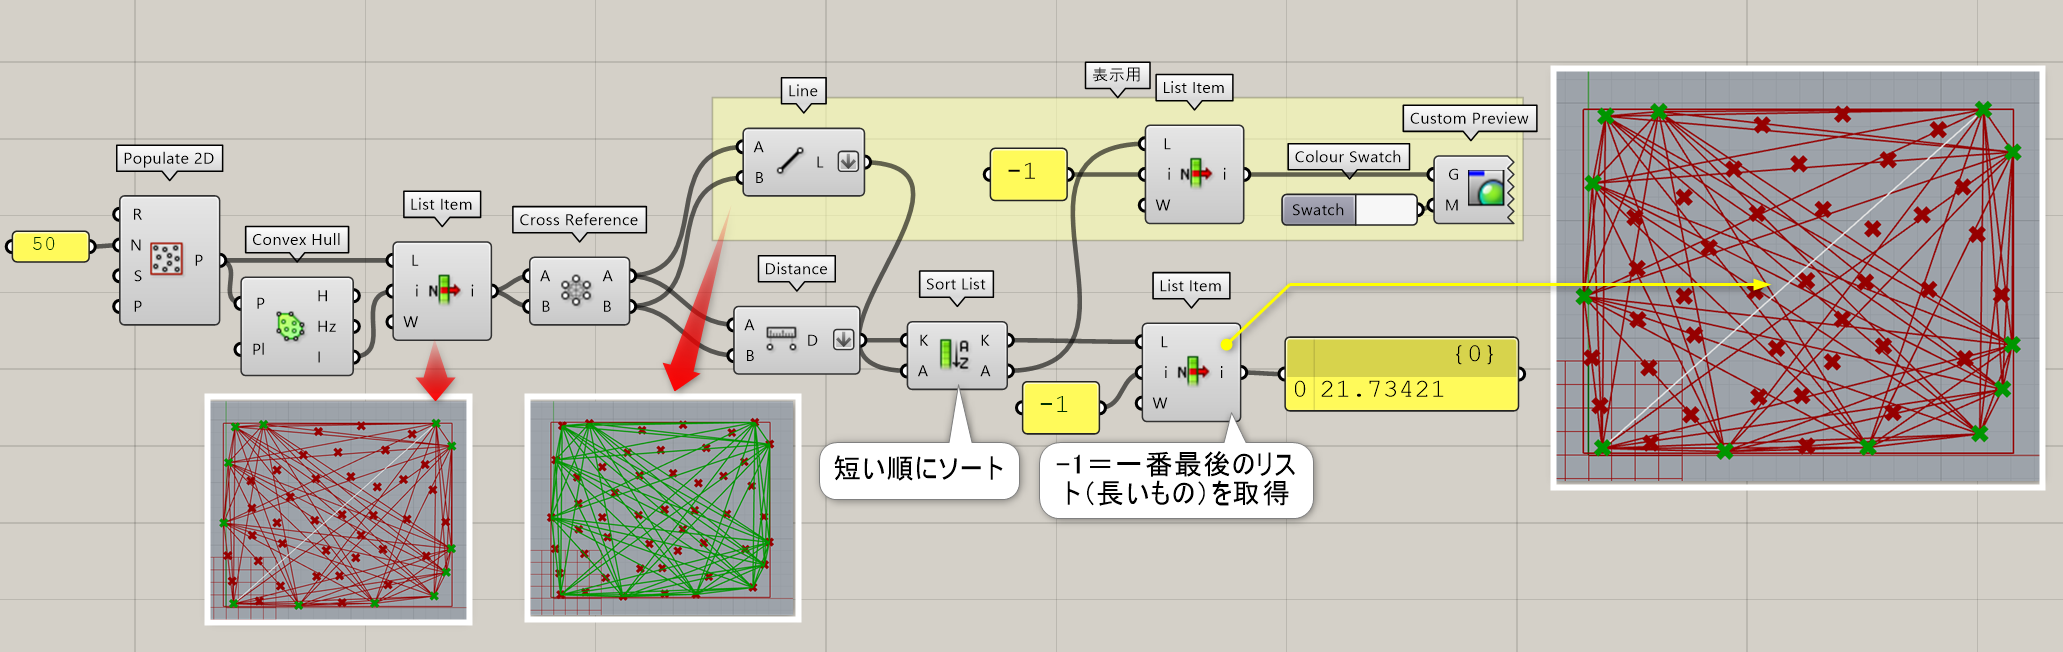
Convex Hull*
B

Mesh>Triangulation
複数の点(Points)と計算する平面(Plane)を指定し、点群の外周を通る曲線を出力する。Hullからは平面に投影されたもの、Hullzからは平面に投影されていない3D空間での外形曲線が出力される。
詳細1:複数の点(Points)と計算する平面(Plane)を指定し、 与えられた点をすべて包含する最小の凸多角形(点群の外周を通る曲線)を出力する。
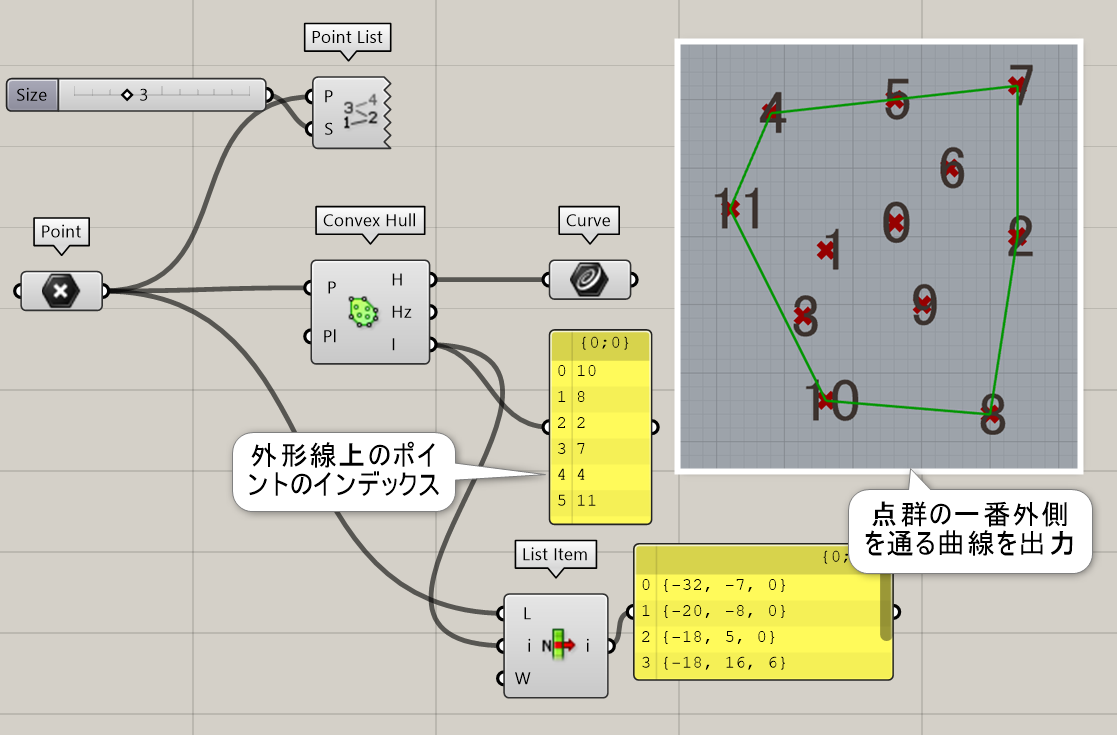
詳細2:Hullからは平面に投影されたもの、Hullzからは平面に投影されていない3D空間での外形曲線が出力される。

詳細3:[Convex Hull]を利用して、点群内での最長距離を出力した例。
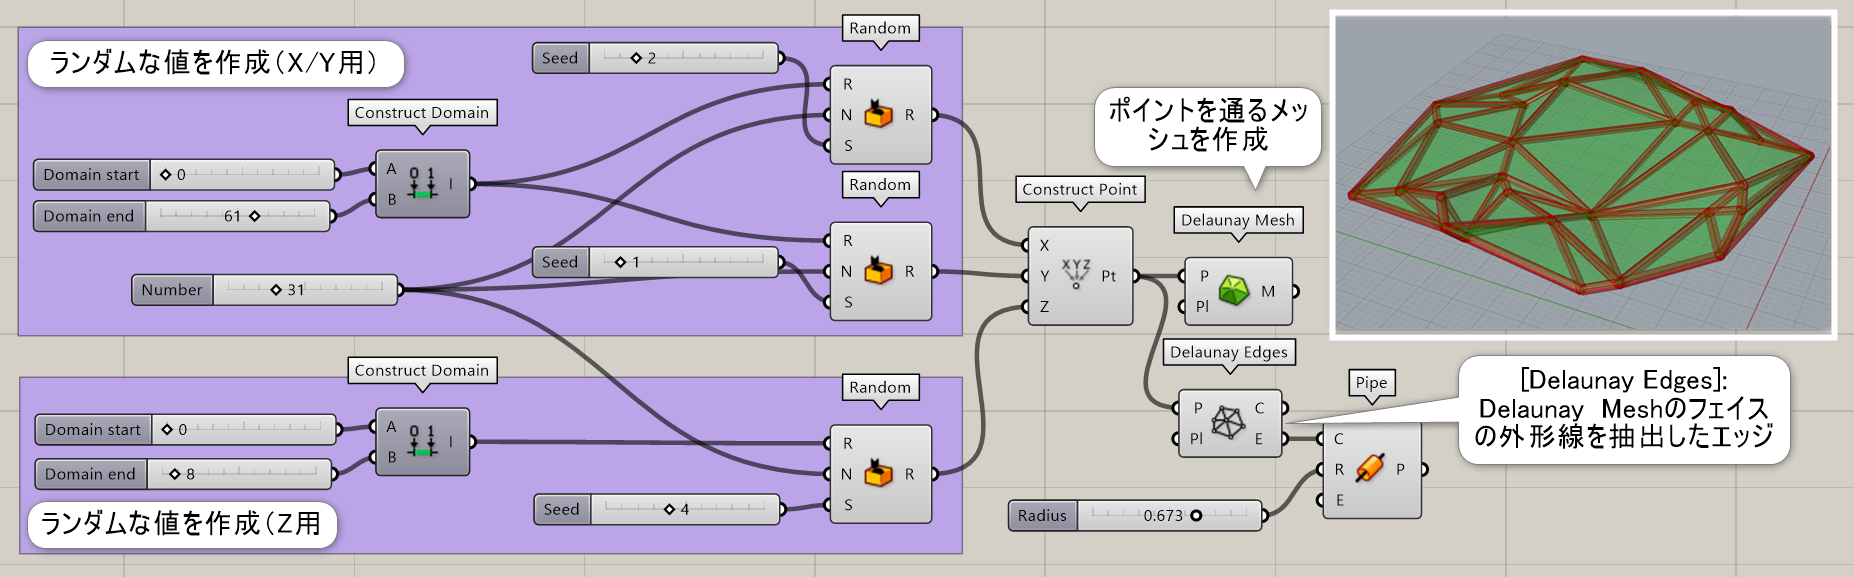
Delaunay Edges
C


Mesh>Triangulation
複数の点(Points)と平面(Plane)を指定し、入力した点を通る直線(Edge)を作成する。Delaunay Meshのフェイスの外形線を抽出した形。
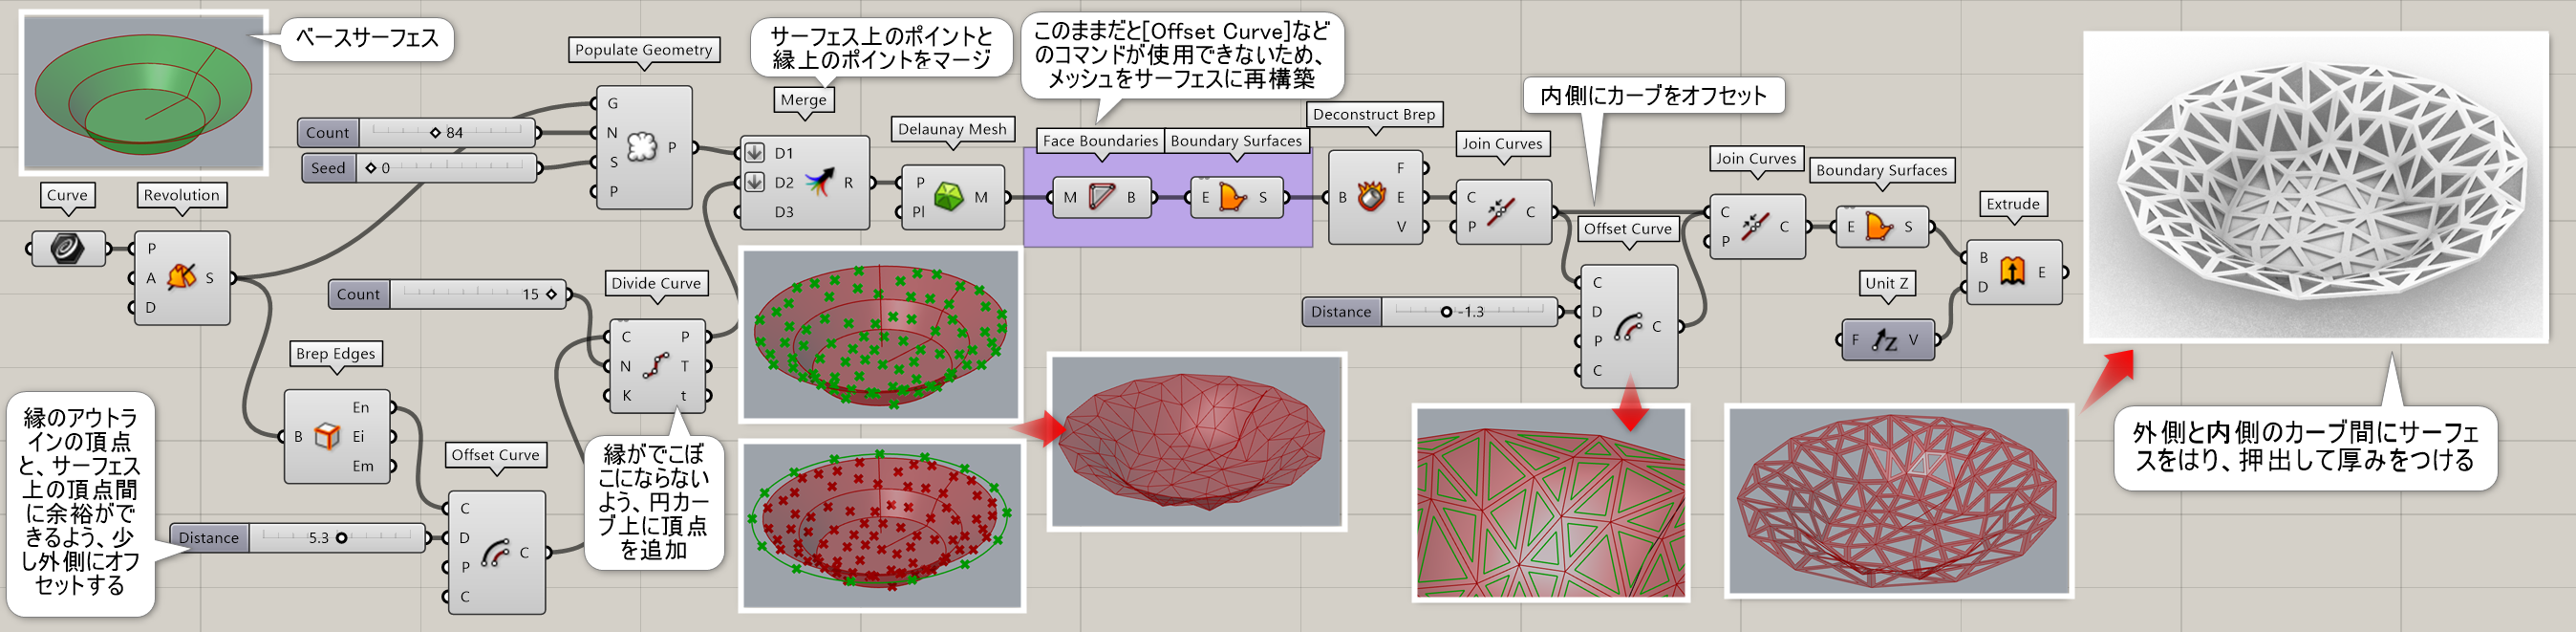
Delaunay Mesh*
B


Mesh>Triangulation
複数の点(Points)と平面(Plane)を指定し、入力した点を通るメッシュを作成する。点が平面にない場合は、Convex HullコンポーネントのHullzの様な働き方をし、3D空間上に作成される。
詳細1:複数の点(Points)と平面(Plane)を指定し、入力した点を通るメッシュを作成する。点が平面にない場合は3D空間上に作成される。[Delaunay Edges]を適用すると、[Delaunay Mesh]の面のアウトラインを抽出したエッジを取得できる。
詳細2:ベースとなるサーフェスに[Populate Geometry]でポイントを配置し、それを元に[Delaunay Mesh]を適用。作成されたメッシュを[FaceBoundary]と[Boundary Surfaces]でサーフェスに変換し、エッジのオフセット、押出しを行って厚みをつけた例。
Substrate
C
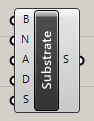
Mesh>Triangulation
Jared Tarball(compleXification.net)のアルゴリズムで基準となる長方形の曲線内(Boundary)を分割する。分割数(Count)や角度、乱数の元となるSeedなどの設定ができる。
Facet Dome*
B


Mesh>Triangulation
4つ以上の球の上にいる点(Points)と半径(Radius)を入力し、曲線パターン(Pattern)を出力する。
詳細1:4つ以上の点(Points)と半径(Radius)を入力し、空間上にボロノイ曲線(Pattern)を作成する。入力した点から近しい球を作成し、法線角度を決めてボロノイを作成する。
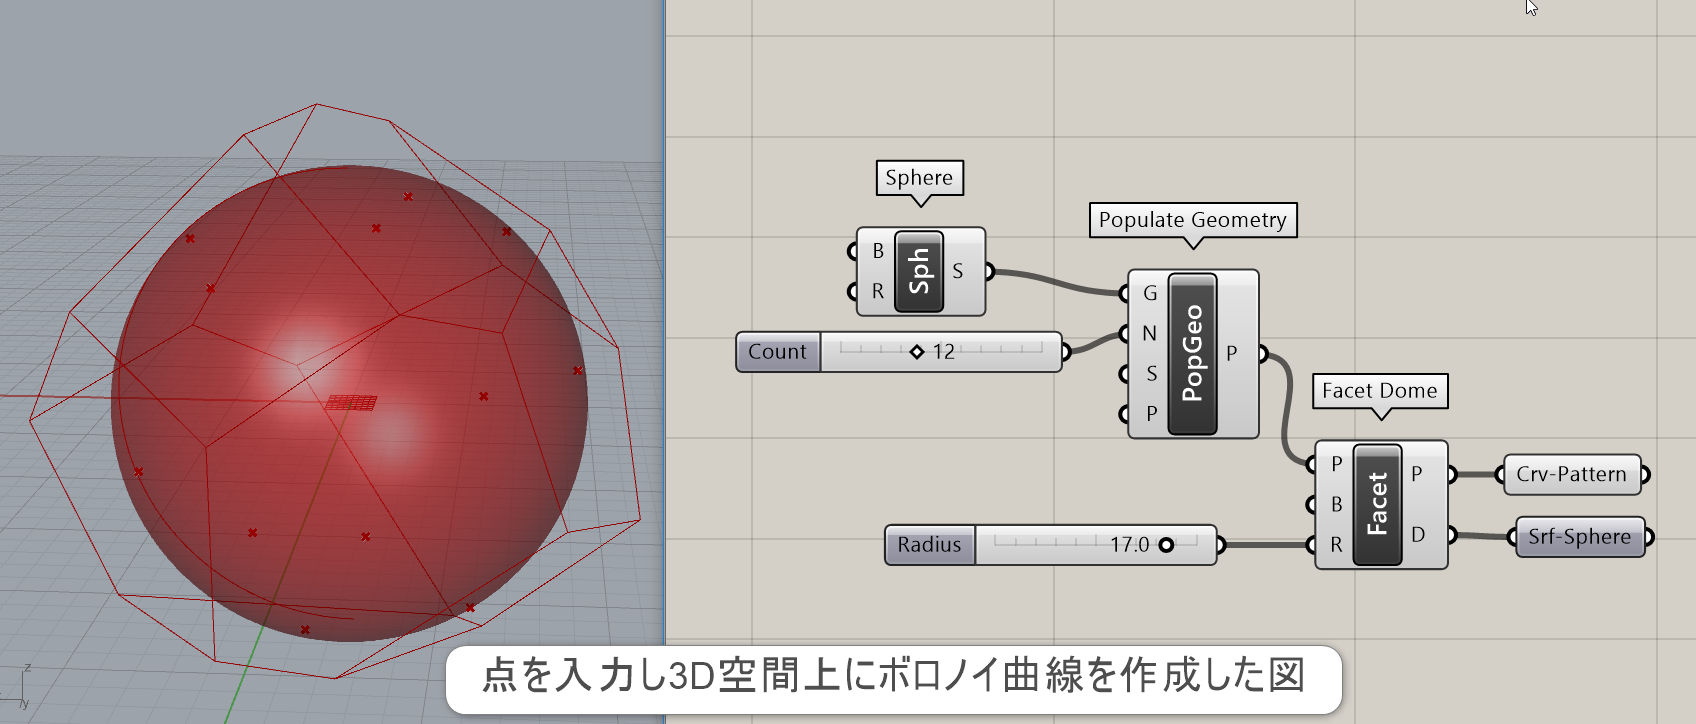
詳細2:左から徐々にRが大きくなっていく図。空間上にボロノイ曲線が作成されるのが、見て取れる。通常のVoronoiコンポーネントは平面矩形の中にパターンを作るが、Facet Domeは球を作成し、球の周りにボロノイ曲線を作成する。

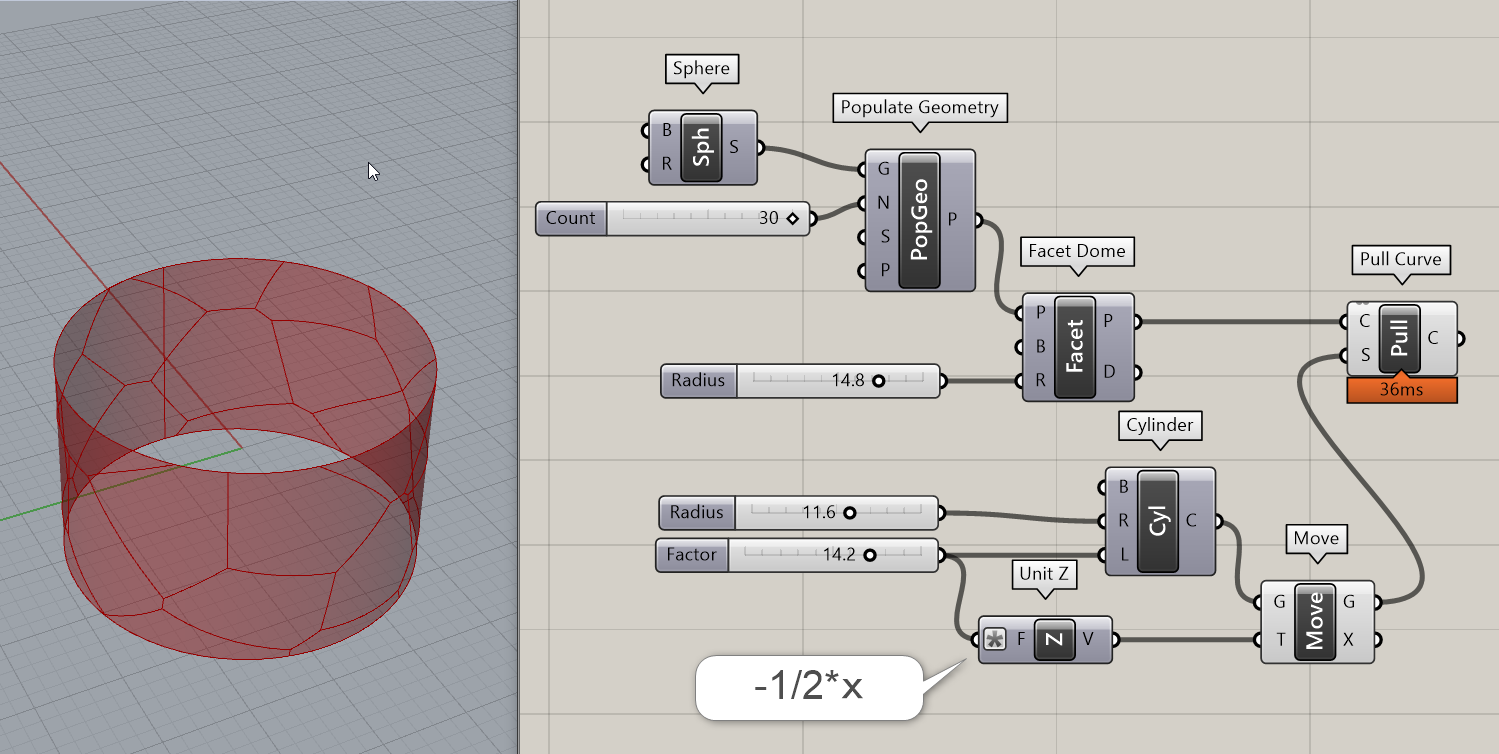
詳細3:Facet Domeコンポーネントで作成した曲線を、Cylinderで作成した円柱にPull投影している図。UVなどに拠らず、法線方向に巻き付けた形。事前にCylinderの長さの-1/2だけZ方向に移動して、中心位置を合わせている。
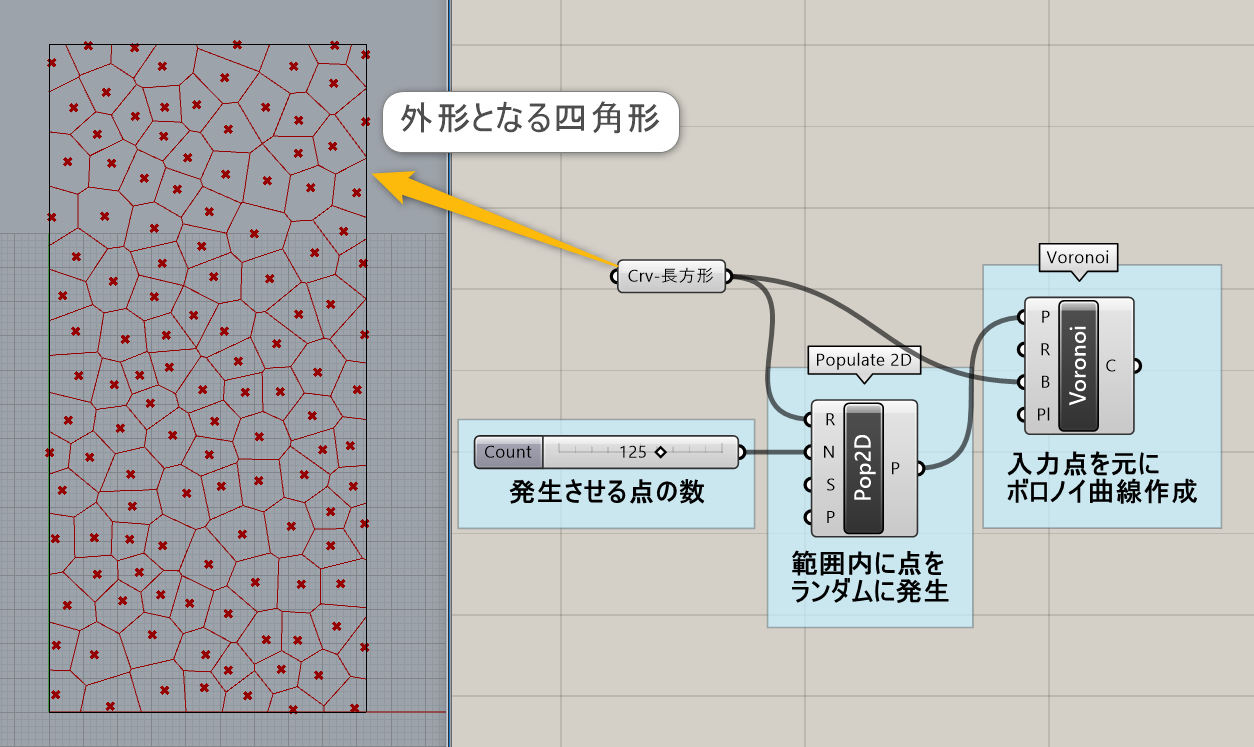
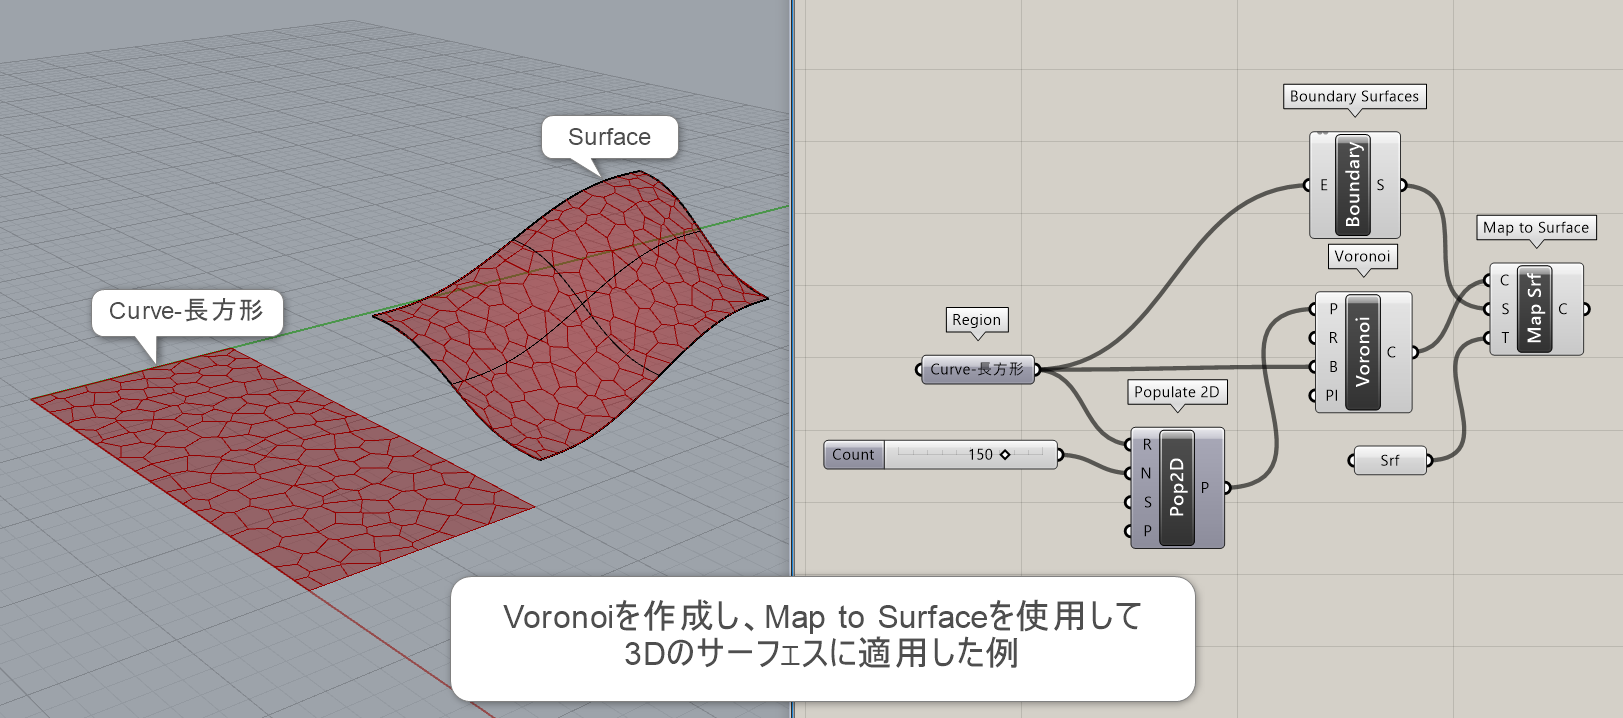
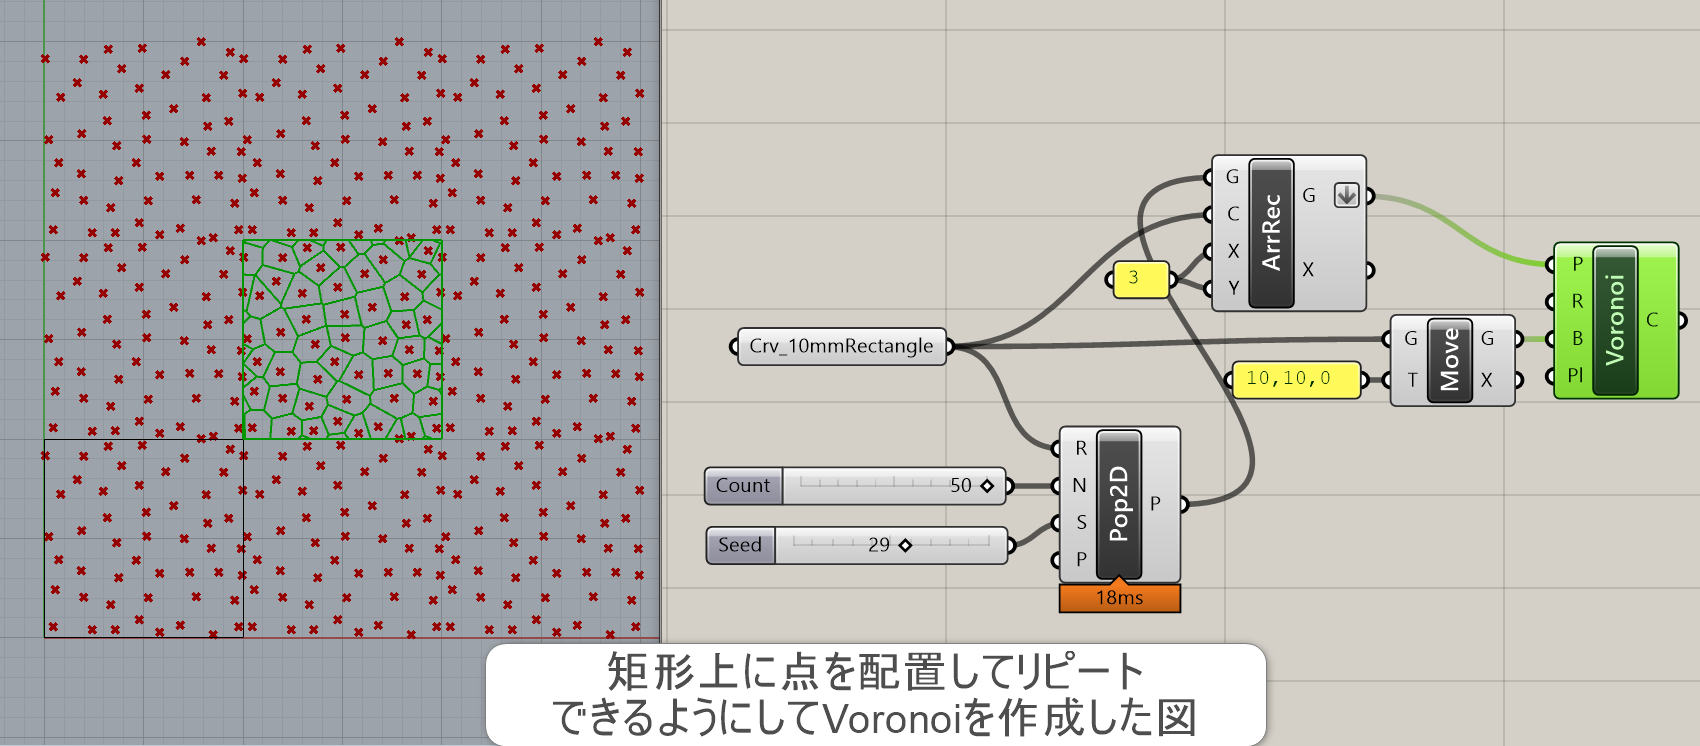
Voronoi*
B
Mesh>Triangulation
点群(Points)や平面(Plane)、などを指定し、2D上にボロノイ曲線を作成する。あらかじめ範囲(Boundary)を決めておくことで、その範囲内にボロノイ曲線を作成できる。
詳細1:点群(Points)や平面(Plane)などを指定し、2D上にボロノイ曲線を作成する。範囲(Boundary)を決めておくことで、その範囲に限定できる。
コンポーネントの性質上、Populate2Dと相性が良く併せて使われることが多い。Populate2Dは範囲内に指定した数だけ、点を作成させるコンポーネント。例では、発生した点をボロノイ作成に、元の矩形をボロノイ作成の範囲となる曲線に使用している。
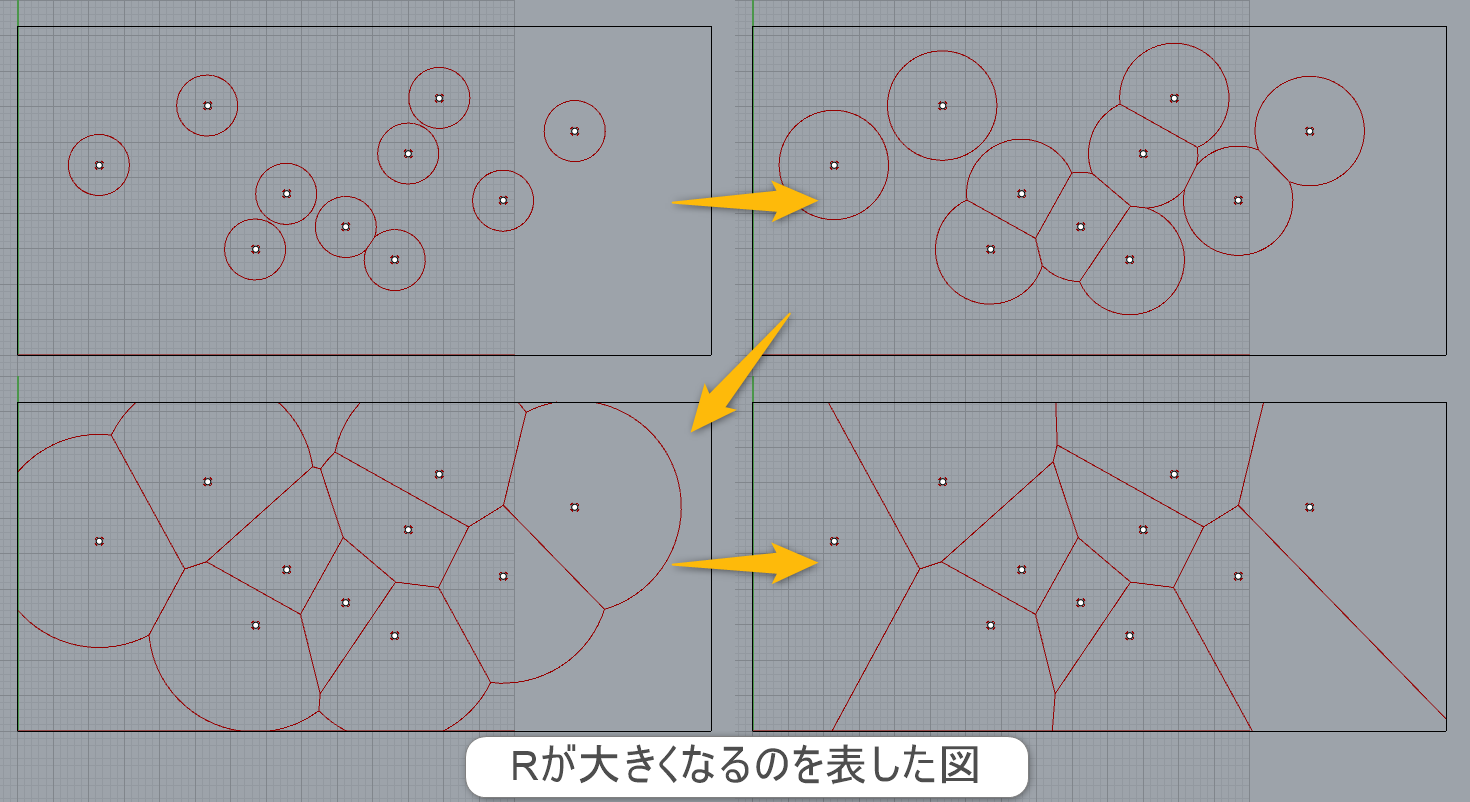
詳細2:またボロノイ曲線とは洗剤の泡の様に点から膨らみ、隣りとぶつかる個所は直線になる数学的な形状のこと。左上から順にRが大きくなるにつれ、直線的な形状が増えていく。Rの値を指定しない時は全て直線になる。
詳細3:平面に作成したボロノイ曲線を、Map to Surfaceを使い空間上の曲面に適用した例(適用前のサーフェスを作成する為に、Boundary Surfacesを使用し平面サーフェスを作成している)。
詳細4:通常のボロノイの場合、筒状に一周回ると継ぎ目が発生する。継ぎ目を無くしたシームレスなパターンにしたい場合は、生成した点をグリッド状に配置しVoronoiを作成すること。
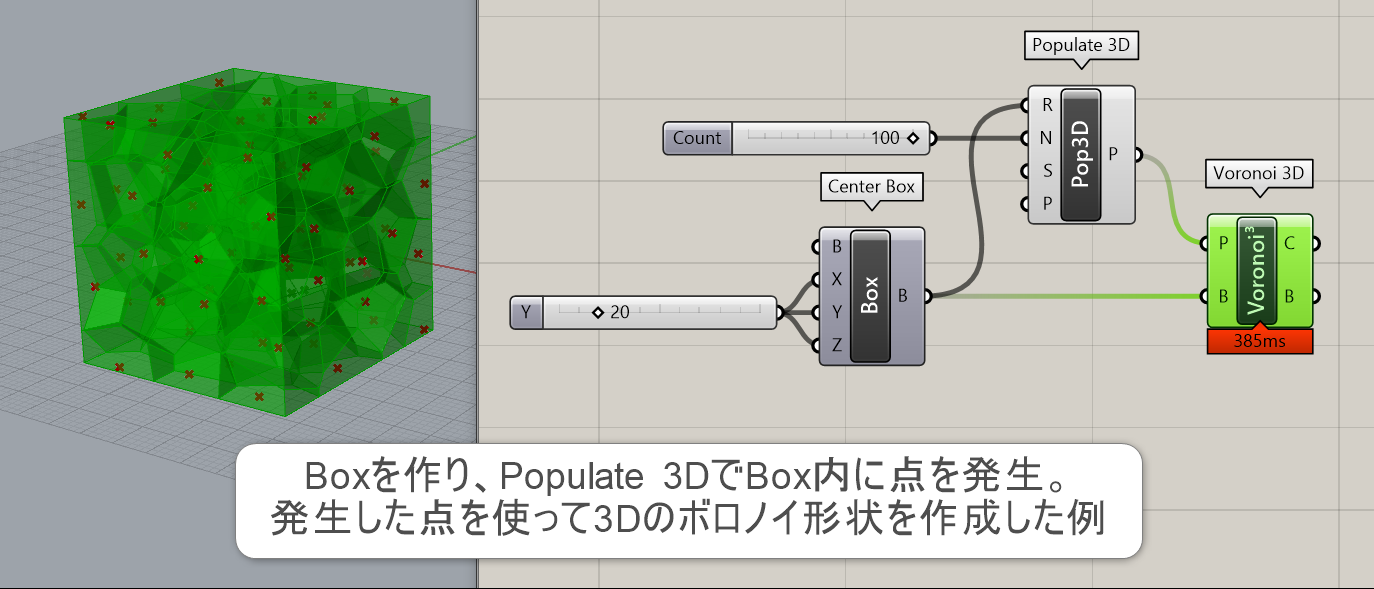
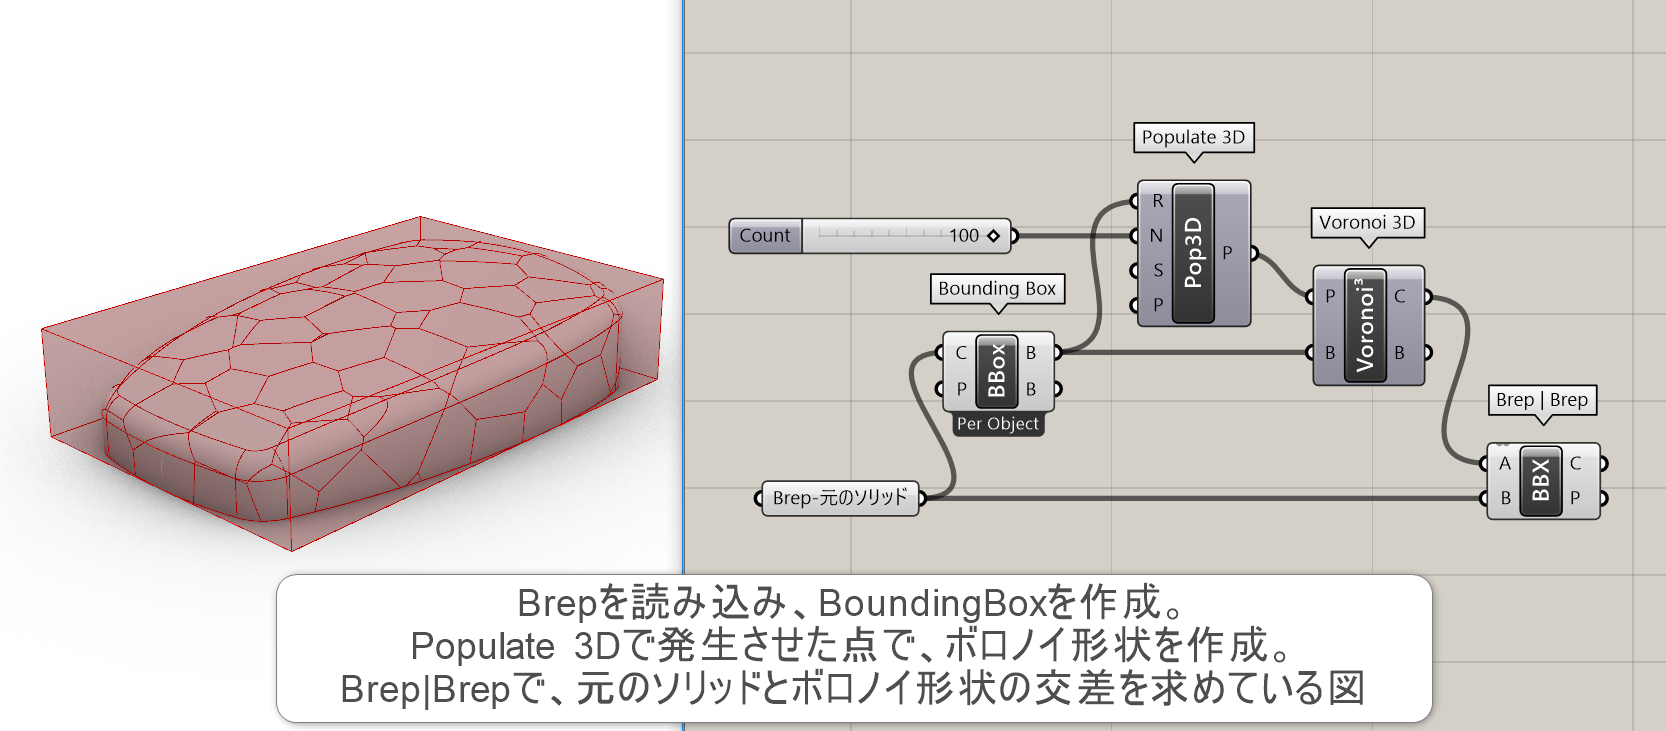
Voronoi 3D*
B


Mesh>Triangulation
点群(Points)とボックスを指定し、点からの距離に応じてボックスを分割するような3Dボロノイ形状を作成する。
詳細1:点群(Points)とボックスを指定し、点からの距離に応じてボックスを分割するような3Dボロノイ形状を作成する。発想としては、Voronoiコンポーネントの3D版の様なもの。コンポーネントの性質上、Populate 3Dと相性が良く併せて使われることが多い。Populate 3Dはボックス内に指定した数だけ、点を作成させるコンポーネントである。
詳細2:Brepを読み込み、Bounding Boxを使用してVoronoi 3Dコンポーネントを使用した例。コンポーネントの使用法はほぼ上と同様だが、最後にBrep | Brepコンポーネントを使い、元のソリッドとボロノイ形状との交差する曲線を求めている。
Voronoi Cell
C


Mesh>Triangulation
基準点一つ(Point)を中心に、任意の点群(Neighbours)から一定の距離だけ離れてカットしたようなソリッド形状を作成する。
Voronoi Groups
C
Mesh>Triangulation
範囲(Boundary)を決め、点群G1(Points)、点群G2(Points)指定し、2D上に入れ子の様になったボロノイ曲線を作成する。
OcTree
C


Mesh>Triangulation
指定した点群(Points)と幾つまで点を入れるかという数(Group)を指定し、その中に納まるようなBoxデータを作成する(OcTree-八分木構造と呼ばれる概念)。Boxデータと、点がどのBoxに納まっているかを出力する。
Proximity 2D
C
Mesh>Triangulation
平面(Plane)を指定し2D上で、複数の点(Points)と近接数(Group)を入力し、それぞれの点から自身の近い点に対して、指定した数だけ順番に線(Line)を引いていくコンポーネント。使用した点のIndexも出力する。
Proximity 3D
C
Mesh>Triangulation
3D上で、複数の点(Points)と近接する数(Group)を入力し、それぞれの点から自身の近い点に対して、指定した数だけ順番に線(Line)を引いていくコンポーネント。使用した点のIndexも出力する。
QuadTree
C
Mesh>Triangulation
指定した点群(Points)と平面(Plane)、幾つまで点を入れるかという数(Group)を指定し、その中に納まるようなポリラインデータを平面上に作成する(QuadTree-四分木構造と呼ばれる概念)。長方形曲線と、点がどの曲線内に入っているかを出力する。
MetaBall*
C
Mesh>Triangulation
基準点群(Points)と平面(Plane)、通過する点Xを指定し2次元のメタボールカーブを作成する。 精度(Accuracy)の値は0に近いほど、正確な形状となり、高くなると粗い曲線となる。
MetaBall(t)
C
Mesh>Triangulation
基準点群(Points)と平面(Plane)、しきい値(Threshold)を決め、2次元のメタボールカーブを作成する。しきい値は0に近いほど、基準点から離れる距離が大きくなる。 精度(Accuracy)の値は0に近いほど、正確な形状となり、高くなると粗い曲線となる。
MetaBall(t) Custom
C
Mesh>Triangulation
基準点群(Points)と平面(Plane)、しきい値(Threshold)とそれぞれの点の強さ(Charge)を決め、2次元のメタボールカーブを作成する。MetaBall(t)コンポーネントとほぼ同様の働きをするが、それぞれの点の強さを決定することができる。
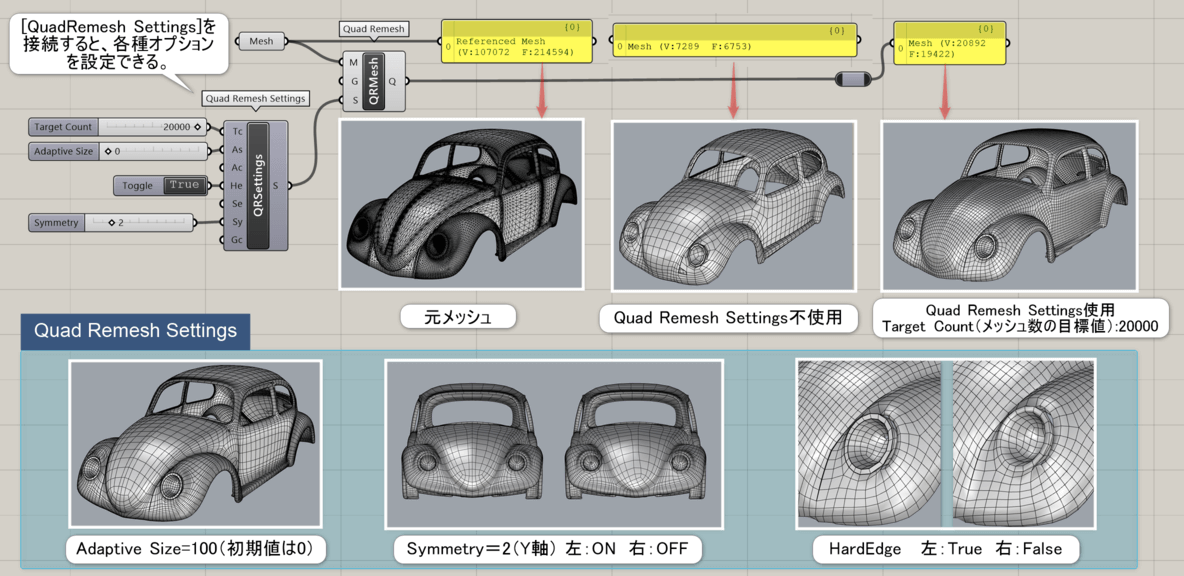
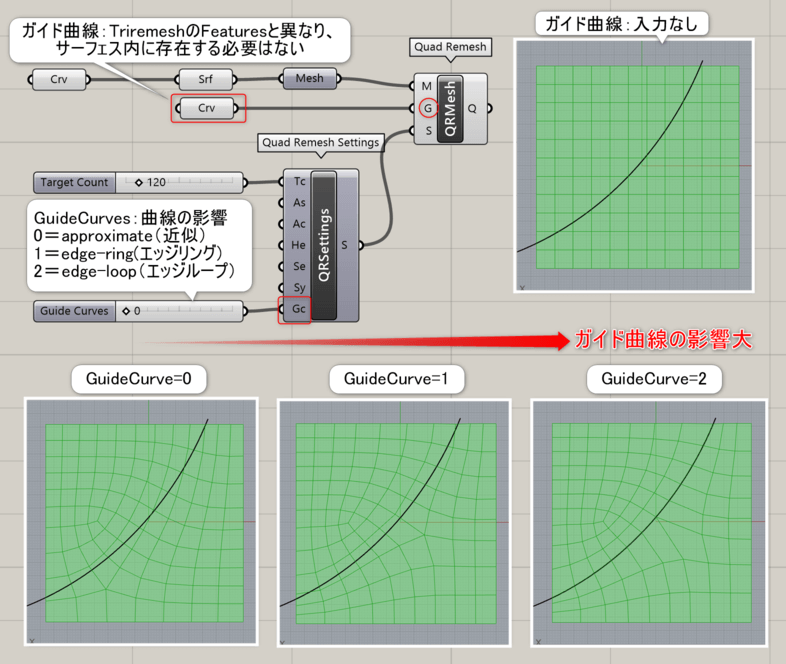
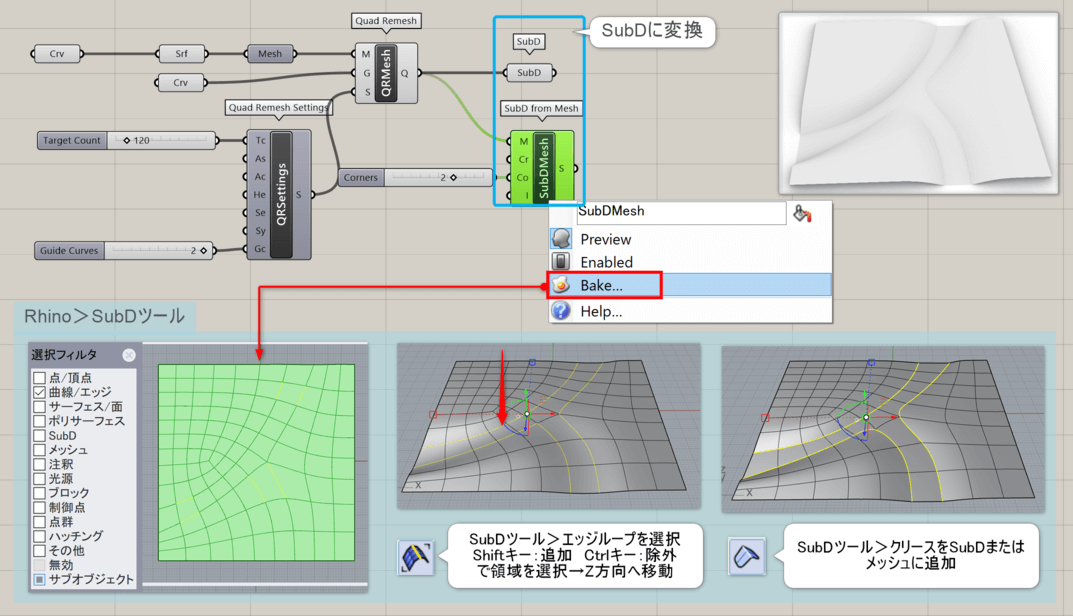
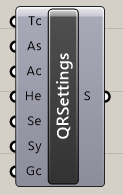
Quad Remesh*
B
Mesh>Triangulation
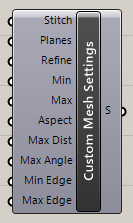
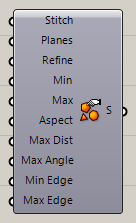
メッシュと、メッシュの流れを決める曲線(Guides)、分割数などの各種設定(Settings)を入力して、四角形メッシュを再作成する。Rhinoの同名のコマンドと異なり、SubDへの変換はできない。SubDに変換したい場合は、[SubD from Mesh]や[SubD]と併せて使用する。
詳細1:メッシュと、メッシュの流れを決める曲線(Guides)、分割数などの各種設定(Settings)を入力して、四角形メッシュを再作成する。Settingsには[QuadRemesh Settings]コンポーネントを接続し、面の数(Target Count)や曲率の大きさに応じた面の大きさ(Adaptive Size:0-100)、ハードエッジの検出(HardEdge)、対称軸の有無(Symmetry)などを指定できる。
詳細2:メッシュの流れを決める曲線(Guides)を指定し、[QuadoRemesh Settings]のガイド曲線(Guide Curves)の数値を上げる(0〜2)と、入力した曲線に沿ってメッシュの流れを決定できる。数値が高いほど曲線の影響力は強くなる。
詳細3:同名のRhinoのコマンドと異なり、GHの[QuadRemesh]から直接SubDへの変換はできないため、[SubD from Mesh]や[SubD]といった各種コンポーネントに接続してSubDへ変換する。ガイド曲線の使用により、トポロジ(メッシュの流れ)を変更できるので、SubDをBakeした後の編集に活用できる。
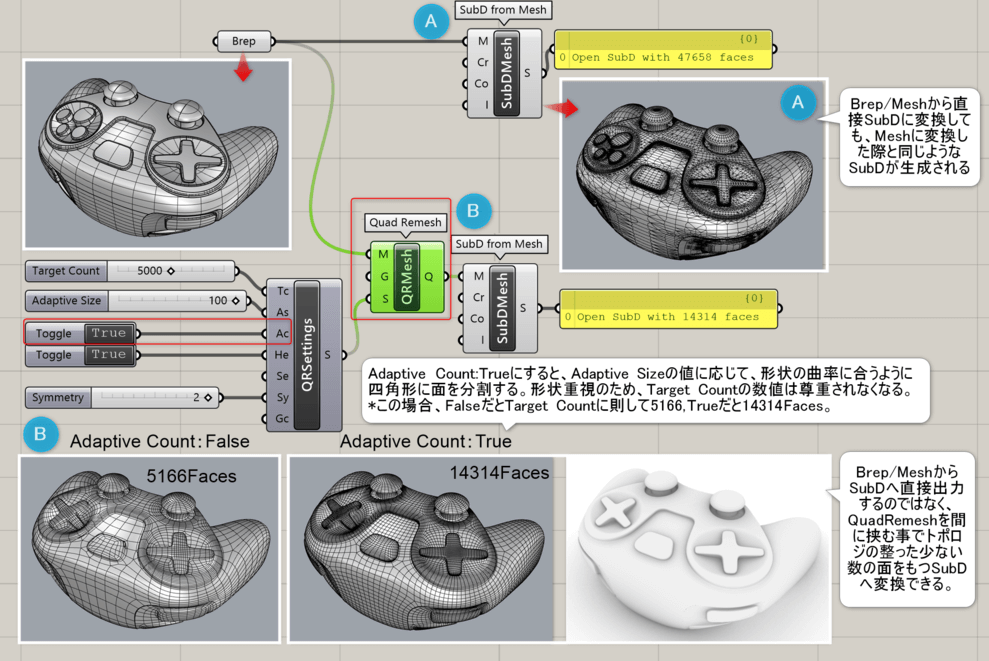
詳細4:Brep(ポリサーフェス)/Meshから[SubDfromMesh]を使用してSubDへ変換する際には、[QuadRemesh]を経由してからSubDへ変換すると望ましい結果となる。図にて[QuadRemeshSettings]のAdaptive Count:True/Falseの違いについても合わせて説明。
Quad Remesh Settings*
C
Mesh>Triangulation
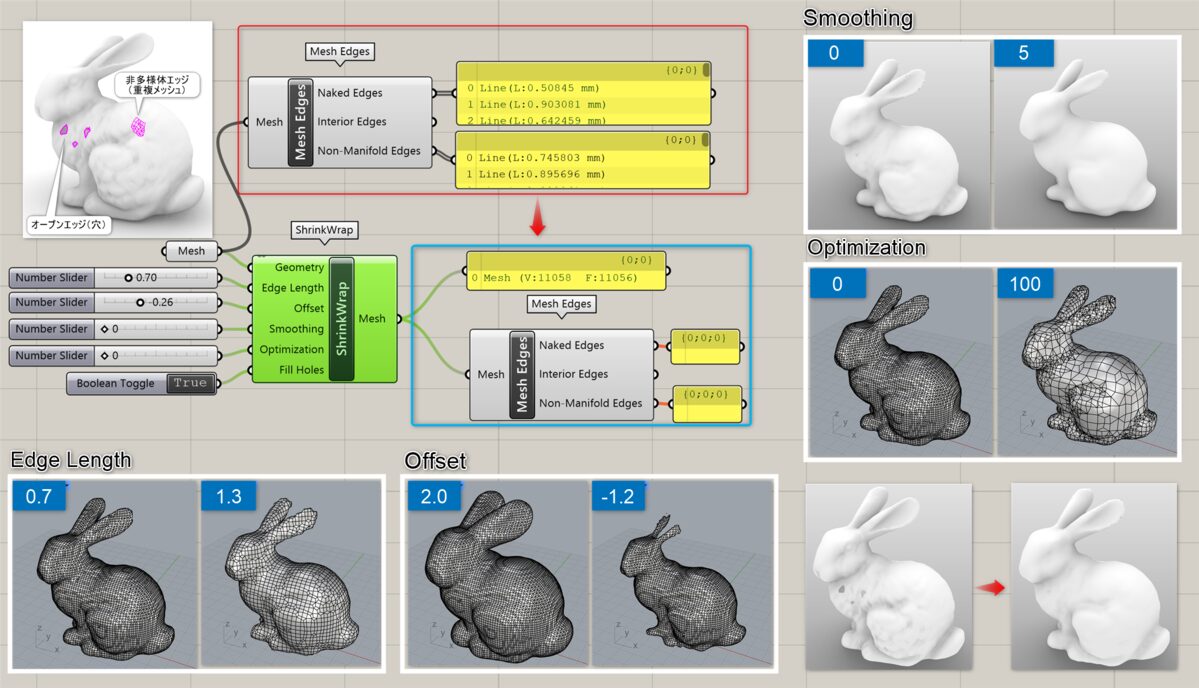
ShrinkWrap
A
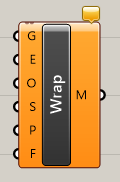
Mesh>Trianglation
詳細1:メッシュか点群(Geometry)、目標となるエッジの長さ(Edge Length)を入力し、形状を覆うようなメッシュを作成する。図は、[Shrink Wrap]を適用後、元のメッシュに存在したオープンエッジや重複メッシュが解消された事を[Mesh Edges]で確認した例。各オプションの比較画像も紹介。
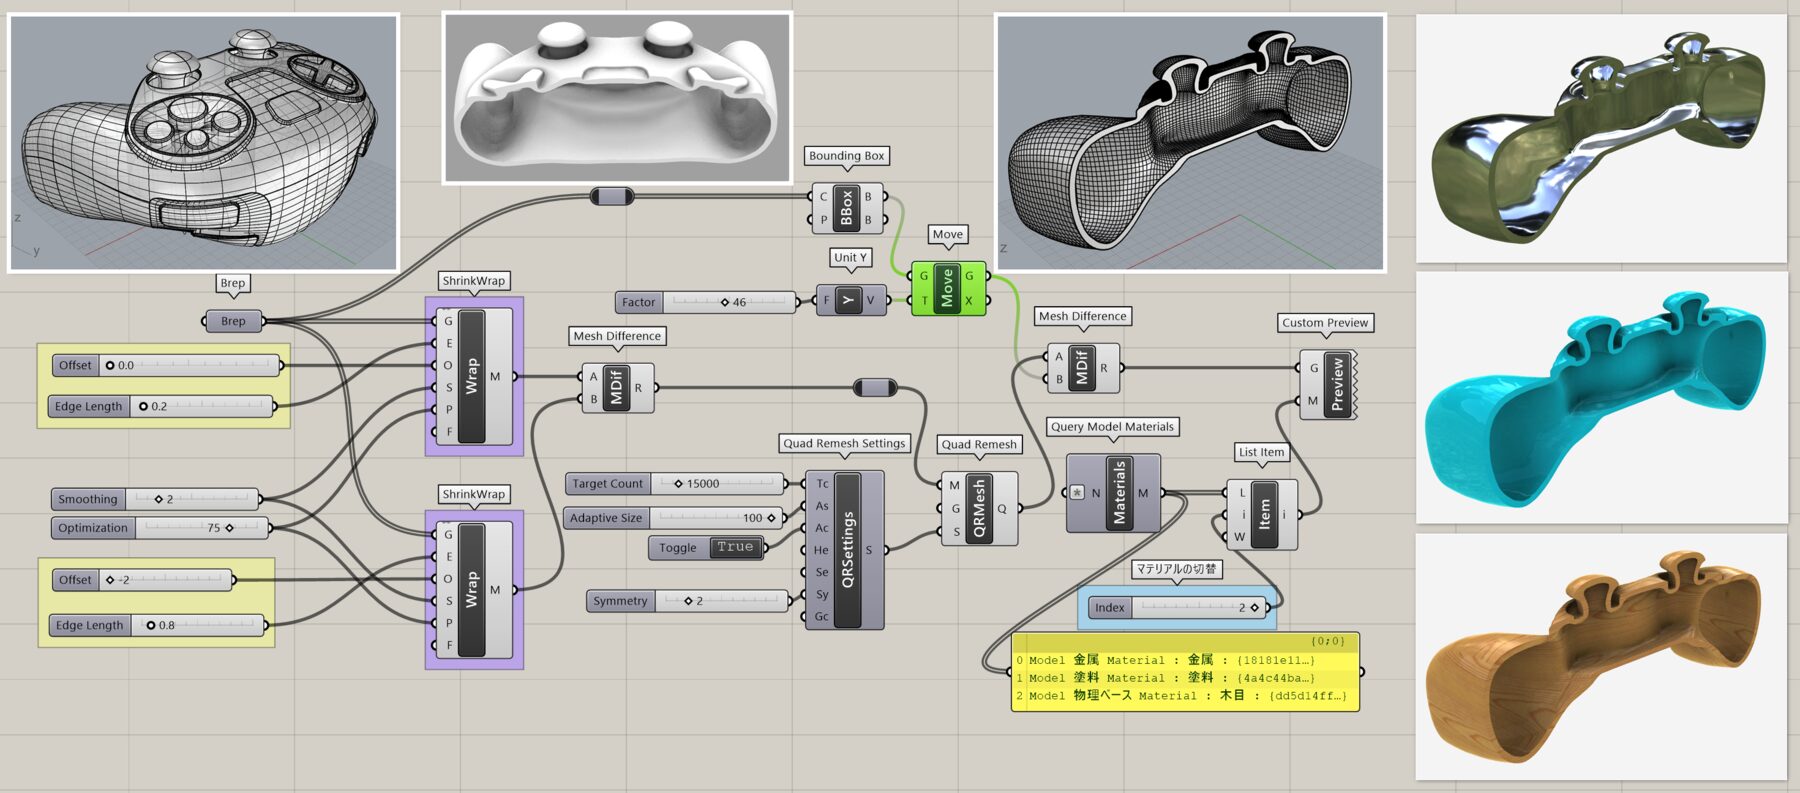
詳細2:Brepに[Shrink Wrap]を2つ適用後、1つはオフセットで小さくしたものを[Mesh Diffrence]で引き算をし、中をくりぬいた例。ここでは更に、[Quad Remesh]で四角ポリゴンに変換し、再度[Mesh Difference]で半分にカット後[Custom Preview]を使用してRhinoファイル上のマテリアルを[Query Model Materials]で読込み、[List Item]で切り替え表示を行っている。(ビューポート表示は”レンダリング”)
クリックで拡大表示できます。
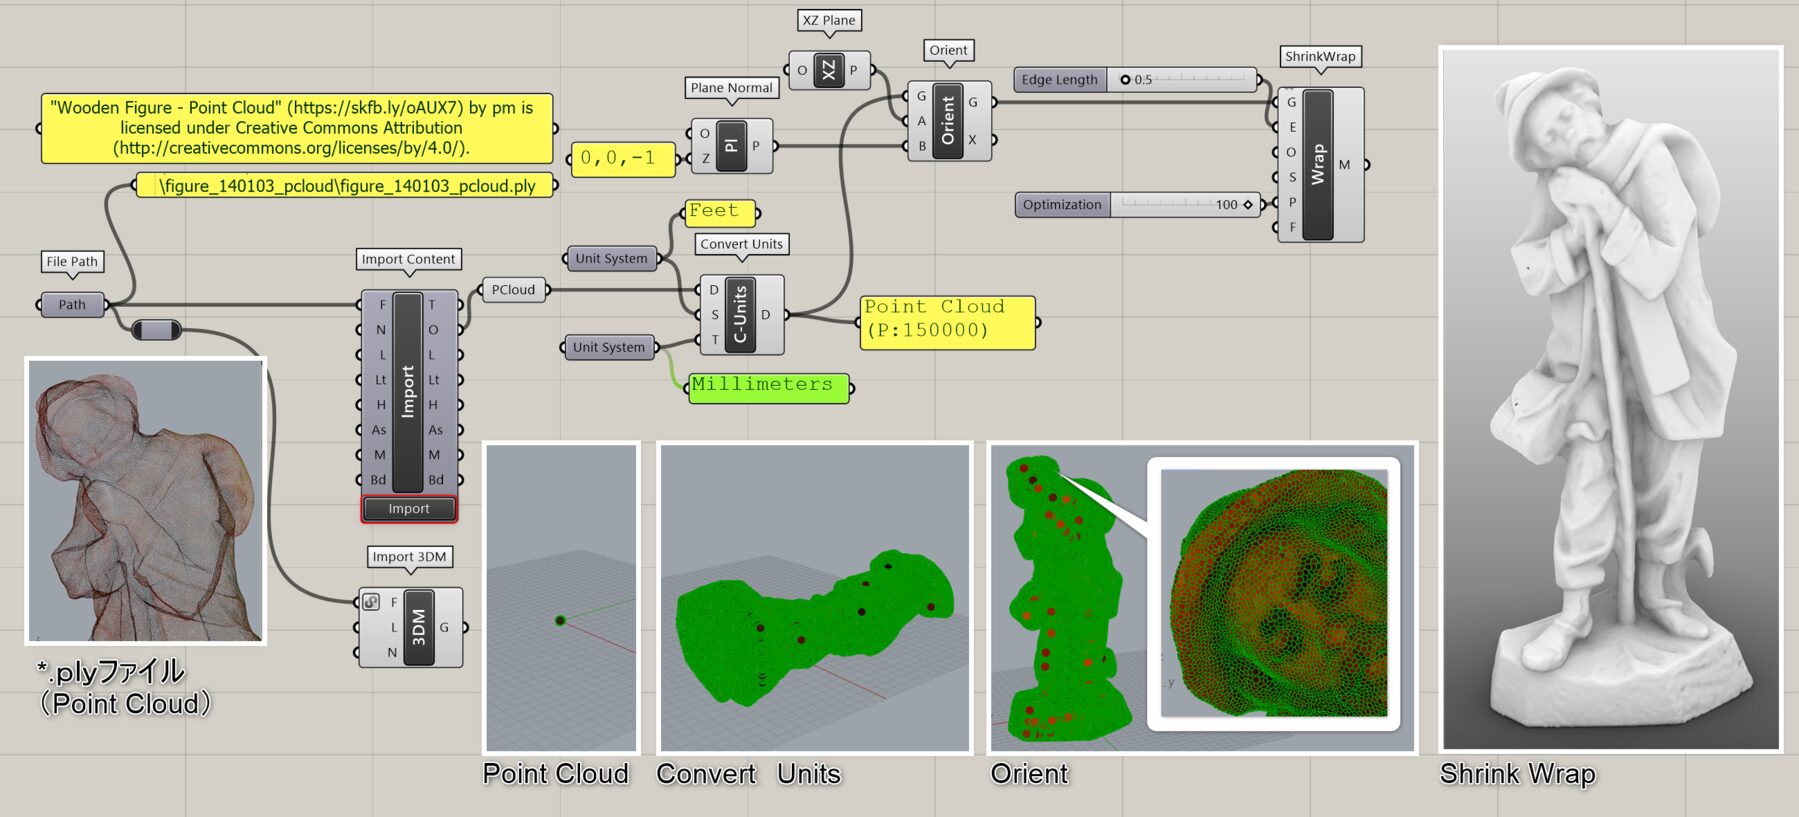
詳細3:点群データ(*.ply)ファイルを[Import Content]で読み込み、(Import 3DMでも可)[Convert Units]で単位を変換後、[Orient]や[Plane Normal]で向きを調整し、[ShrinkWrap]でメッシュ化した例。
クリックで拡大表示できます。
TriRemesh*
B
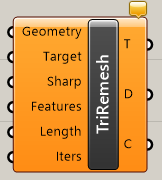
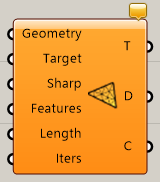
Mesh>Triangulation
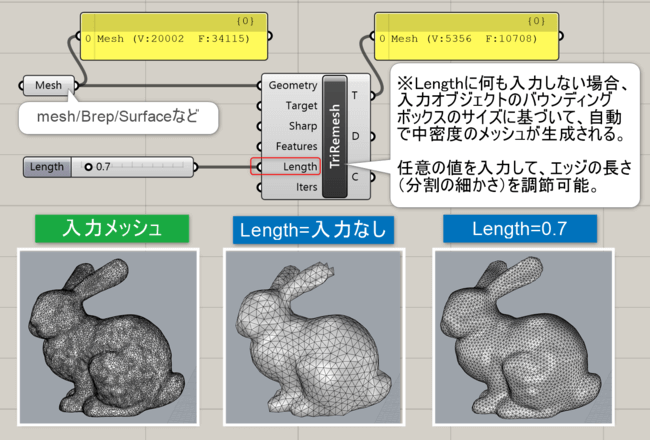
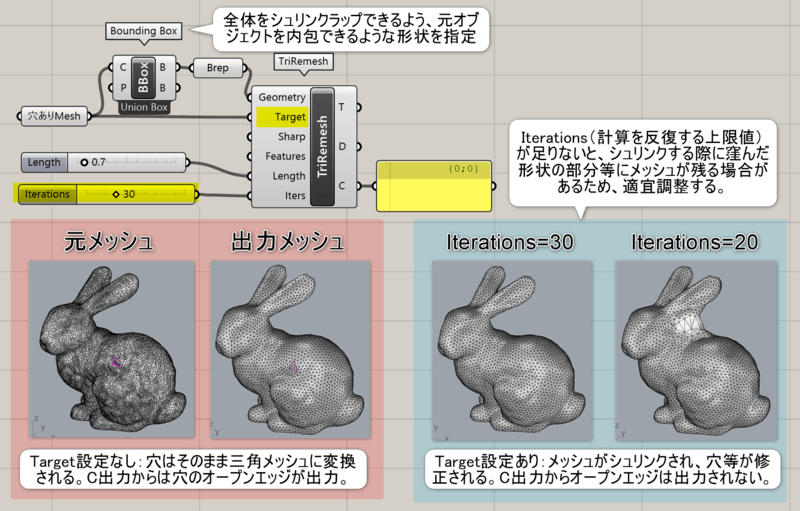
サーフェスやBrep、メッシュを入力し(Geometry)、エッジの長さ(Length)を指定することで、できる限り均等な三角形メッシュ(Triangulation)を繰り返し計算することで求める。また三角形の頂点が中心となる六角形メッシュ(Dual)も同時に作成する。折れている箇所を残すか(Sharp)、特定の曲線を入力し形状を維持(Features)などのオプションもある。計算を繰り返す(Iterations)上限値の指定も可能。
詳細1:詳細1:サーフェスやBrep、メッシュを入力し(Geometry)、エッジの長さ(Length)を指定することで、できる限り均等な三角形メッシュ(Triangulation)を繰り返し計算することで求める。
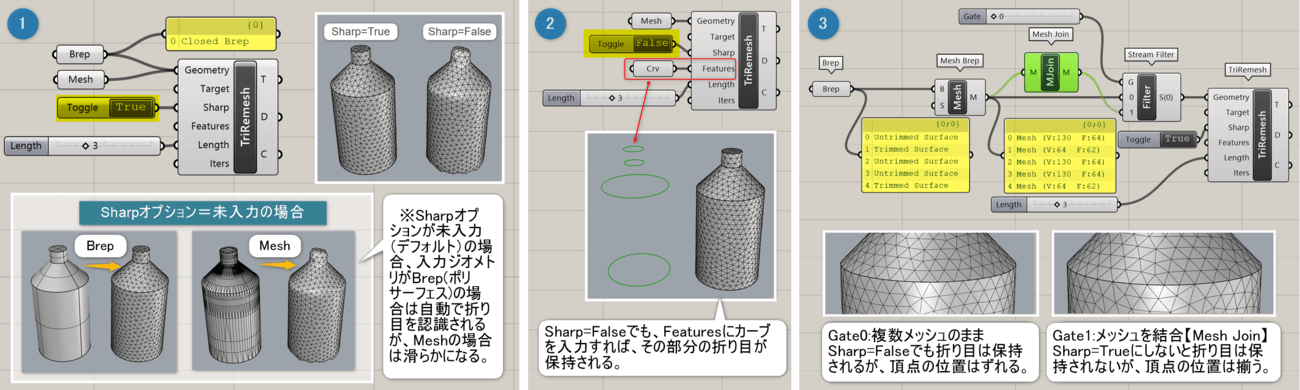
詳細2:
①Sharp(折れている箇所を残す)オプションを指定すると、True=折り目を認識、False=滑らかになる。(デフォルトは未入力)
②Sharp=Falseまたは未入力でも、形状を維持(Features)に特定の曲線を入力すれば、Sharpと同様に折り目が保持される。
③頂点が連結されていない(複数メッシュ)場合は折り目が自動認識されるが、頂点の位置がずれる。この場合は、[MeshJoin]を行い、Sharp=Trueにすれば、頂点の位置を揃える事ができる。
詳細3:Featuresを利用してカーブに沿ってメッシュをカットした例。Featuresはサーフェス上のカーブでなければならないため、[Surface Split]で一旦分割し、結合している。
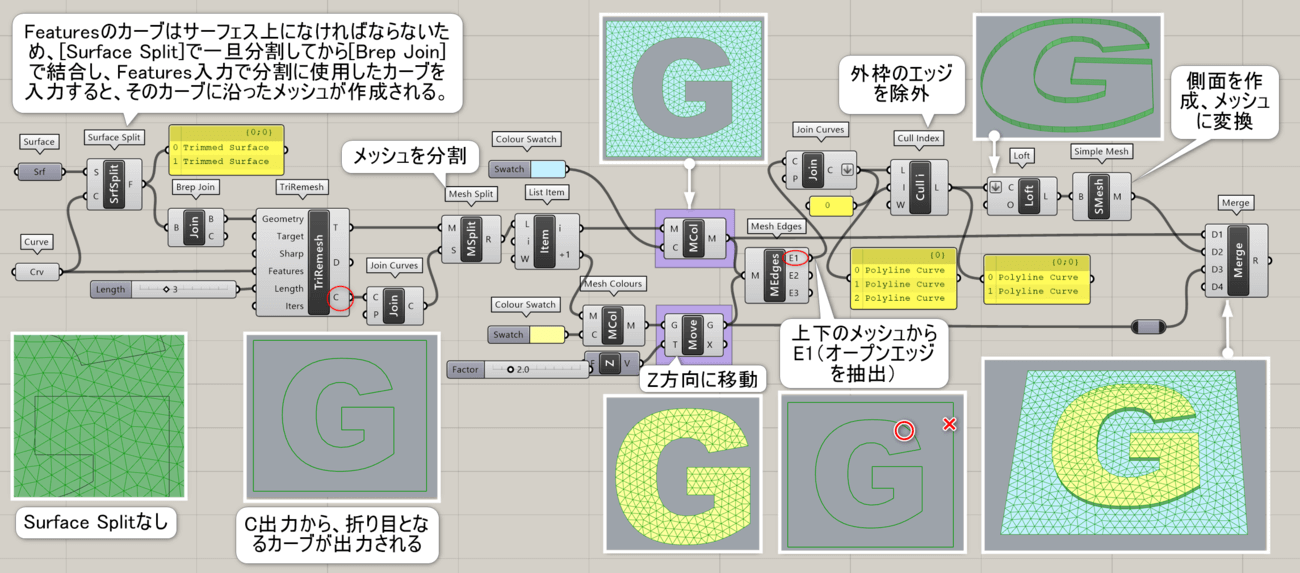
詳細4:D出力から、三角形の頂点が中心となる六角形メッシュ(Dual)も同時に出力する。図は、Dual出力をポリラインに変換してMultiPipeに接続した例。
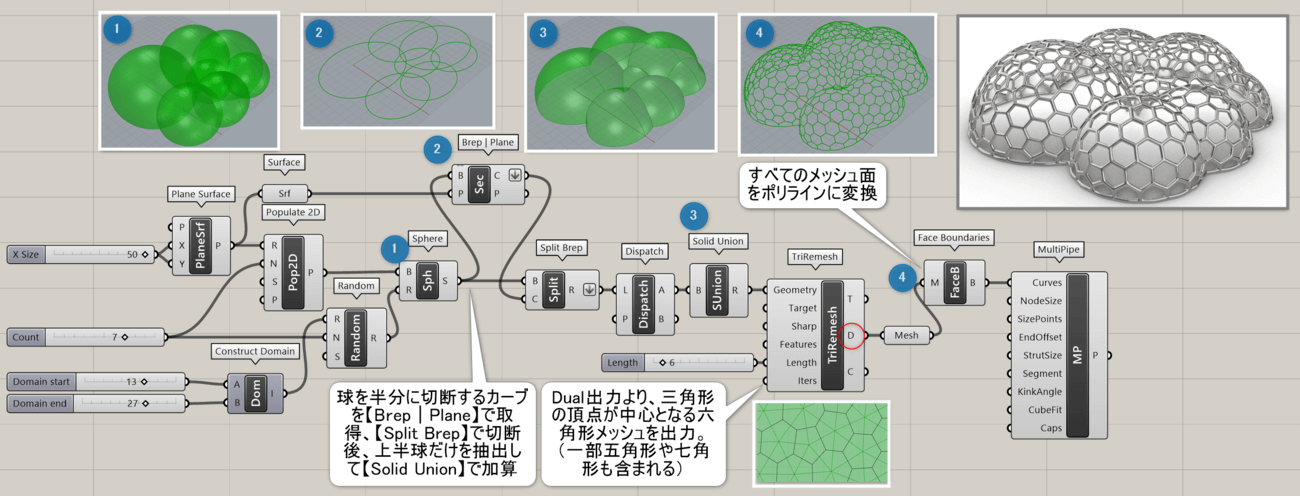
詳細5:Targetに現在のオブジェクトを指定し、Geometryにバウンディングボックス等を指定する事で、一方を他方にシュリンク ラップする事が可能。これにより、軽微な穴、非多様体エッジ、複製面のある不良メッシュを修正するのに利用できる。
Util
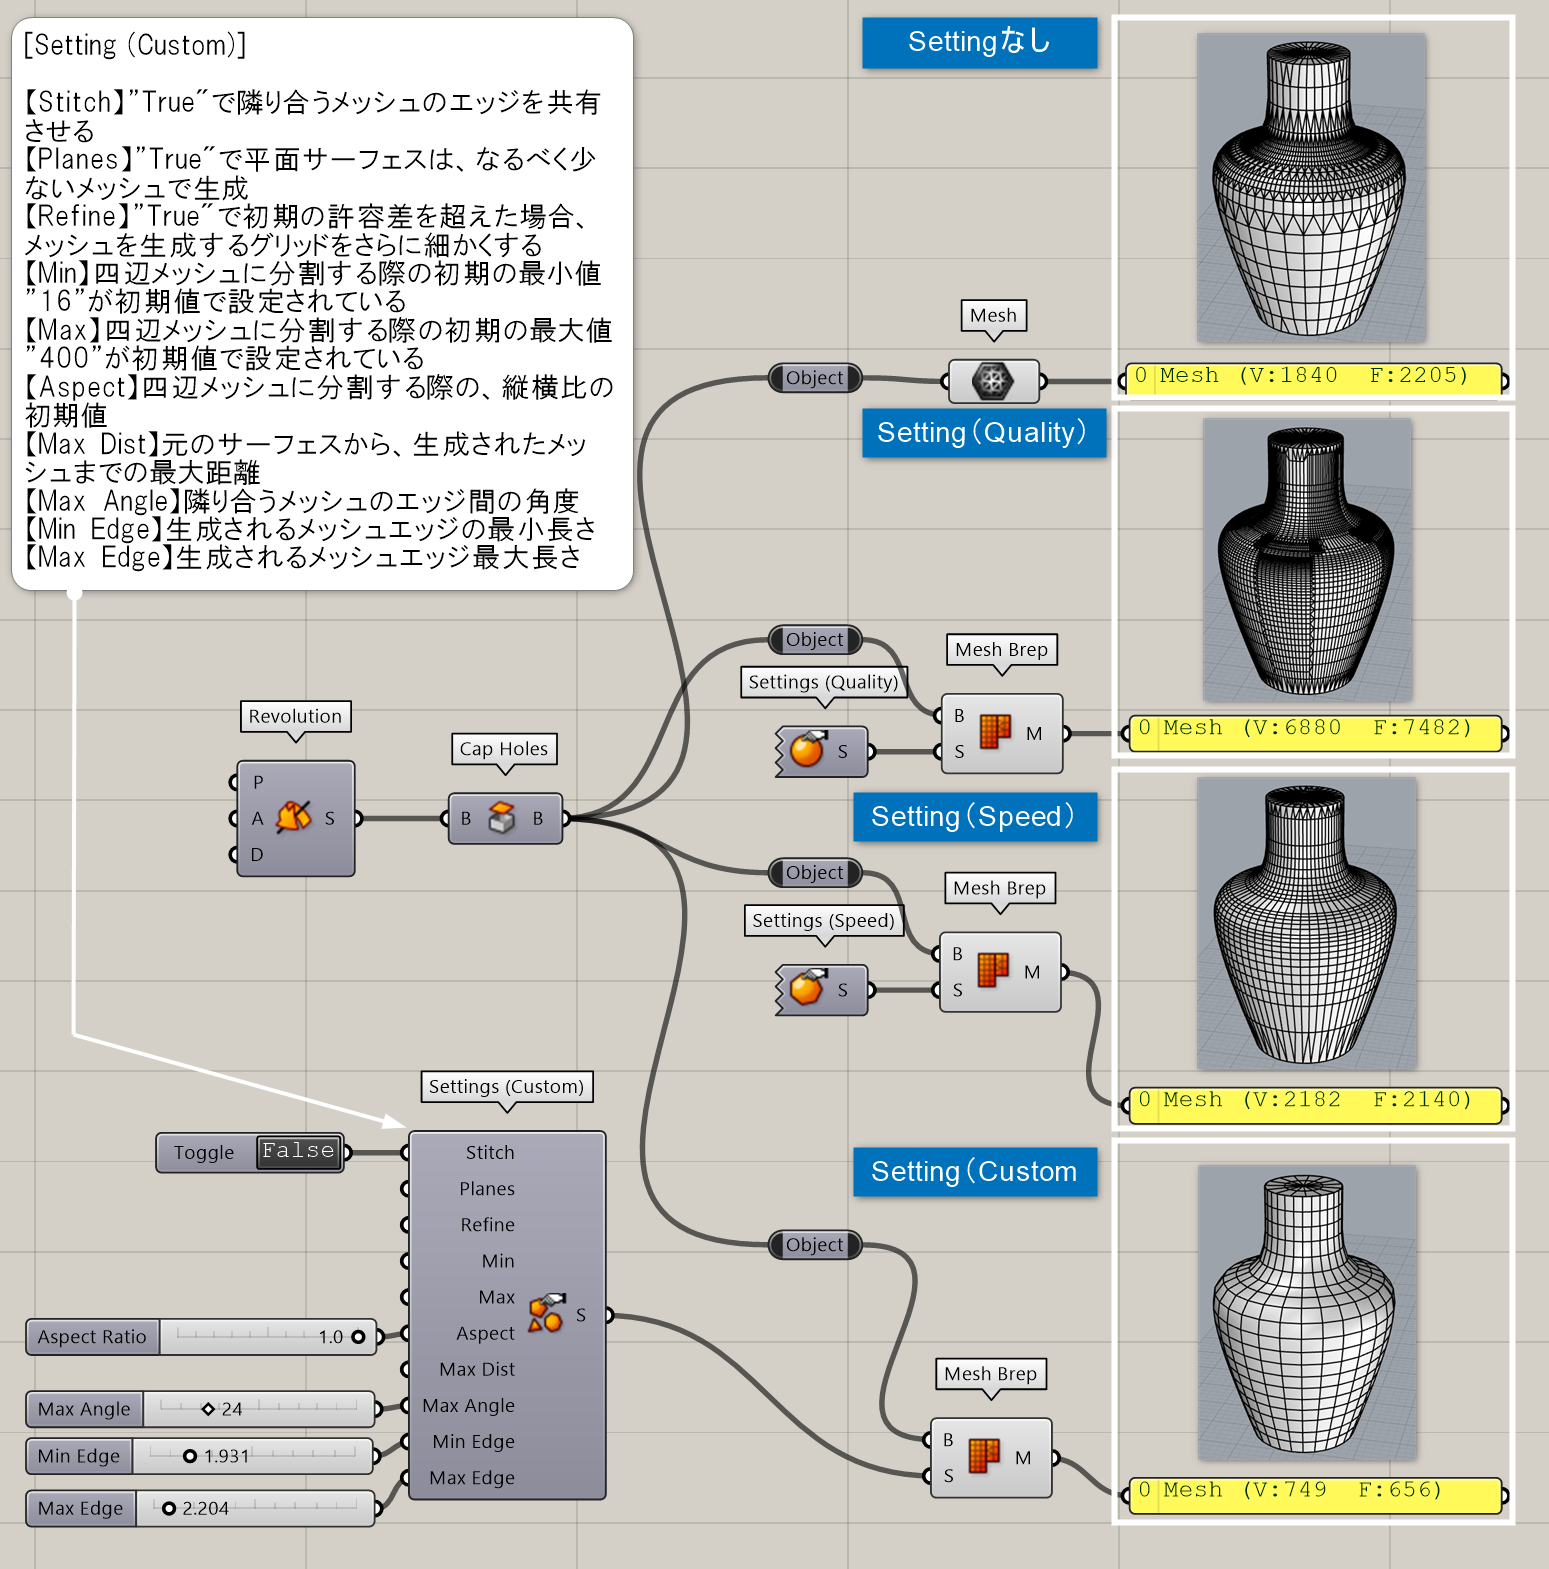
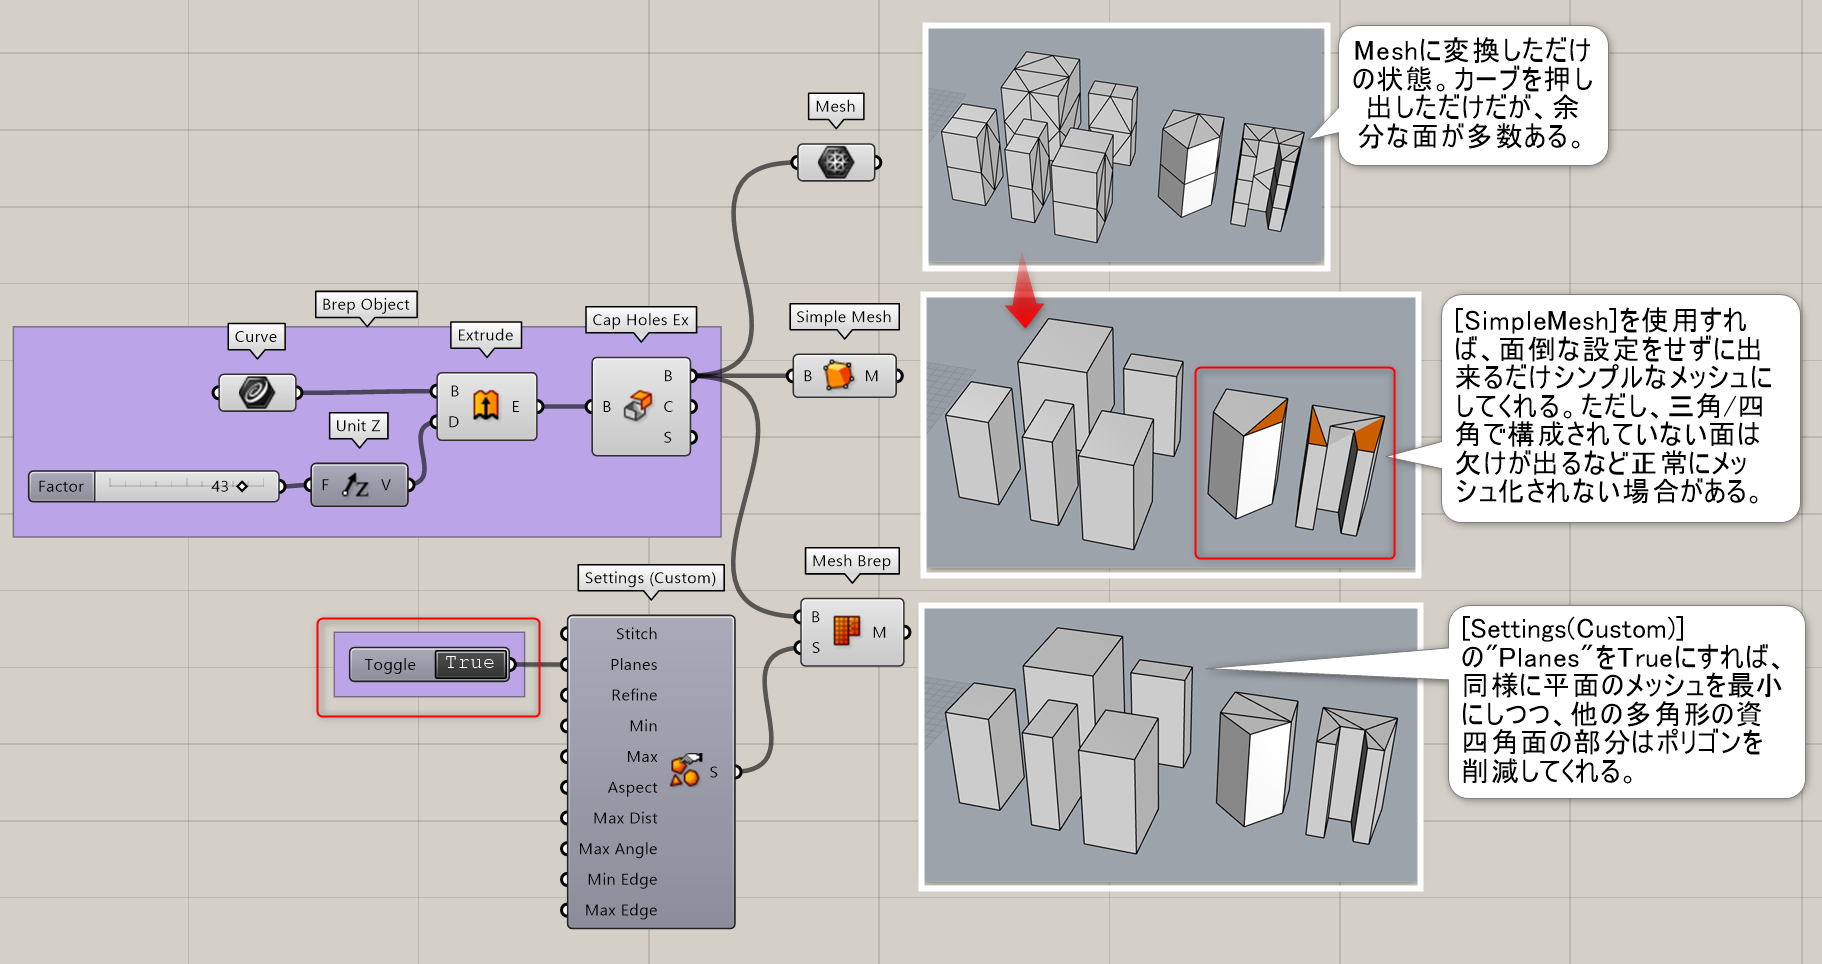
Mesh Brep*
B


Mesh>Util
Brepを入力して、近似したメッシュを作成する。メッシュ分割の設定(Settings)と合わせて使用する。
詳細1:Brepを入力して、近似したメッシュを作成する。詳細設定については、入力Sを右クリックして”Set Mesh Options”を開くか、入力Sに接続する形でメッシュ分割のカスタム設定を行う[Settings(Custom)]や、grasshopper側で定義したプリセットの[Settings(Quality・品質重視)]、[Settings(Speed・速さ重視)]を使用する。
Mesh Surface
C
Mesh>Util
サーフェスをUVの分割数を指定し、近似したメッシュを作成する。OverhangがTrueの時は、トリムサーフェス時にトリムした箇所に、一つ分だけメッシュを覆うように作成する。
Settings(Custom)*
C
Mesh>Util
カスタムに設定したメッシュの設定(Settings)を出力する。各種パラメーターの意味は、Rhinoヘルプか下記リンク参照のこと。
https://www.applicraft.com/tips/rhinoceros/mesh-option/
Settings(Quality)
C


Mesh>Util
Rhinoのメッシュ(滑らか&やや遅い)の設定(Settings)を出力する。
Settings(Speed)
C


Mesh>Util
Rhinoのメッシュ(粗い&高速)の設定(Settings)を出力する。
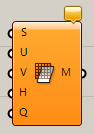
Simple Mesh*
B


Mesh>Util
Brepを入力し、できる限りシンプルなメッシュを作成する。曲面部も直線でつなぐ為、データは軽くなるが、本来の形状とは異なるメッシュを作成する。
詳細1:Brepを入力し、できる限りシンプルなメッシュを作成する。曲面部も直線でつなぐ為、データは軽くなるが、本来の形状とは異なるメッシュになる。
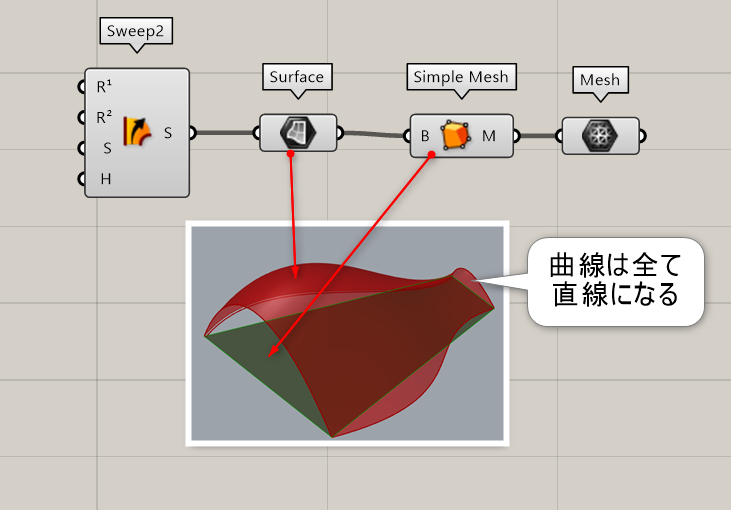
詳細2:角柱などのオブジェクトをメッシュ化するとそれだけでポリゴンが増えてしまうが、[SimpleMesh]を適用すれば単純なメッシュへ変換してくれる。ただし、形状によっては欠けなどが起こる場合がある。その場合は、[Settings(Custom)]の”Planes”オプションを使用すれば、同様の効果を出しつつポリゴンの形状を変えずに済む。
Blur Mesh
C


Mesh>Util
頂点カラーを持ったメッシュを入力し、指定回数(Iterations)だけ色をぼかす。
Cull Faces
C


Mesh>Util
メッシュフェイスを指定したパターン(Pattern)に従い削除する。Trueが削除、Falseが削除しない。
Cull Vertices
C


Mesh>Util
メッシュ頂点を指定したパターン(Pattern)に従い、削除する。Trueが削除、Falseが削除しない。
Delete Faces
C

Mesh>Util
メッシュフェイスの指定した箇所(Index)を削除する。
Delete Vertices
C


Mesh>Util
メッシュ頂点の指定した箇所(Index)を削除する。
Disjoint Mesh
C


Mesh>Util
エッジが結合されていないが、一つと認識されたメッシュを、それぞれのメッシュに切り離す。 RhinoのSplitDisjointMeshコマンドと同等の機能。
Mesh Join*
C

Mesh>Util
複数のメッシュのデータを、ひとつのメッシュに結合する。RhinoやGHでは、メッシュに関してはエッジが接していなくても結合される為、データを扱う上で注意すること。
Mesh Shadow
C

Mesh>Util
メッシュと光源を指定するベクトル(Light)と平面(Plane)を指定し、平面に落ちる影の輪郭曲線を作成する。
Mesh Split Plane
C


Mesh>Util
メッシュを平面(Plane)で分割し、AとBに分けて出力する。
Smooth Mesh*
C
Mesh>Util
メッシュ形状を滑らかになる様修正する。適用する強さ(Strength)や回数(Iterations)、オープンエッジの処理の有無などを選ぶことができる。
Align Vertices
C

Mesh>Util
メッシュと許容差(Tolerance)を設定して、許容差以内の頂点を移動する。
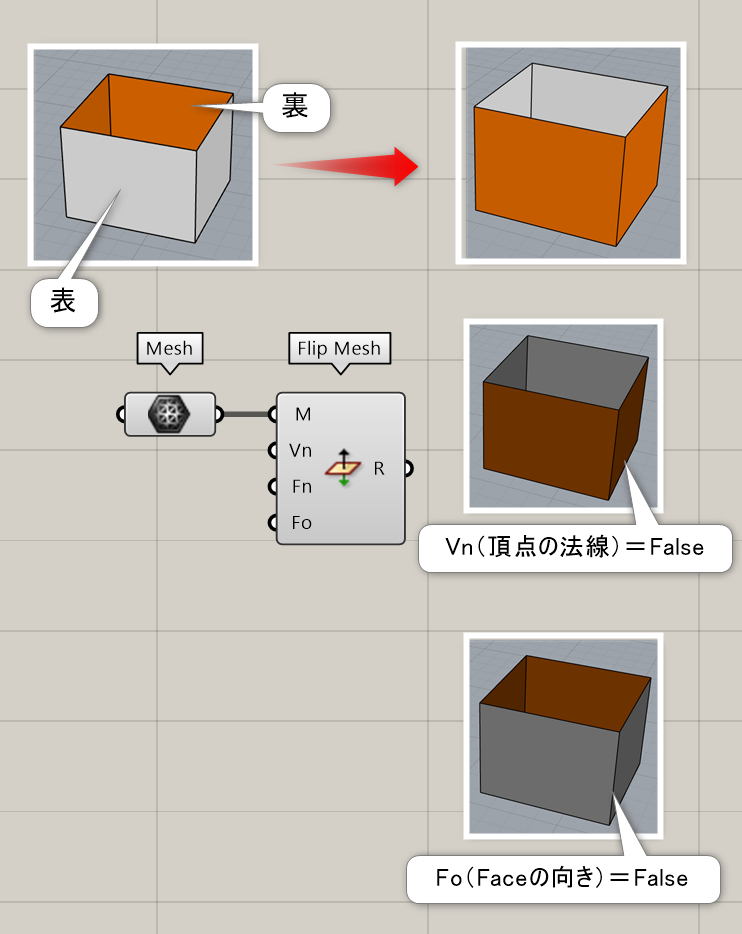
Flip Mesh*
B
Mesh>Util
メッシュを入力し法線方向を、反転する。頂点の法線(Vertics Normals)、フェイスの法線(Face Normals)、フェイスの向きをそろえるか(Face Orientation)をそれぞれTrue,Falseで指定できる。
詳細1:メッシュを入力し法線方向を、反転する。頂点の法線(Vertics Normals)を反転、フェイスの法線(Face Normals)を反転、フェイスの向きを反転(Face Orientation)かを、それぞれTrue,Falseで指定できる。バラバラになったフェイスの向きを揃える機能はない。
Quadrangulate
C


Mesh>Util
メッシュの三角形部分を、四角形へと変換する。しきい値となる角度(Angle)や比率(ratio)を決めることができる。
Triangulate*
B

Mesh>Util
メッシュの四角形部分を、三角形へと変換する。五角形以上のメッシュには非対応。
詳細1:四角形メッシュを三角形メッシュへ変換する。
もともと三角形の場合はそのまま保持される。
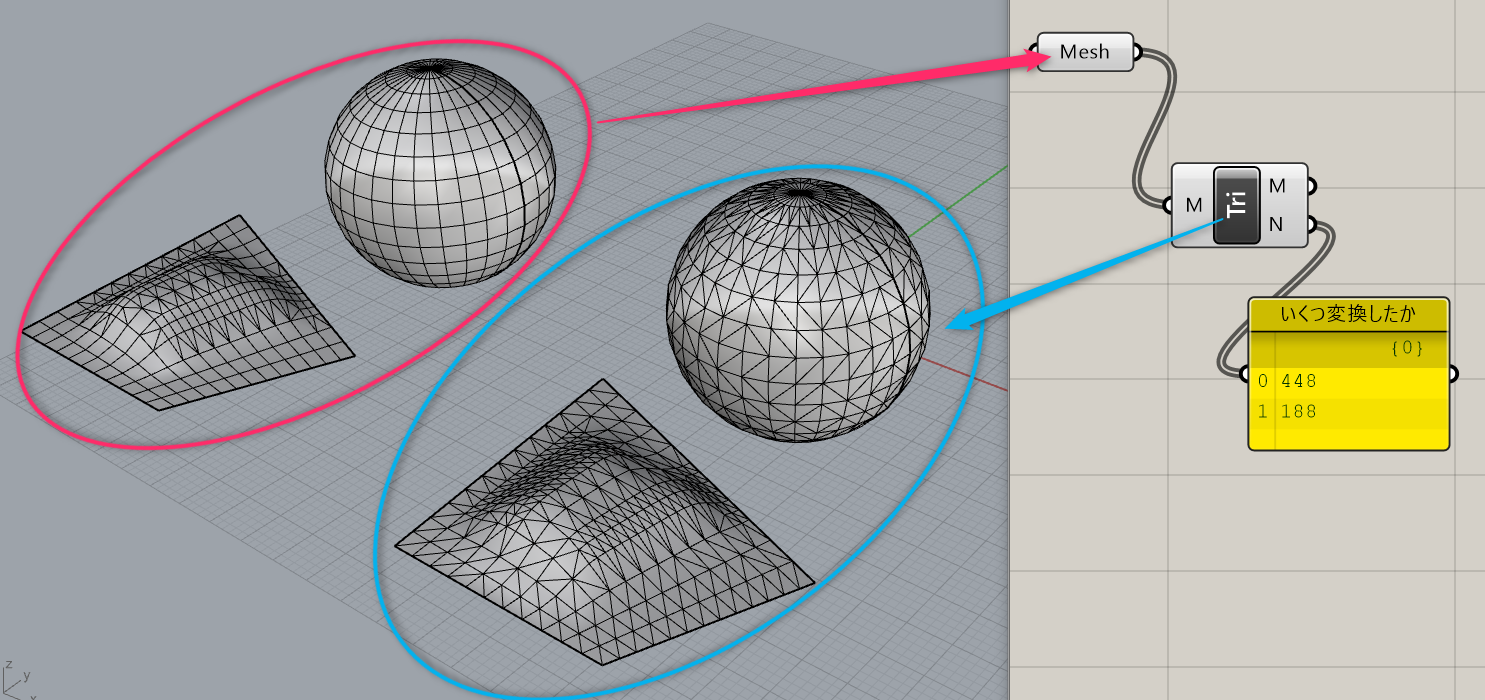
詳細2:Kangaroo2など一部のメッシュベースの機能では三角形メッシュでのみ
動作するものもあるため、そのような場合の変換に使用できる。
Unify Mesh
C


Mesh>Util
メッシュ内の法線方向が異なるものがあった場合、同じ方向に統一する。
Unweld Mesh
C


Mesh>Util
メッシュを指定した角度(Angle)以上の箇所で、ウェルド状態を解除する。
Weld Mesh
C


Mesh>Util
メッシュを指定した角度(Angle)以下の箇所を、ウェルド状態にする。
Exposure
C
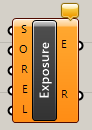
Mesh>Util
障害となるメッシュ(Obstructions)から光の方向(Rays)を決め、メッシュ(Shape)の頂点に点が入るかどうかを判定する。方向が複数ある場合は影に入る数が(Exposure)から出力される。
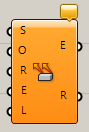
Occlusion
C


Mesh>Util
障害となるメッシュ(Obstructions)と点群(Samples)、光の方向(Rays)を決め、メッシュが落とす影部分に点が入るかどうかを判定する。方向が複数ある場合は影に入る数(Hit)、それぞれの影に含まれるかどうかがTrue/Falseの情報が出力される。