- グループ名ボタンをクリックで各グループ一覧にジャンプします。
- 左にあるA~Cは重要度で、Aが一番重要度の高いコンポーネントになります。
- 「詳しい機能を見る」をクリックで詳細説明が開きます。
- *は書籍『Rhino×Grasshopper All in 1 パーフェクトリファレンス』に記載しているコンポーネントです。

Field
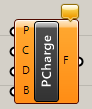
Line Charge
C


Vector>Field
入力した線(Line)に磁力の強さ(Charge)を与え、磁場(Field)を出力する。オプションで磁力の境界(Bounds)を決めることもできる。
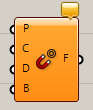
Point Charge
C
Vector>Field
入力した点(Points)に磁力の強さ(Charge)を与え、磁場(Field)を出力する。オプションで磁力の境界(Bounds)や磁場の減衰値(Decay)を決めることもできる。
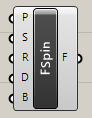
Spin Force
C
Vector>Field
入力した平面(Plane)を中心に強さ(Strength)と半径(Radius)を決め、回転する磁場(Field)を出力する。オプションで磁力の境界(Bounds)や磁場の減衰値(Decay)を決めることもできる。
Vector Force
C


Vector>Field
入力した線(Line)をベクトルに見立てて、その向きの磁場(Field)を出力する。オプションで磁力の境界(Bounds)を決めることもできる。
Break Field
C


Vector>Field
一つにまとめた磁場(Field)データを、それぞれの磁場データに分ける。
Merge Field
C


Vector>Field
複数の磁場(Field)データを一つにまとめる。
Evaluate Field
C


Vector>Field
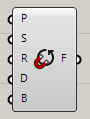
磁場(Field)データとその中の点(Point)を入力することで、その位置での磁場のベクトル(Tensor)と強さ(Strength)を出力する。
Field Line
C
Vector>Field
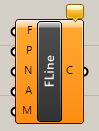
磁場(Field)データと動かす点(Point)、回数(Steps)を決め、磁場の力で点を移動させた曲線を作成する。オプションで精度(Accuracy)や移動させる方法(Method)も変更できる。
Direction Display
C


Vector>Field
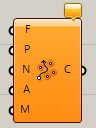
磁場(Field)データと範囲となる長方形(Section)、サンプル数を入力することで、範囲内での磁場の向きや強さを、メッシュに色を付けた形で出力する。
Perpendicular Display
C

Vector>Field
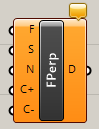
磁場(Field)データと範囲となる長方形(Section)、サンプル数を入力することで、範囲内での磁場の垂直方向の向きを、メッシュに色を付けた形で出力する。上方向の向きの色(Positive Color)、下方向の向き(Negative Color)をそれぞれ色で指定できる。
Scalar Display
C


Vector>Field
磁場(Field)データと範囲となる長方形(Section)、サンプル数を入力することで、範囲内での磁場の強さを、メッシュに色を付けた形で出力する。
Tensor Display
C


Vector>Field
磁場(Field)データと範囲となる長方形(Section)、サンプル数を入力することで、範囲内の磁場の向きをRhino画面内でプレビューできる。
Grid
Hexagonal
A

Vector>Grid
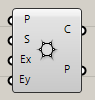
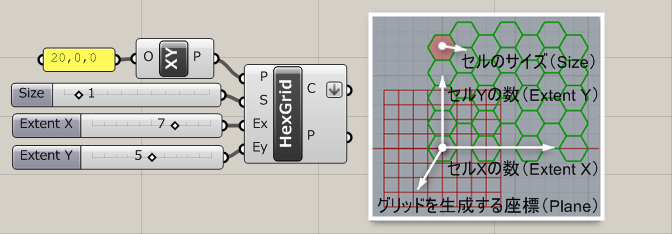
平面(Plane)の原点から、六角形の2Dグリッド線を出力する。六角形の大きさ(Size)、X方向Y方向のグリッドの数(Ex,Ey)をそれぞれ指定できる。
詳細1:セルの形状が六角形(Hexagnal)の2次元のグリッドを生成する。入力Sではセルのサイズ、入力Ex/Eyでは、セルの数を指定。出力Cからはカーブ、出力Pからはポイントのデータを抽出できる。
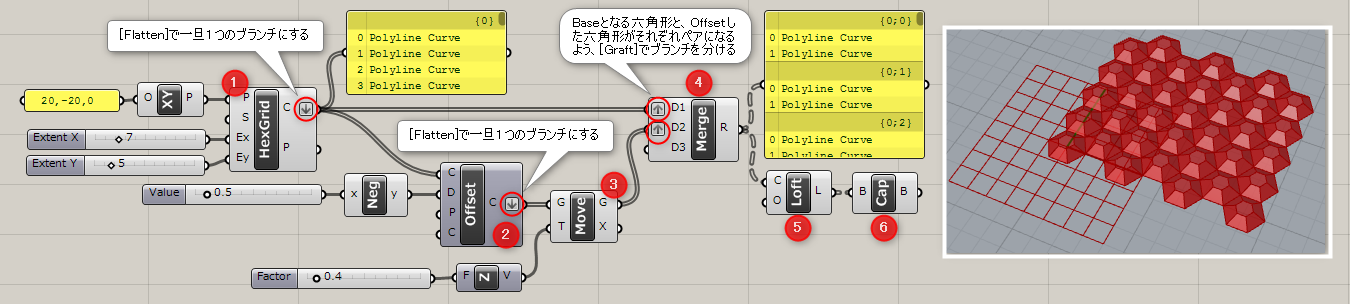
詳細2:ベースの六角形と、それをオフセットして高さを与えたものをLoftでつなぎ、Capをした例。
①元になる六角形グリッドを作成
②[Offset]コンポーネントでカーブを縮小
③[Move]コンポーネントでZ方向に高さを与える
④[Merge]コンポーネントで①と②のカーブを結合
⑤[Loft]コンポーネントでサーフェスを作成⑥[Cap]コンポーネントで穴をふさぐ
Radial
A

Vector>Grid
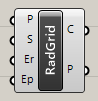
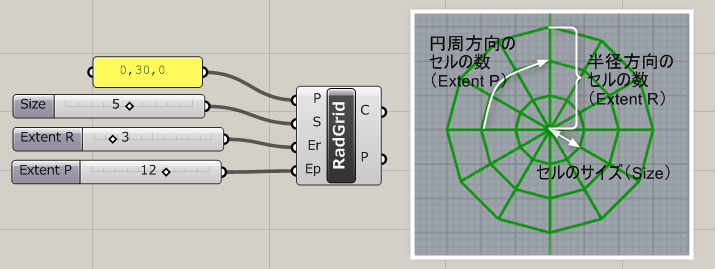
平面(Plane)の原点から、同心円状に2Dグリッド線を作成する。同心円の大きさ(Size)、円の数(Er)、円の分割数(Ep)を指定できる。
詳細1:セルの形状が放射状の2次元グリッドを生成する。入力Sではセルのサイズ、入力Erでは半径方向のセルの数、入力Epでは円周方向のセルの数を指定する。(デフォルトは20)
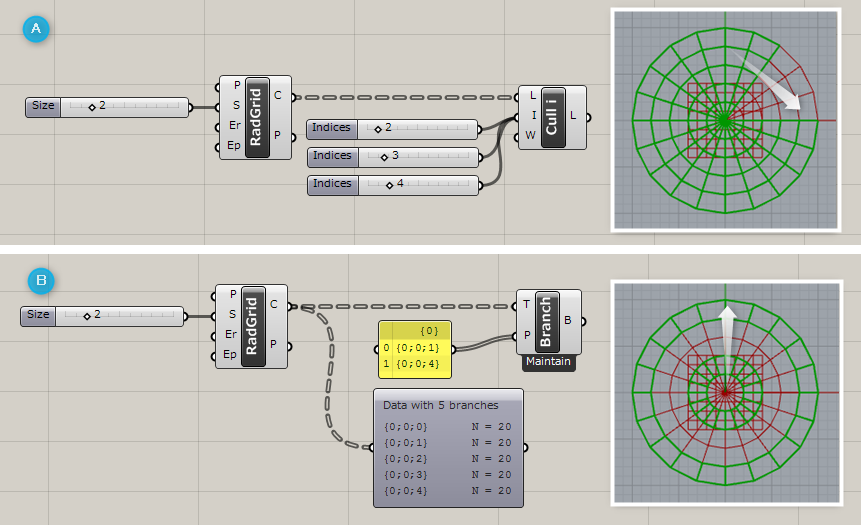
詳細2:
A [Cull Index]コンポーネントにて削除するIndexを指定した例。円周方向にIndexが削除される。
B [Tree Branch]コンポーネントを使用して、取り出すIndexを指定した例。半径方向にIndexが選択される。
Rectangular
A
Vector>Grid
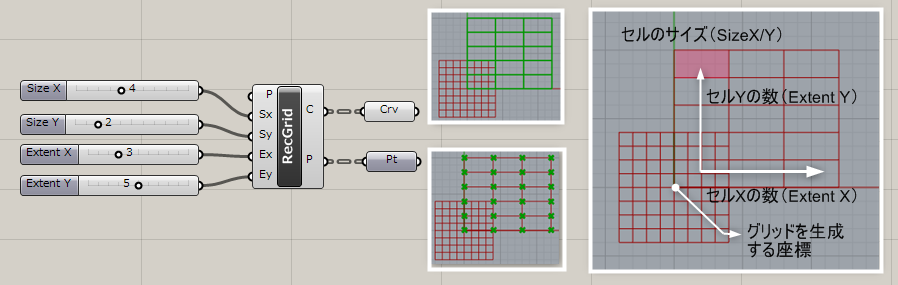
平面(Plane)の原点から、長方形の2Dグリッド線を出力する。長方形の大きさ(SizeX、SizeY)、X方向Y方向のグリッドの数(Ex,Ey)をそれぞれ指定できる。
詳細1:セルの形状が長方形(Rectanglar)の2次元のグリッドを生成する。入力Sx/Syではセルのサイズ、入力Ex/Eyでは、セルの数を指定。 出力Cからはカーブ、出力Pからはポイントのデータを抽出できる。
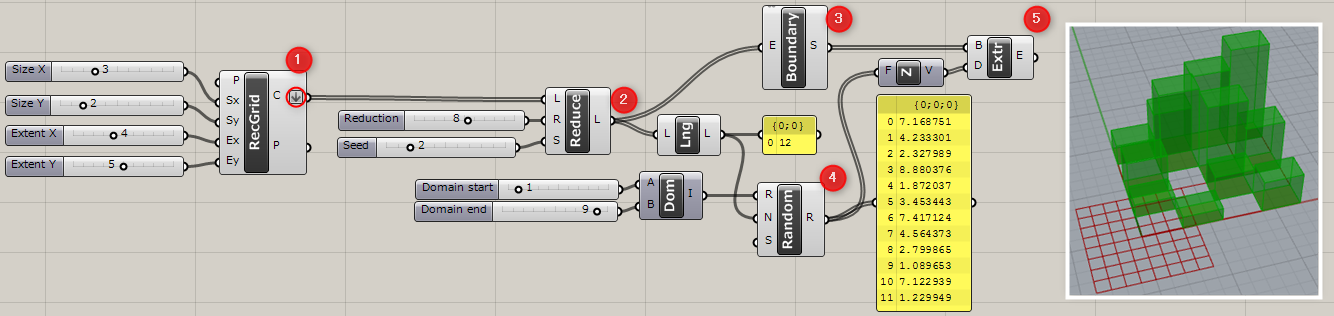
詳細2:セルをランダムに削減して押し出した例。
①長方形のセルを生成、出力カーブはXYごとの階層に分かれているため、[Flatten]を選択
②[Random Reduce]コンポーネントでセルのカーブを指定した数や割合で削減
③[Boundary Surfaces]コンポーネントで面を張る
④[Random]コンポーネントで押し出す高さをランダム化
⑤[Extrude]コンポーネントでZ方向にセルを押し出し
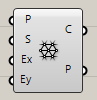
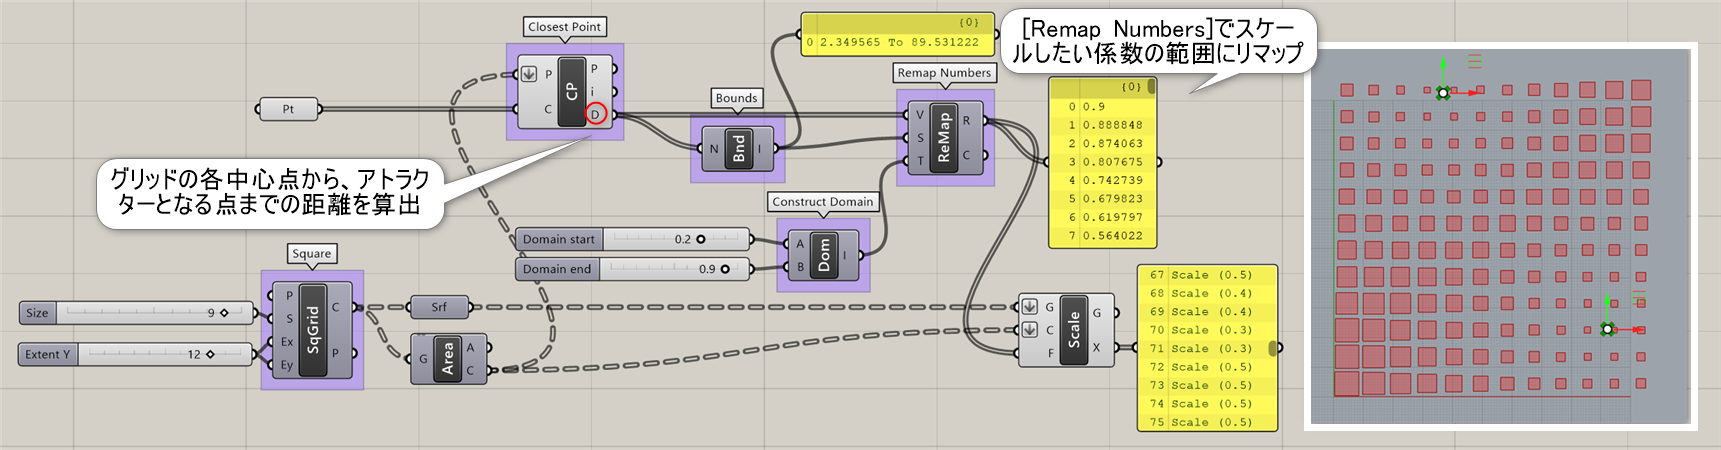
Square
B

Vector>Grid
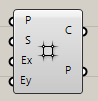
平面(Plane)の原点から、正方形の2Dグリッド線を出力する。正方形の大きさ(Size)、X方向Y方向のグリッドの数(Ex,Ey)をそれぞれ指定できる。
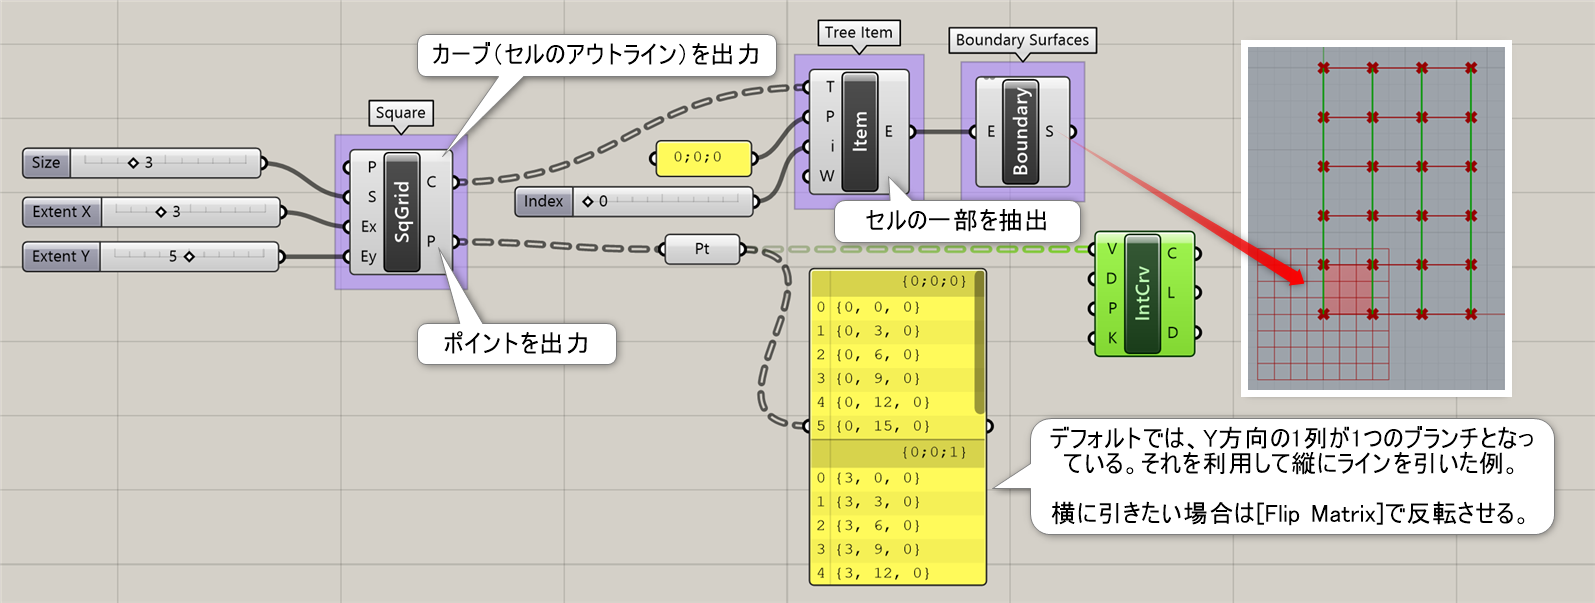
詳細1:セルの形状が正方形(Square)の2次元のグリッドを生成する。入力Sではセルのサイズ、入力Ex/Eyでは、セルの数を指定。出力Cからはカーブ(セルのアウトライン)、出力Pからはポイントのデータを抽出できる。
図は、出力Cのデータから[Tree Item]でセルカーブの一部を抽出して[Boundary Surfaces]でサーフェスを張った例と、出力Pに[Interpolate]でブランチごとのラインを作成した例。
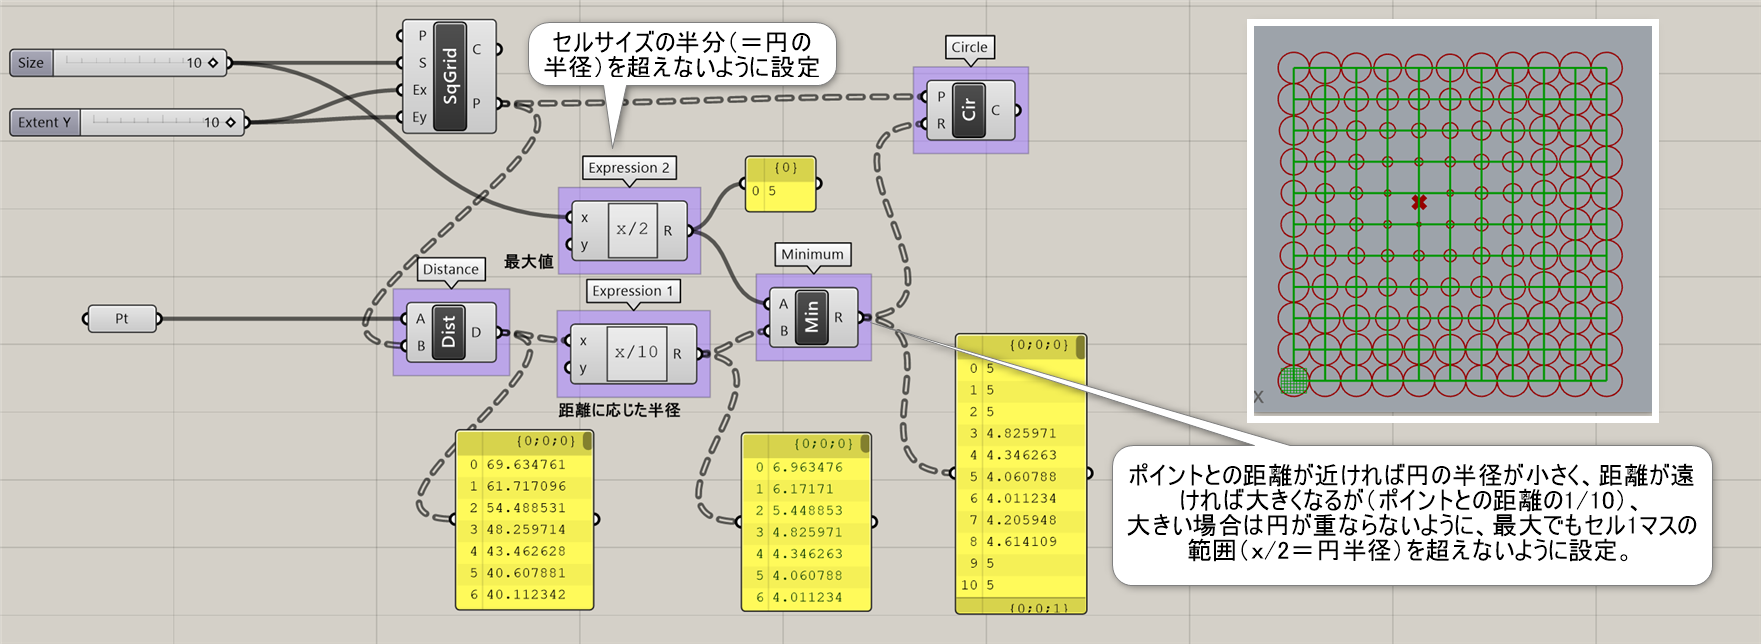
詳細2:[Square]のグリッドを利用して、ポイント上に円を作成し、任意のポイントをアトラクターにし、ポイントが近づいた場所の円の半径が小さくなるように設定した例。
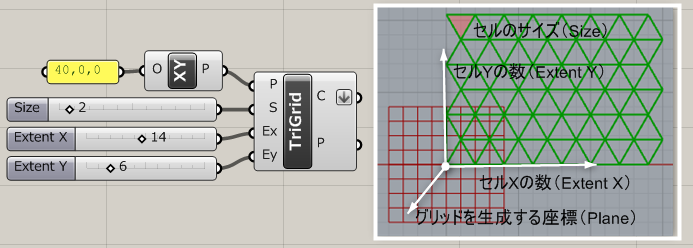
Trianglar
A

Vector>Grid
平面(Plane)の原点から、正三角形の2Dグリッド線を作成する。三角形の大きさ(Size)、X方向Y方向の数(Ex,Ey)をそれぞれ指定できる。
詳細1:セルの形状が三角形(Trianglar)の2次元のグリッドを生成する。入力Sではセルのサイズ、入力Ex/Eyでは、セルの数を指定。 出力Cからはカーブ、出力Pからはポイントのデータを抽出できる。
詳細2:ベースの三角形の中心点を利用して、円を配置し、スケールをする事によりパターンを作成した例。
①元になる三角形グリッドを作成
②三角形から出力したポイントに、円を作成
③[List Lengrh]コンポーネントで円のリスト数を取得
④[Repeat]コンポーネントを適用し、繰り返しを行う範囲のデータを入力
⑤[Scale]コンポーネントで入力G(ジオメトリ)を円に、入力C(中心点)を三角形のポイントに、入力F(スケールファクター)をRepeatを適用した4つのスケール値に指定する。

Populate 2D
A
Vector>Grid
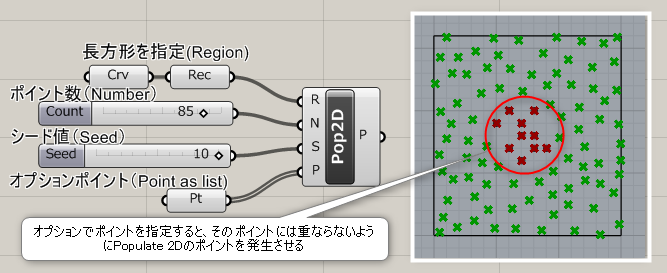
範囲となる長方形(Region)を指定し、2D平面に点(Point)を指定した数(Count)だけ発生させる。乱数の元となる値(Seed)を指定できる。
詳細1:2次元の長方形内に、指定した数のポイントをランダムに生成できる。入力R>右クリック>Set One Rectangleにて、ビューでドラッグして長方形を作成したり、[Curve]コンポーネントにて既存の長方形を指定する事が可能。
※Rectangle以外の2Dを使用する場合は、Populate Geometryで2D+サーフェスを使用するか、Curve>Point In Curveで指定したカーブ内にポイントを発生させるなどで対応可能。
Populate 3D
A


Vector>Grid
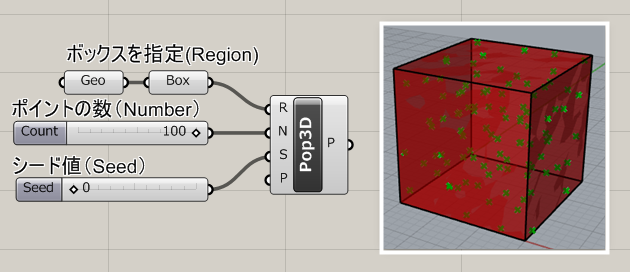
範囲となる直方体(Region)を指定し、3D空間に点(Point)を指定した数(Count)だけ発生させる。乱数の元となる値(Seed)を指定できる。
詳細1:3次元のボックス内に、指定した数のポイントをランダムに生成できる。入力R>右クリック>Set One Boxにてビューでドラッグしてボックスを作成したり、[Geometry]コンポーネントて既存のボックスを指定する事が可能。
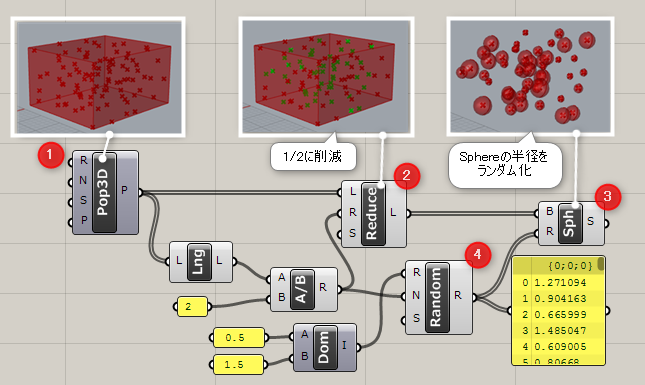
詳細2:Populate 3Dで生成したポイントを中心として、ランダムな半径の球を配置した例。
①[Populate 3D]コンポーネントでランダムなポイントを作成
②[List Length]コンポーネントにて頂点の数を出力し、[Division]コンポーネントで2分の1に削減
③[Sphere]コンポーネントで球を配置
④[Random]コンポーネントで、球の半径を0.5~1.5の範囲内でランダム化
Populate Geometry
A
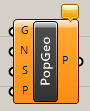
Vector>Grid
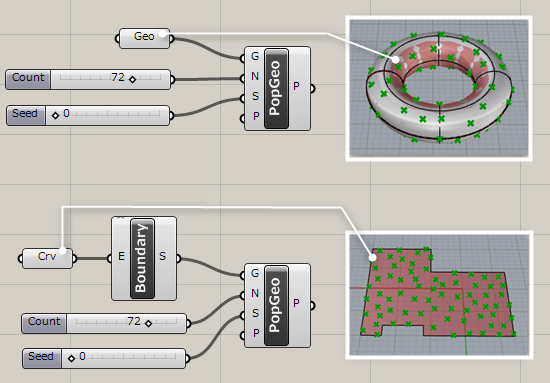
ジオメトリを指定して、ジオメトリ上に点(Point)を指定した数(Count)だけ発生させる。乱数の元となる値(Seed)を指定できる。Populate 2D,3Dと異なりジオメトリの表面上に点を作成する。
詳細1:入力Gで指定したジオメトリの表面上に、指定した数のポイントをランダムに生成できる。
Plane
Deconstruct Plane
A
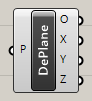

Vector>Plane
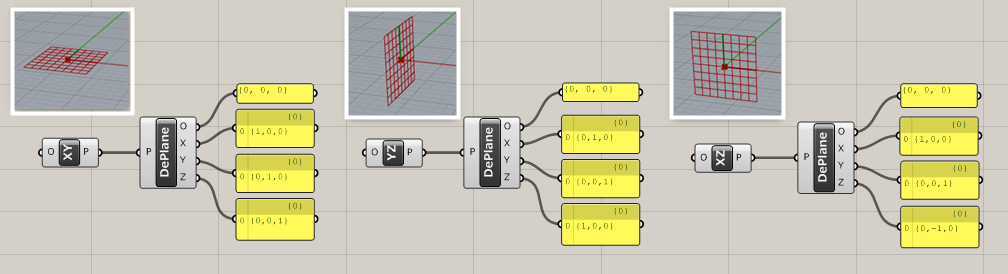
平面(Plane)を入力し、原点(Origin)とXYZそれぞれの方向をしめすベクトルを出力する。
詳細1:入力した平面を原点OとベクターX/Yの要素に分解する。
XY Plane
B


Vector>Plane
XY平面を出力する。 原点(Origin)を入れると、その座標を原点とするXY平面を作成する。
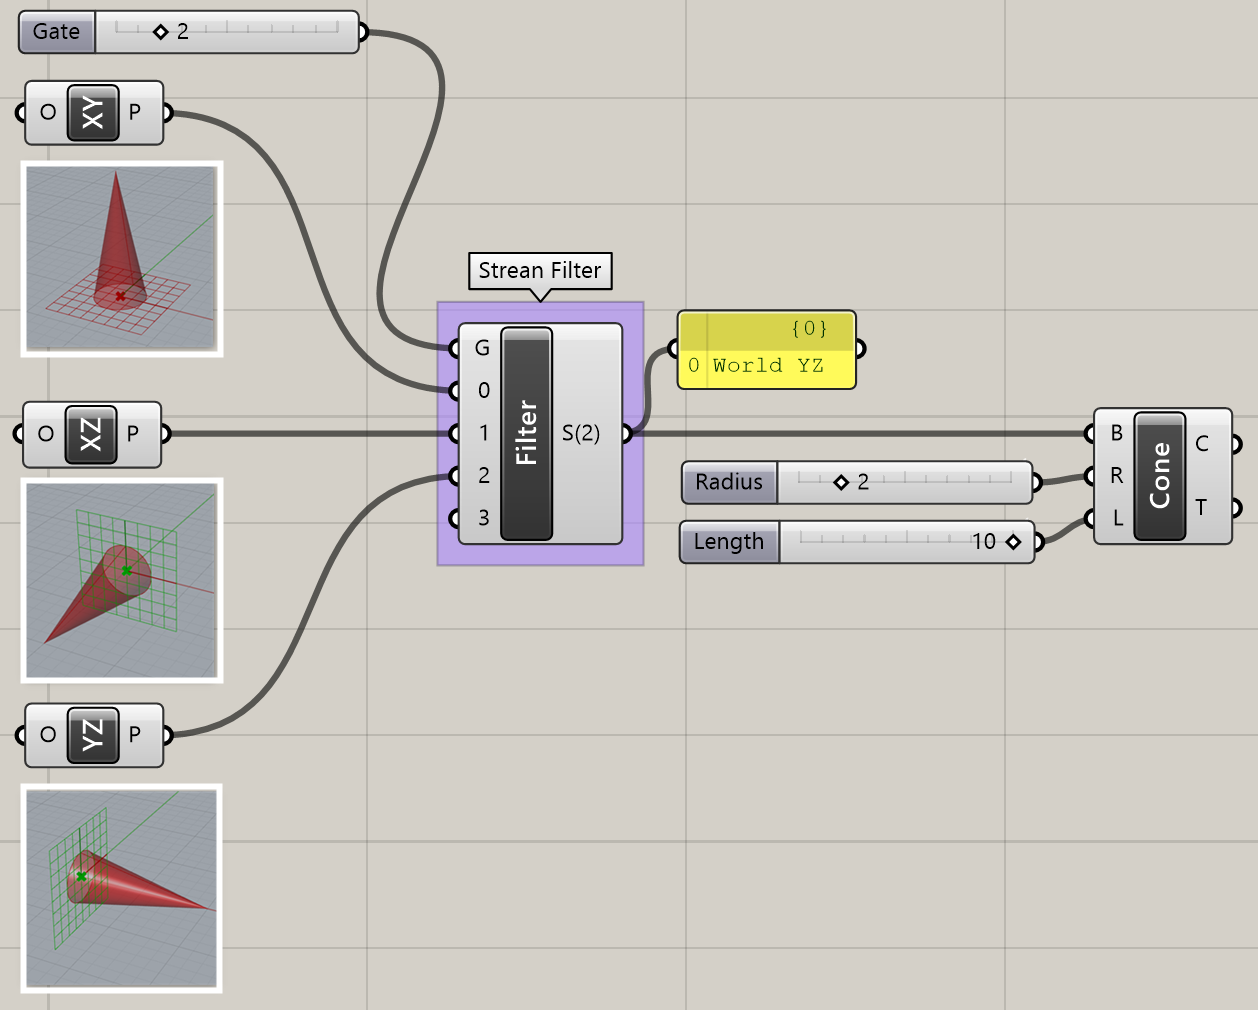
詳細1:XY平面を出力する。 原点(Origin)を入れると、その座標を原点とするXY平面を作成する。図は、[Stream Filter]を使用して各種プレーンを切替えた例。
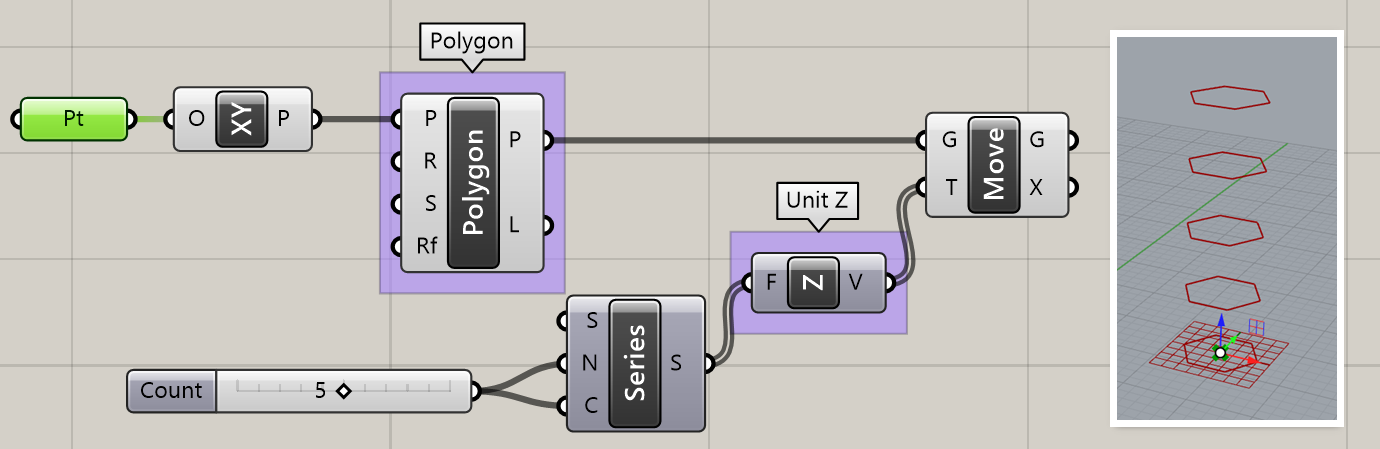
詳細2:Planeは、移動や押出し、ミラーなど平面の向き(方向)が関連するものに使用する。図は、原点をポイントで指定し、XY平面上にある多角形をZ方向に移動した例。
XZ Plane
B

Vector>Plane
XZ平面を出力する。原点(Origin)を入れると、その座標を原点とするXZ平面を作成する。
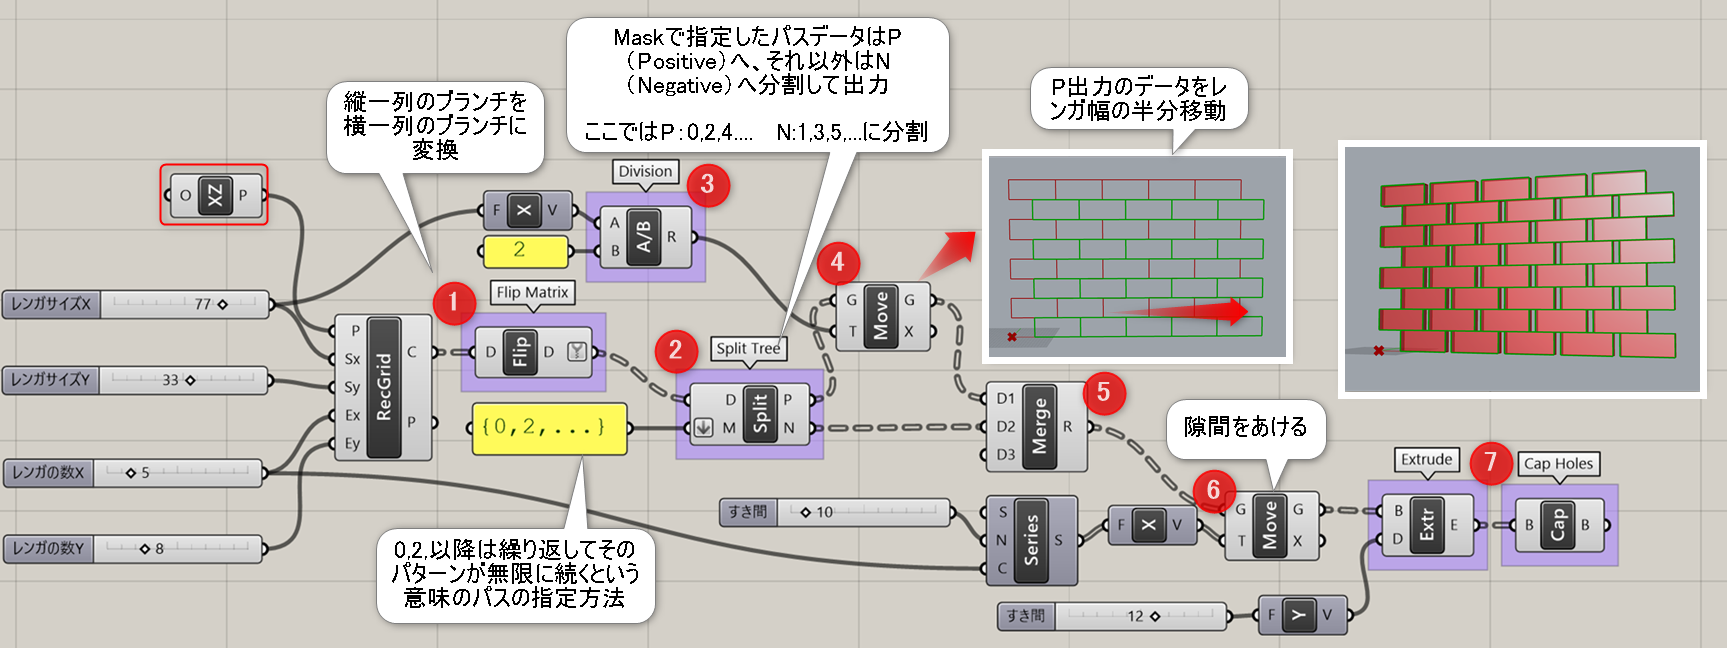
詳細1:XZ平面を出力する。 原点(Origin)を入れると、その座標を原点とするXZ平面を作成する。 図は、XZ平面に[Rectangular]のグリッドを使用して、レンガを作成した例。 ①グリッドのブランチがデフォルトは縦方向になっているので[FlipMatrix]で反転 ②[Split List]にてマスクを{0,2,…}と指定すると、偶数のパスをPから、奇数のパスをNから出力できる ③④偶数のパスをX方向にサイズの半分だけ移動 ⑤移動した偶数のパスとそのままの奇数のパスをマージ ⑥X方向に隙間をあけるため、[Series]を利用してレンガの数だけX方向に移動 ⑦[Extrude]と[Cap Holes]で押出しと面を張って完成
YZ Plane
B

Vector>Plane
YZ平面を出力する。原点(Origin)を入れると、その座標を原点とするYZ平面を作成する。
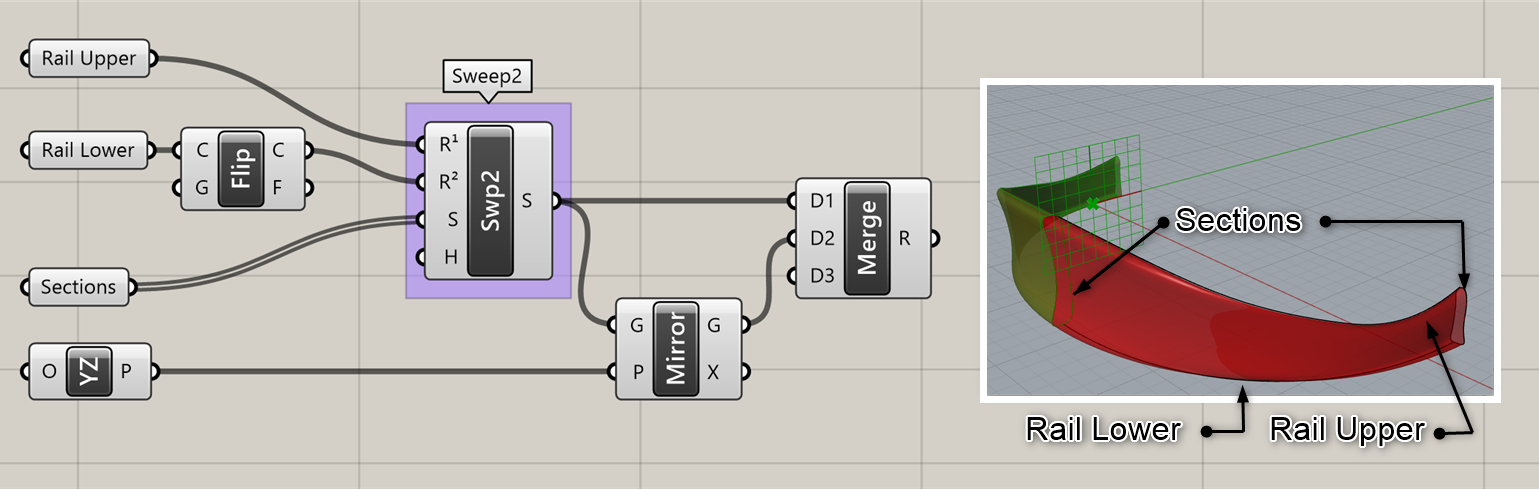
詳細1:YZ平面を出力する。 原点(Origin)を入れると、その座標を原点とするYZ平面を作成する。図は、[Sweep2]で作成したサーフェスをYZ平面でミラーコピーした例。
Construct Plane
A

Vector>Plane
原点(Origin)とX、Y方向を指すベクトルを入力し、平面(Plane)を作成する。
詳細1:原点Oとベクター(方向)X/Yの3つの要素から平面を出力する。入力Oは、右クリックして、”Set One Point”によりビューポートでクリックするか、既存のポイントコンポーネントを接続する。入力X/Yは、右クリックして”Set One Vector”によりビューポートでベクターを設定するか、既存の各種ベクターコンポーネントを接続する。
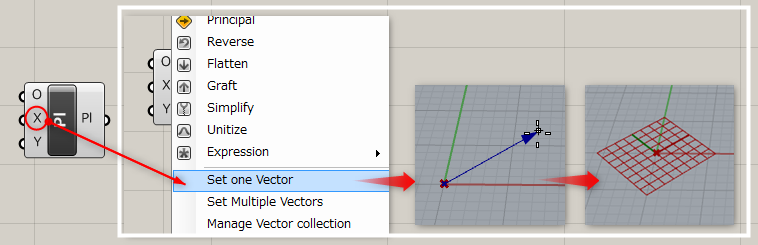
詳細2:ベクターのX方向Y方向と原点(Origin)、を定義することで平面を作成する事もできる。

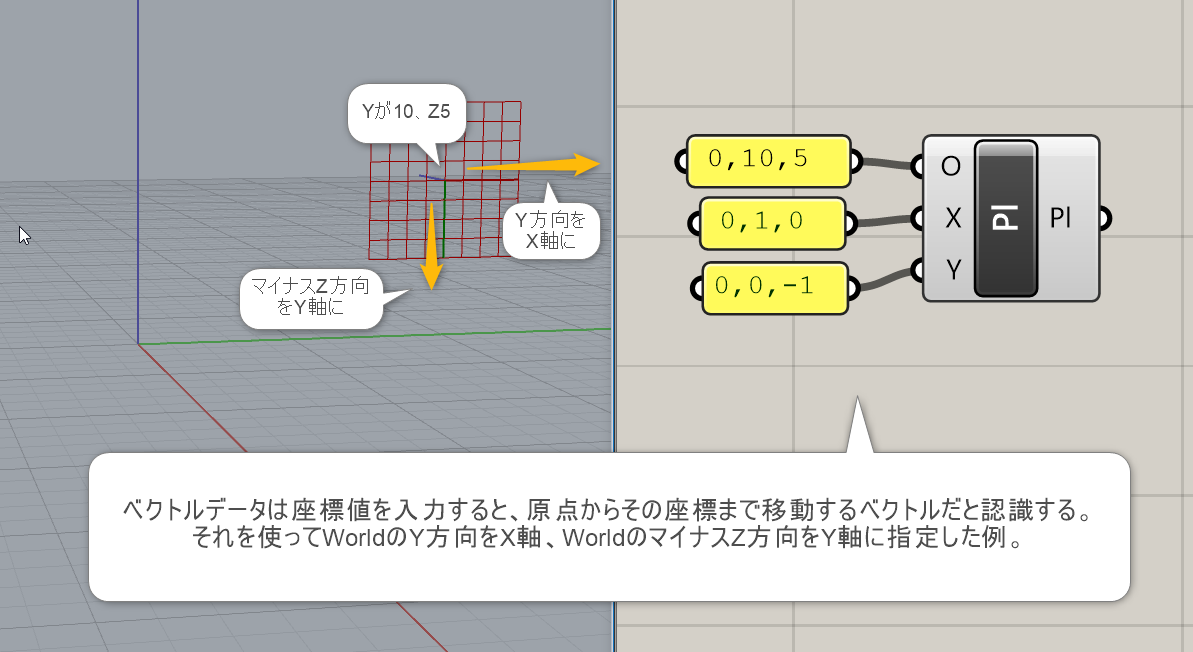
詳細3:ベクターを座標値で入力した場合、{0,0,0}からその位置までの移動量と認識する。例では、移動量をそれぞれ指定することで、特定の方向を向いた平面を作成している。
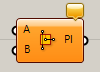
Line+Line
C

Vector>Plane
直線AとBの2本を入力し、平面(Plane)を作成する。
Line+Pt
C


Vector>Plane
直線と点(Point)を入力し、平面(Plane)を作成する。
Plane 3Pt
C


Vector>Plane
ABCの3点を通過する、平面(Plane)を出力する。
Plane Fit
C

Vector>Plane
複数の点(Points)にできる限り、フィットする平面(Plane)を作成する。
Plane Normal
C


Vector>Plane
原点(Origin)とZ方向を指すベクトルを入力し、平面(Plane)を作成する。
Plane Offset
C


Vector>Plane
平面(Plane)を指定した値(Offset)、垂直にオフセットした平面(Plane)を作成する。
Plane Origin
C
Vector>Plane
元となる平面(Base)と原点(Origin)を入力することで、新しい原点を持った平面を作成する。
Adjust Plane
B


Vector>Plane
平面(Plane)とベクトル(Normal)を入力し、ベクトルが法線となるように向きを合わせた平面(Plane)を作成する。
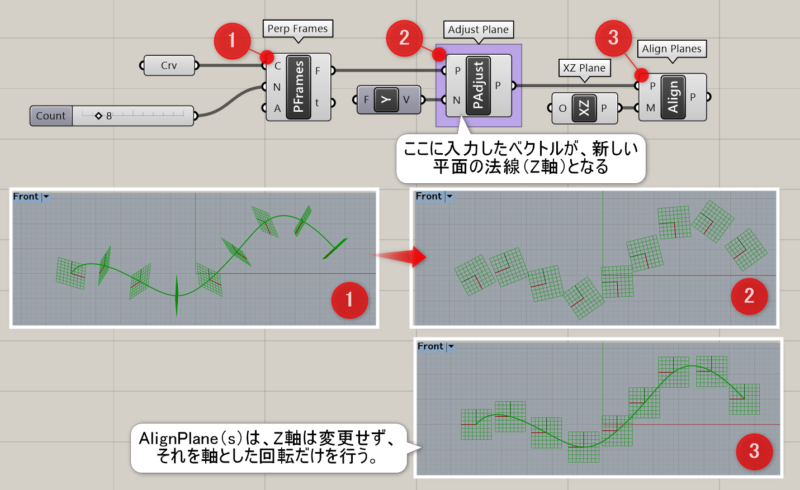
詳細1:平面(Plane)とベクトル(Normal)を入力し、そのベクトルが法線となるように向きを合わせた平面(Plane)を作成する。類似したコンポーネントに[Align Plane(s)]があるが、これらは入力した平面の法線(Z軸)は変更せず、軸の1つを同じ方向に投影する。
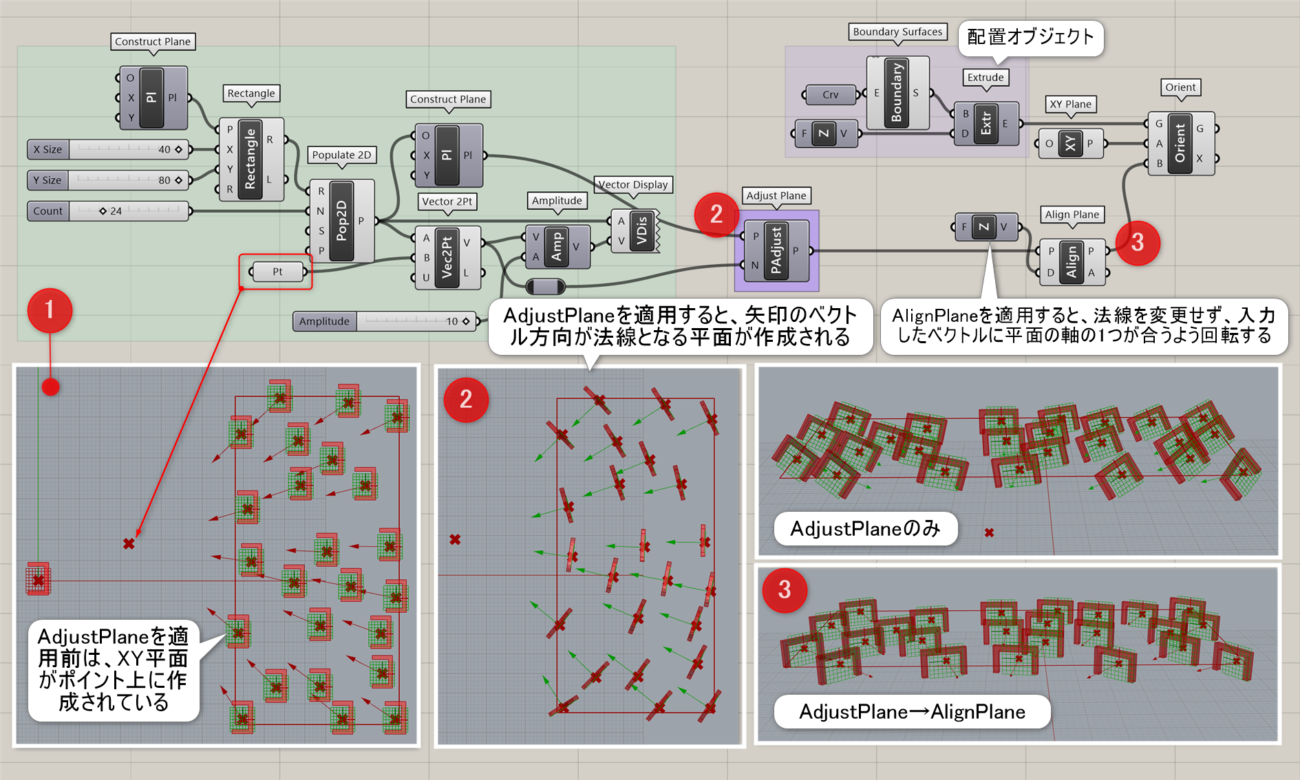
詳細2:図は、[Adjust Plane]を使用して[Vector2Pt]で指定したベクトルを法線とする平面を作成後、[Align Plane]で回転を修正し、XY平面にあるオブジェクトを[Orient]で作成した平面に位置合わせした例。
Align Plane
B


Vector>Plane
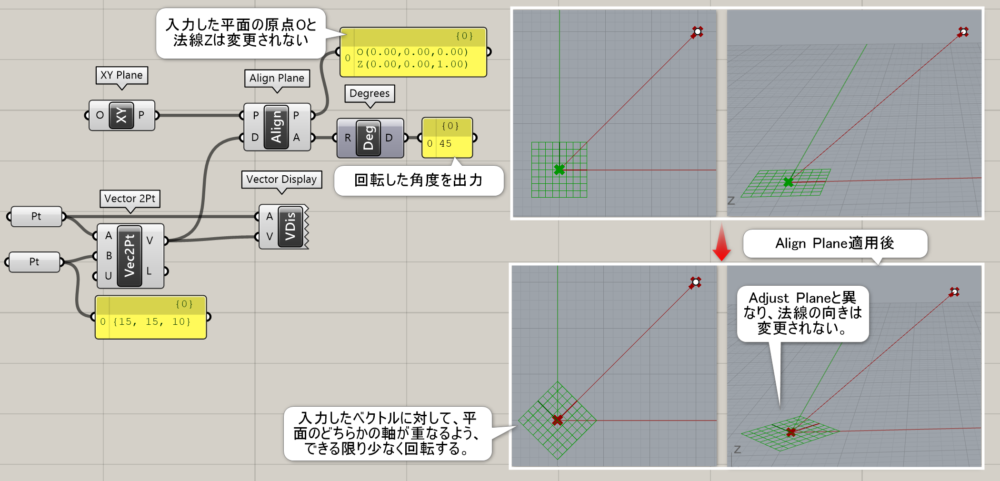
平面(Plane)をガイドとなるベクトル(Direction)に合うように、できる限り少なく回転する。 入力した平面のZ軸で回転し向きを合わせる。
詳細1:平面(Plane)をガイドとなるベクトル(Direction)に合うように、できる限り少なく回転する。その際、入力した平面の法線は変更されず、その法線を軸としてXY軸のどちらか1つを同じ方向に投影(回転)して向きを合わせる。
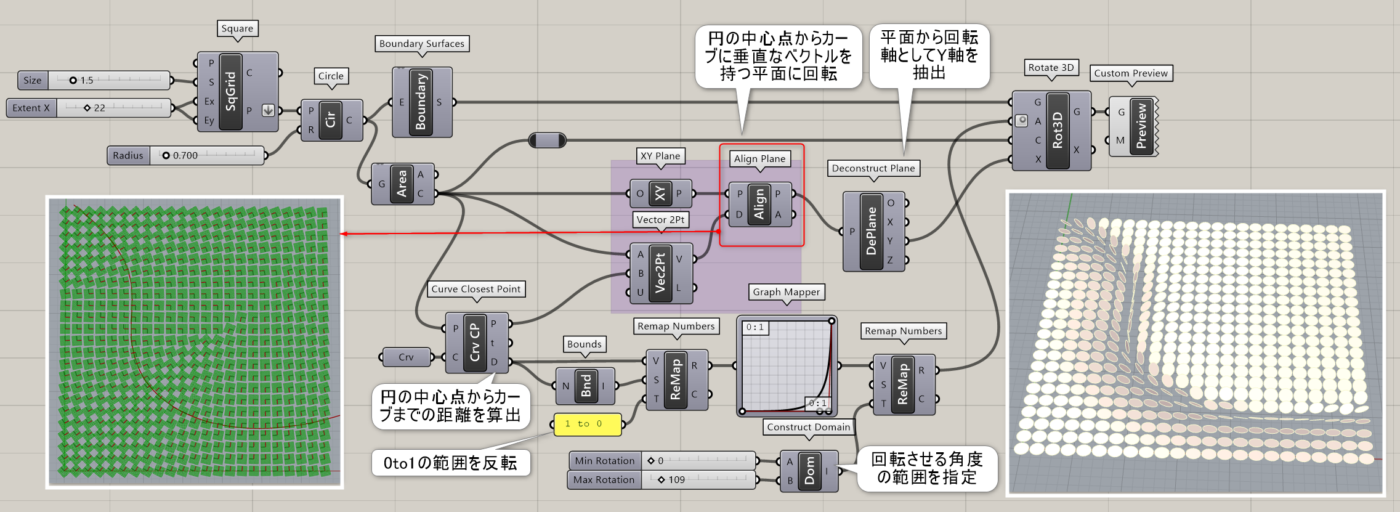
詳細2:[Curve Closest Point]と[Vector2Pt]でカーブに垂直な方向のベクトルを取得しそれを利用して[Align Plane]で平面を回転、その平面の軸を使用してカーブに近い場所ほど円の回転が多くなるよう設定した例。
Align Planes
B


Vector>Plane
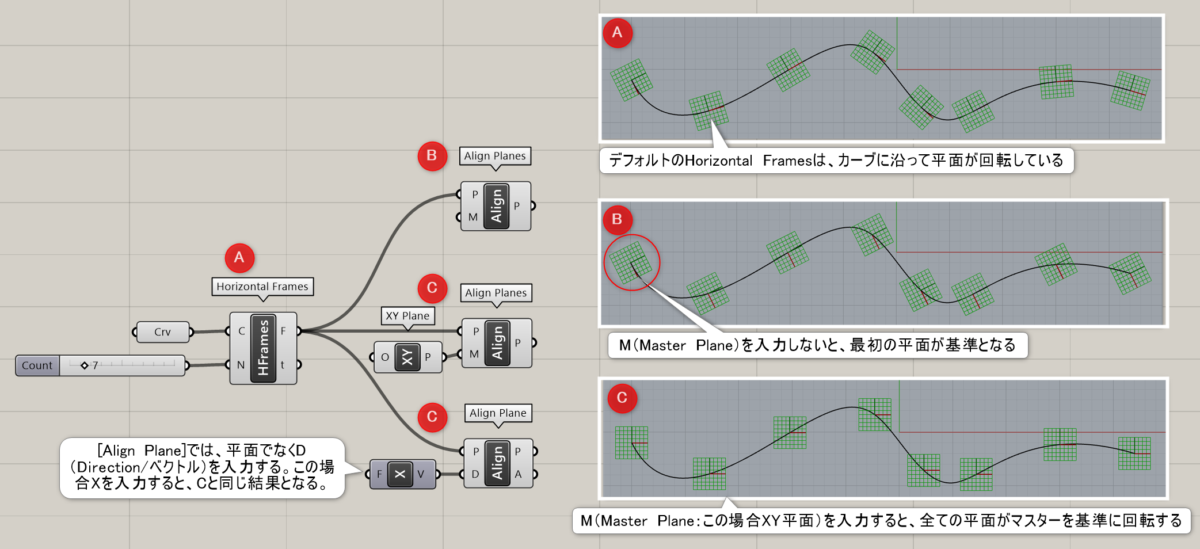
複数の平面(Planes)をマスターとなる平面の向きになる様に、できる限り少なく回転し合わせる。
詳細1:複数の平面(Planes)をマスターとなる平面の向きになる様に、できる限り少なく回転し合わせる。平面のZ軸は変更されず、回転軸となる。マスター(M)が入力されていない場合は、最初のフレームがマスターとなる。
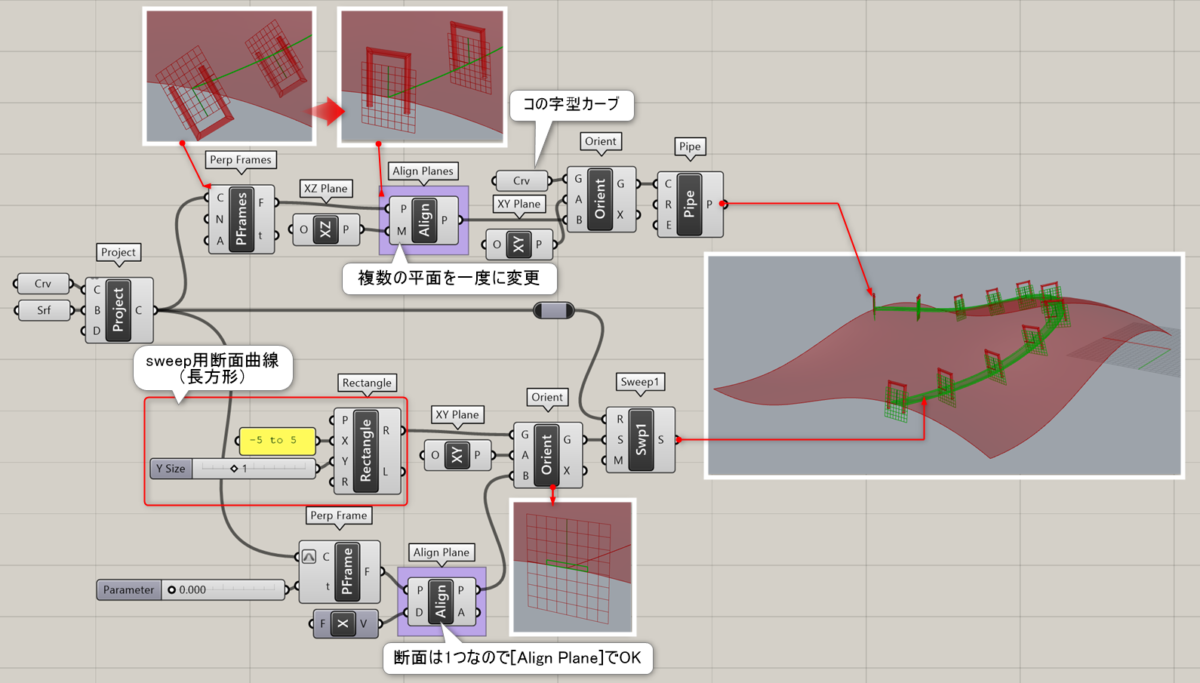
詳細2:[Project]でサーフェスに投影したカーブに対して、[Perp Frames]で平面を作成し、[Align Planes]で複数の平面の向きを修正した例。道路の形状は[Sweep1]を使用しているが、この場合は断面平面が1つあれば良いので[Align Plane]を使用して平面の向きを合わせている。
Flip Plane
C
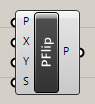
Vector>Plane
平面(Plane)の向きを変更する。XYそれぞれの方向を反転するかどうかを、True,Falseで入力する。Swap Axisで軸を入れ替えるかどうかも指定できる。
Plane Closest Point
C


Vector>Plane
サンプルとなる点(Sample)と平面(Plane)を入力し、平面上の一番近い点(Point)、距離(Distance)などを出力する。
Plane Coodinates
C


Vector>Plane
点(Point)とローカル平面(System)を入力し、その平面内でのXYZの座標値を出力する。
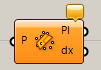
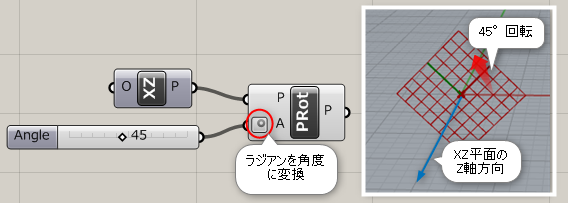
Rotate Plane
A


Vector>Plane
平面(Plane)と角度(Angle)を入力し、Z方向を軸として回転させた平面(Plane)を作成する。
詳細1:平面を、その平面のZ軸を中心に回転させる。回転角を入力する際、入力Aを右クリックで[Degree]を指定すると、ラジアンを度数に変換できる。
Point
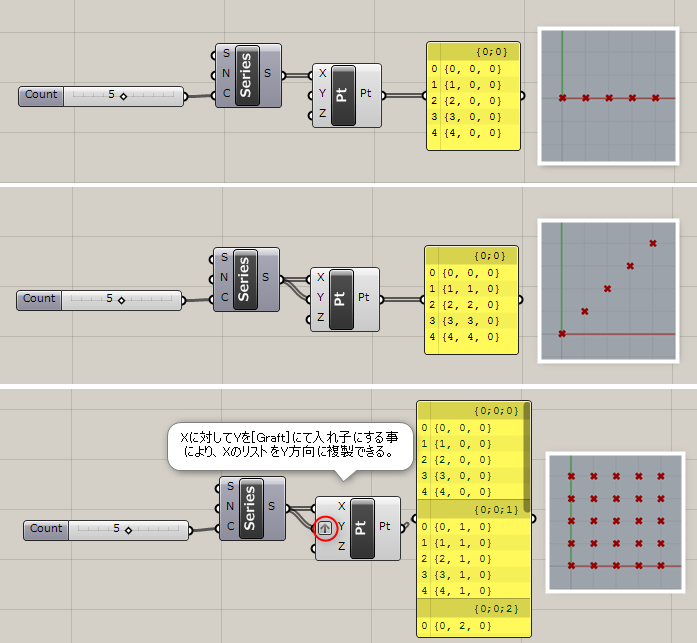
Construct Point
A


Vector>Point
XYZ座標をそれぞれ入力し、点を作成する。
詳細1:ポイントのX座標、Y座標、Z座標となる数値をそれぞれ入力すると、その座標のポイントが出力される。図は、[Series]コンポーネントを接続して複数ポイントを出力した例。
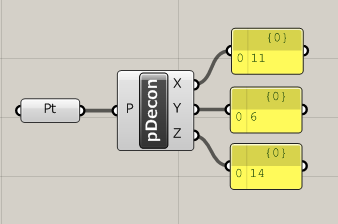
Deconstruct
A


Vector>Point
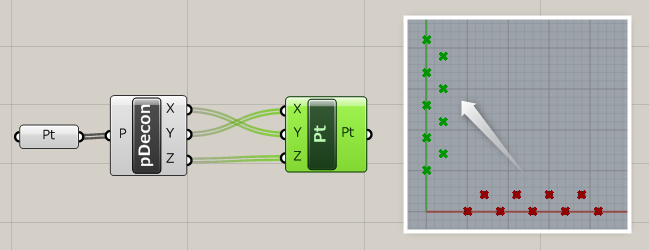
点(Point)を入力し、そのXYZの座標値を出力する。
詳細1:ポイントをX座標、Y座標、Z座標のそれぞれの数値に分解して出力する。
詳細2:[Construct Point]コンポーネントと組み合わせて、XとYの座標を入れ替えた例。
Numbers to Points
C


Vector>Point
複数の数値(Numbers)と数値がXYZのどれに対応するか(Mask)を指定し、点を作成する。
Points to Numbers
C

Vector>Point
点(Point)と点座標をどの順に出力するか(Mask)を指定し、指定した順に座標を出力する。
Barycentric
C
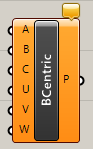
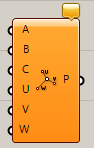
Vector>Point
点A,B,C(Point)とその点に引き付ける力U,V,Wを入力し、新しい点(Point)を作成する。
Distance
A


Vector>Point
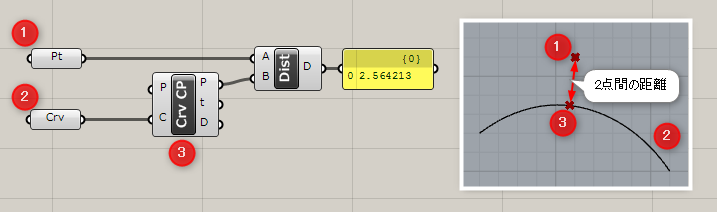
点AとBの2つの距離を計算する。
詳細1:2つのポイント間の距離を算出する。ポイントのみ入力可能なため、カーブとの距離、サーフェスとの距離などを出力したい場合には、ポイントを算出する必要がある。図は[Curve Closest Point]コンポーネントで算出したポイントを使用した例。
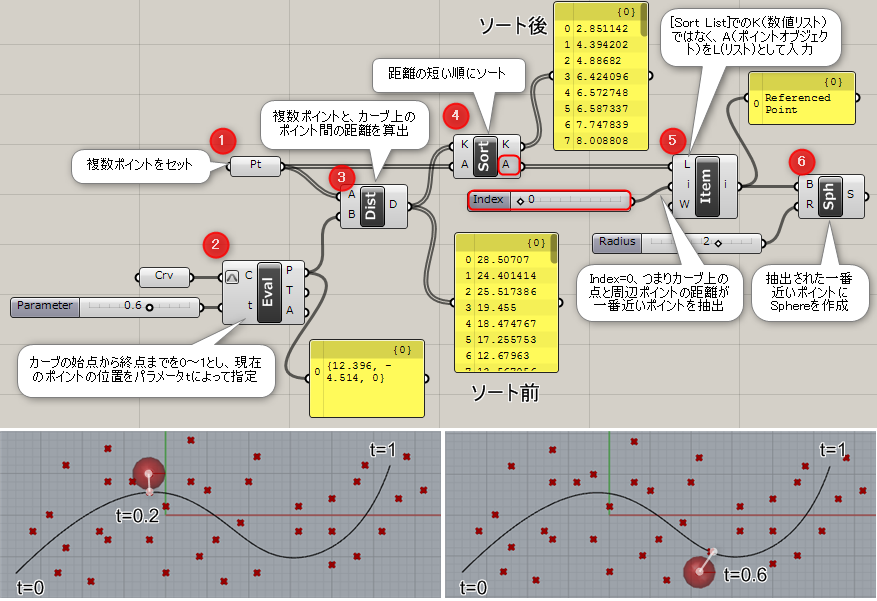
詳細2:[Sort List]コンポーネントとの組み合わせで、カーブ上のtパラメータに応じて、そこから一番距離が短いポイントにSphereを作成する例。
Point Cylindrical
C

Vector>Point
円柱を指定する様に平面(Plane)と角度(Angle),半径(Radius),高さ(Elevation)で位置を指定し、点(Point)を作成する。
Point Oriented
B
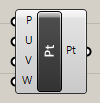
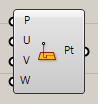
Vector>Point
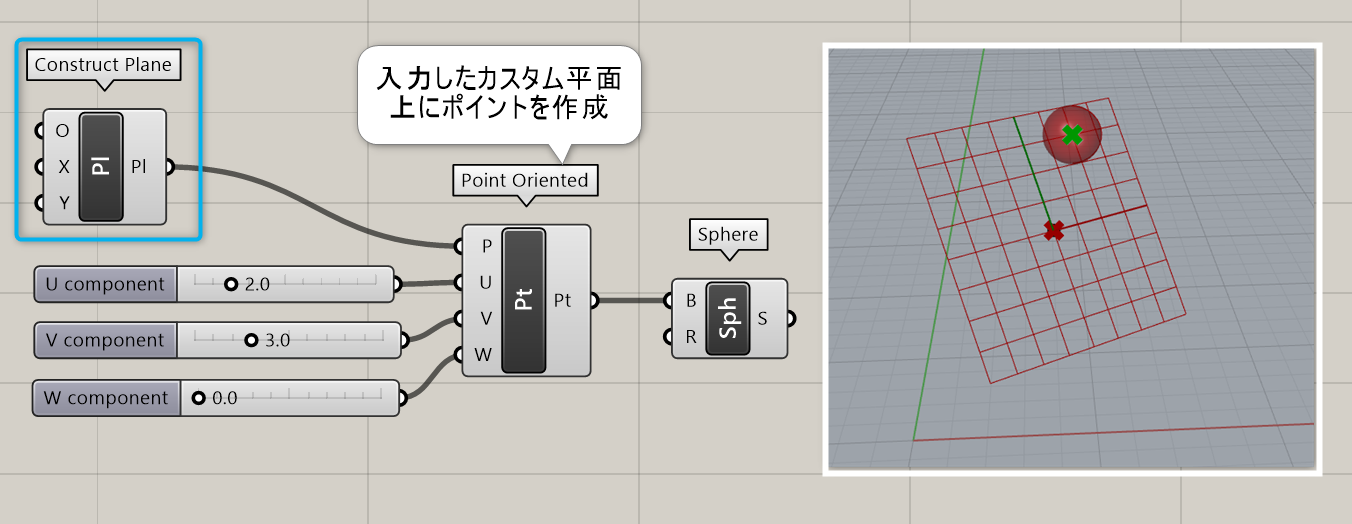
平面(Plane)とその平面でのUVW座標を入力し、点(Point)を作成する。
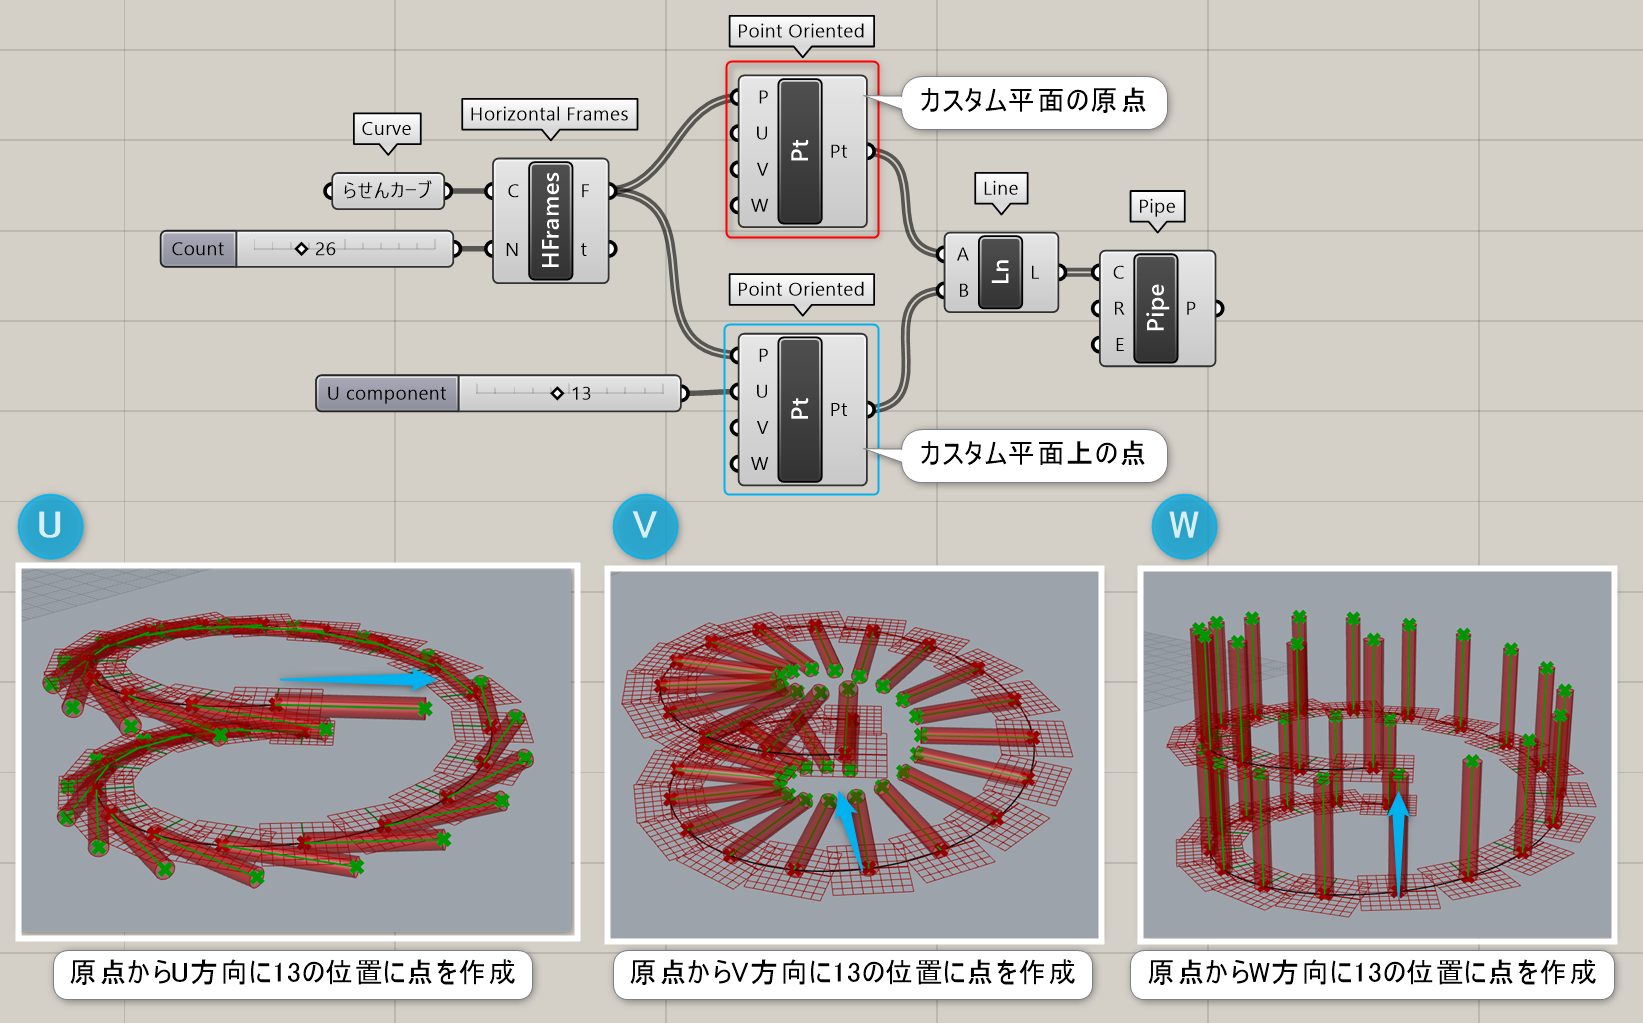
詳細1:入力したカスタム平面(Plane)上に、UVW座標を入力することで点(Point)を作成する。
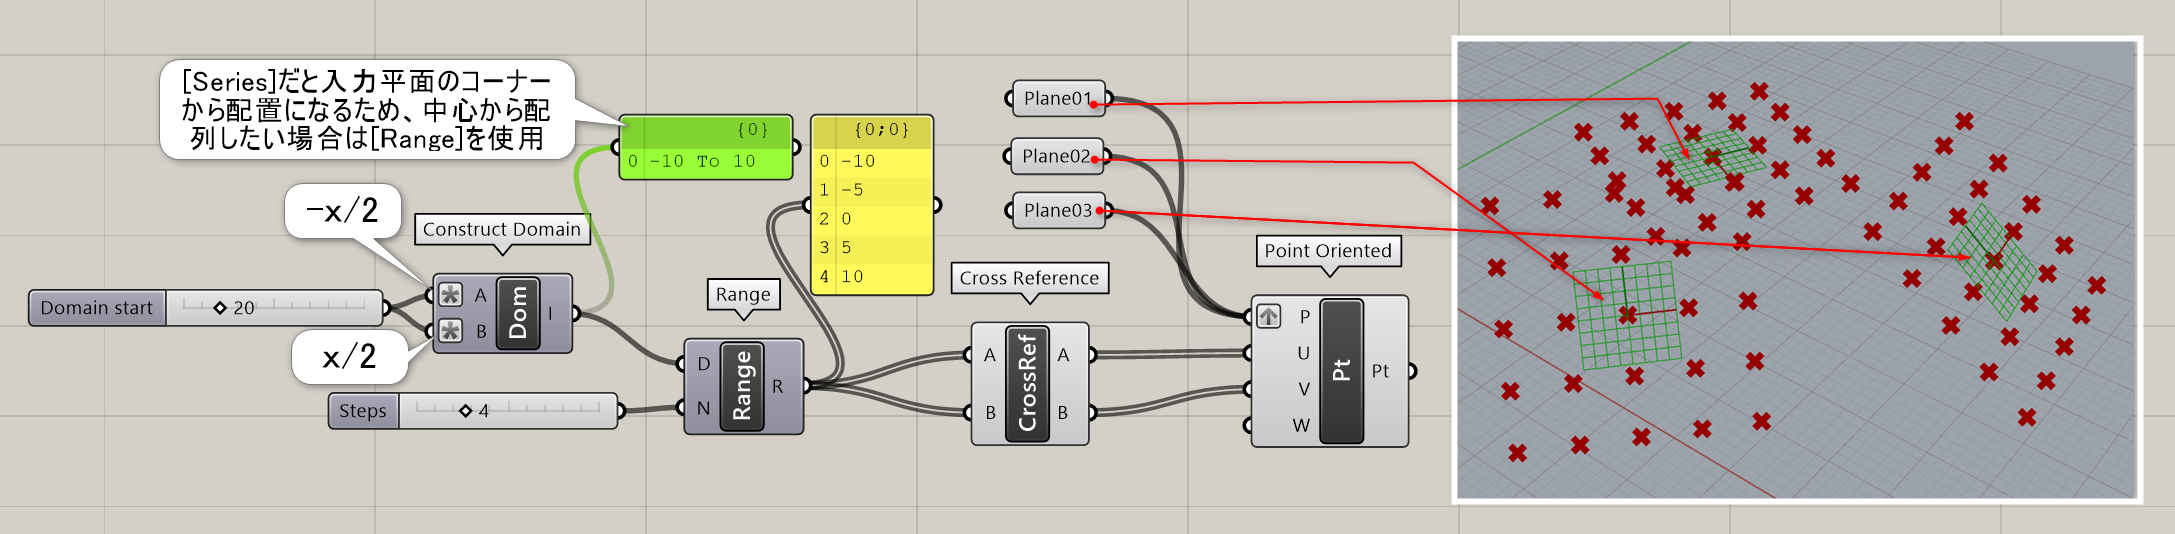
詳細2:[Point Oriented]のUVポイントの入力に[Cross Reference]を使用して、複数のUVポイントを格子状に配列した例。
詳細3:らせんカーブ上に[Horizontal Frames]で作成したカスタム平面上の原点から、[Point Oriented]でU/V/W方向それぞれにラインを作成し、[Pipe]で肉付けした例。
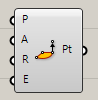
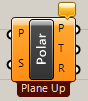
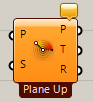
Point Polar
C

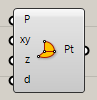
Vector>Point
極座標の様に平面(Plane)とXY平面の角度、Z方向の角度、オフセット距離(Distance)を指定し、点(Point)を作成する。
To Polar
C
Vector>Point
点(Point)と基準の平面(System)を決め、平面の軸をどれくらい回転したかを出力する。PhiからはX軸を、Thetaからは垂直方向の回転量を出力する。
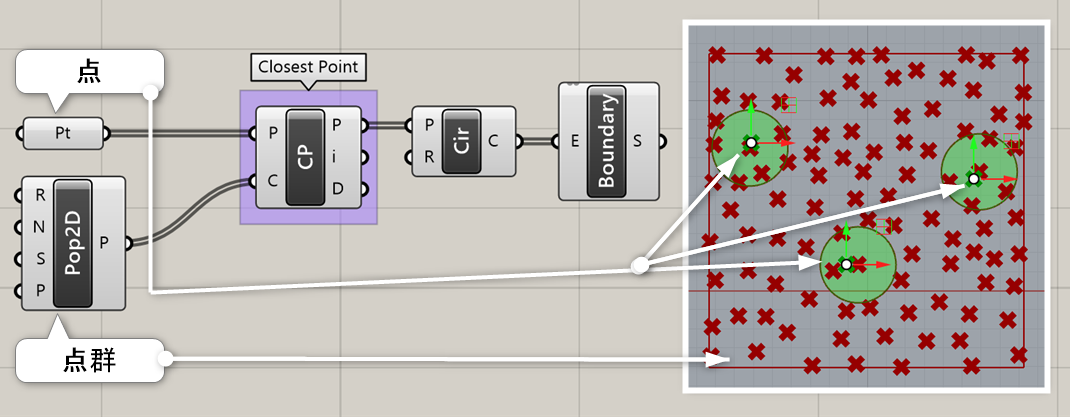
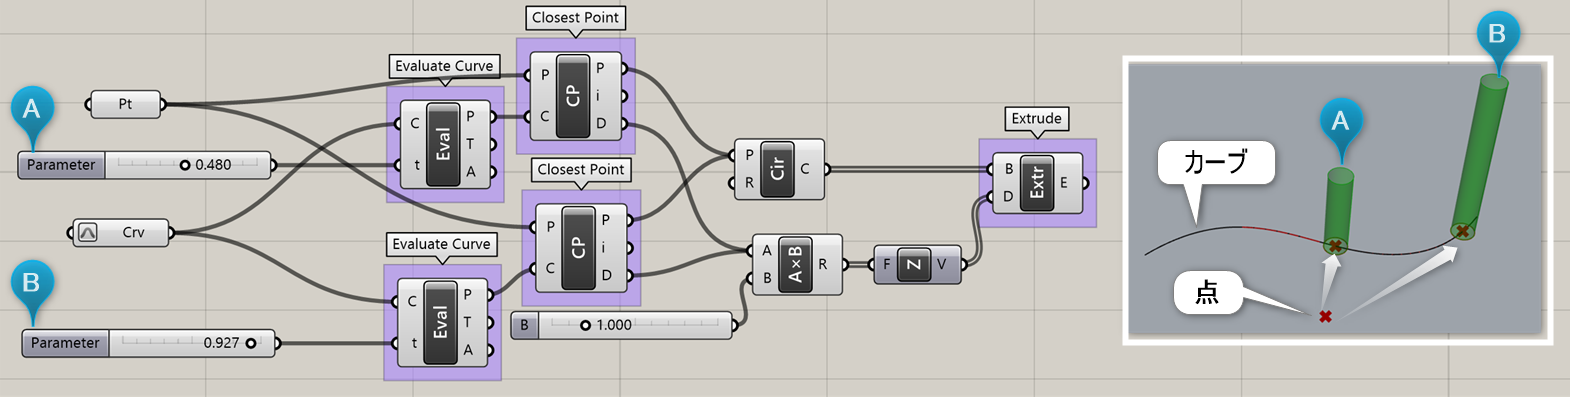
Closest Point
B


Vector>Point
点(Point)と、検索する点群(Cloud)を入力することで、点群の中から一番近い点(Point)を出力する。その際、点群のIndexと距離(Distance)も出力する。
詳細1:点(Point)と、検索する点群(Cloud)を入力することで、点群の中から一番近い点(Point)を出力する。その際、点群のIndexと距離(Distance)も出力する。
詳細2:カーブ上の点との距離に応じて円柱の高さが高くなるように設定した例。
詳細3:Closest Pointから出力されるDistanceを利用して、点群からの距離に応じて半径を変化させた例。
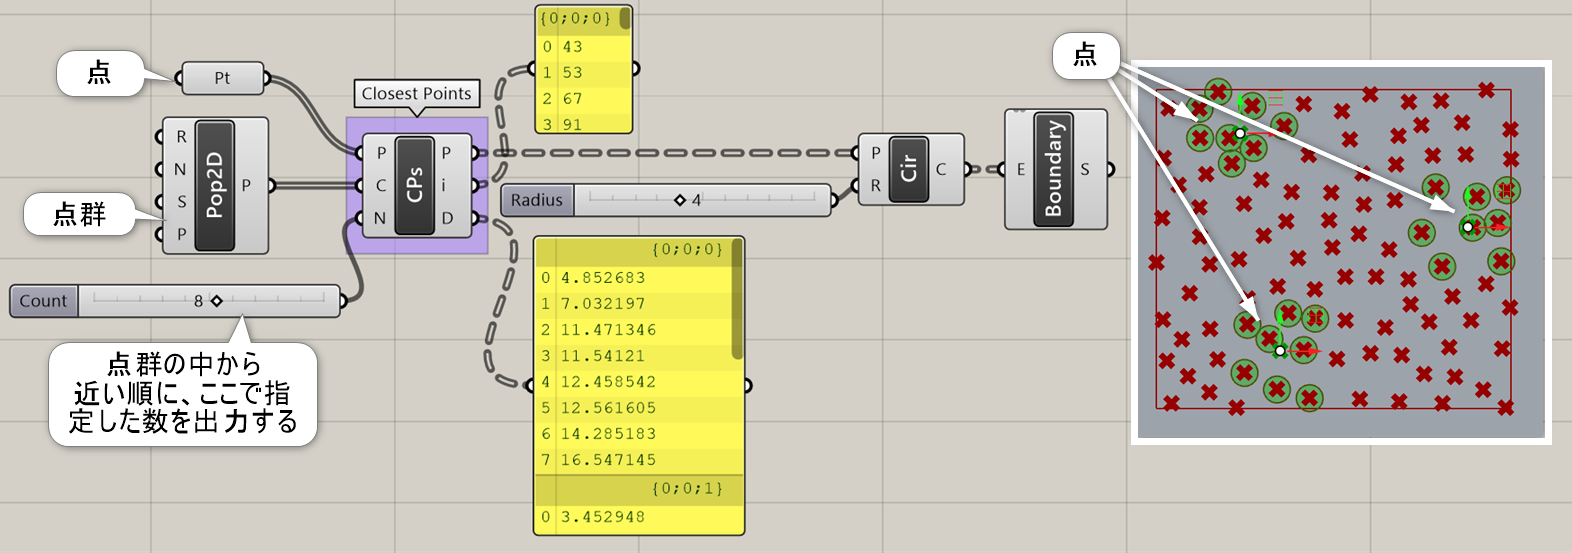
Closest Points
B


Vector>Point
点(Point)と、検索する点群(Cloud)、指定する数(Count)を入力することで、点群の中から指定する数だけ点(Point)を出力する。その際、点群のIndexと距離(Distance)も出力する。
詳細1:点(Point)と、検索する点群(Cloud)、指定する数(Count)を入力することで、点群の中から近い順に指定した数の点(Point)を複数出力する。(類似コンポーネントの[Closest Point]は一番近い1点しか出力しない)その際、点群のIndexと距離(Distance)も出力する。
Cull Duplicates
A
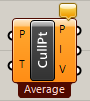
Vector>Point
複数の点(Points)を入力し、許容差(Tolerance)以内の重複する点を削除する。コンポーネントを右クリックすることで、削除するオプションを変更できる。
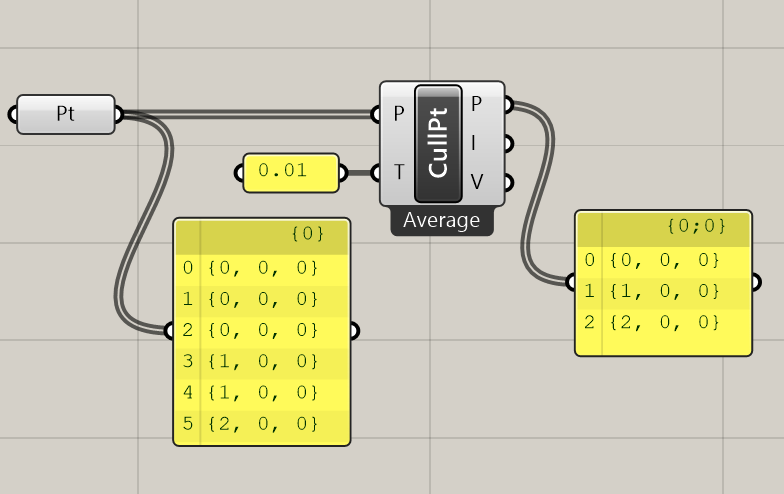
詳細1:複数の点(Points)を入力し、許容差(Tolerance)以内の重複する点を削除する。
画像では、{0,0,0}の座標に3つ、{1,0,0}に2つ点が存在していたが、重複するものが削除されている。
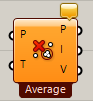
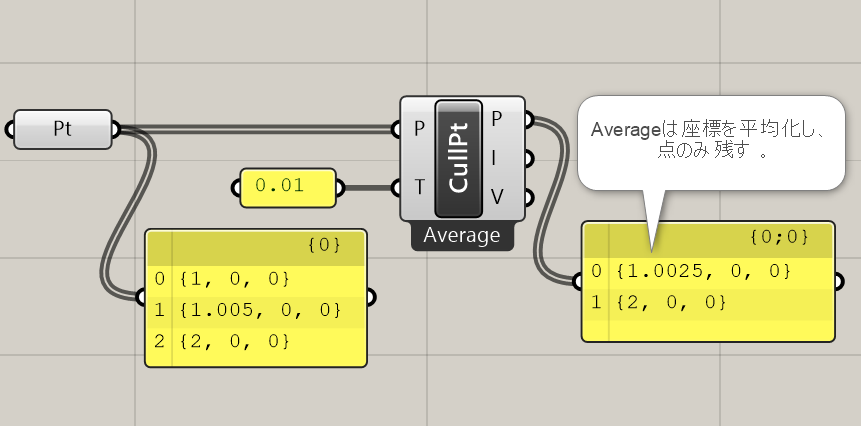
詳細2:コンポーネントを右クリックすることで、削除するオプションを変更できる。
Averageは、平均値の点のみ残す。
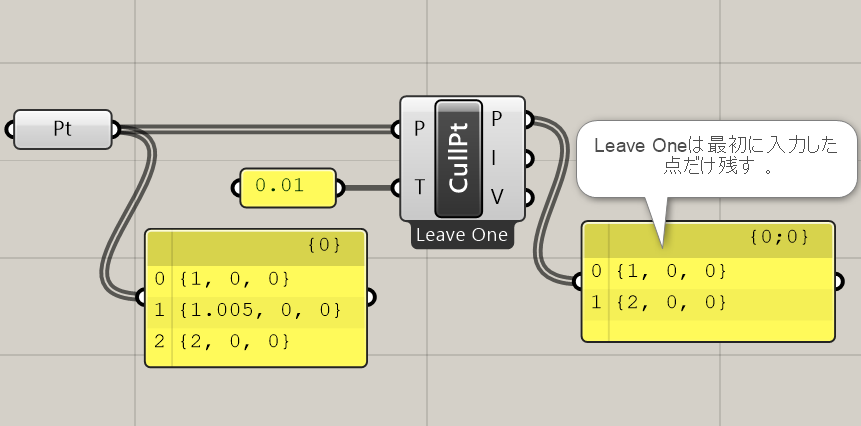
詳細3:Leave Oneは、最初に入力された点のみ残す。
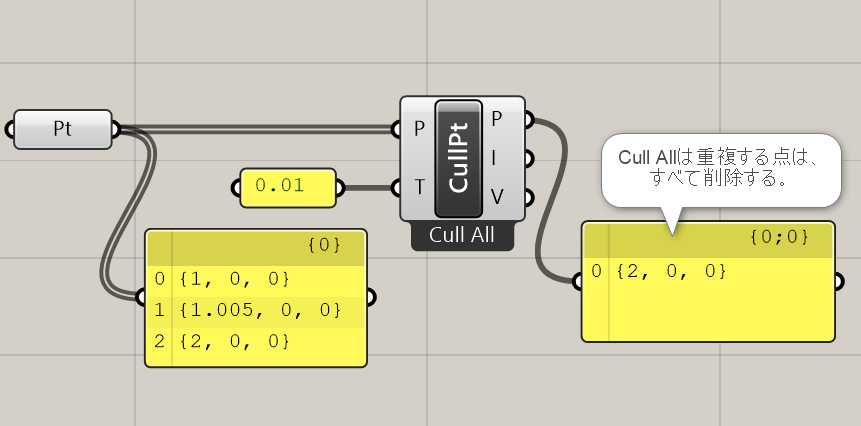
詳細4:Cull Allは、重複する点を全て削除する。
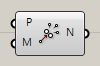
Point Groups
B


Vector>Point
複数の点(Points)を指定した距離(Distance)以内のものをまとめて、同じ階層のデータとして出力する。
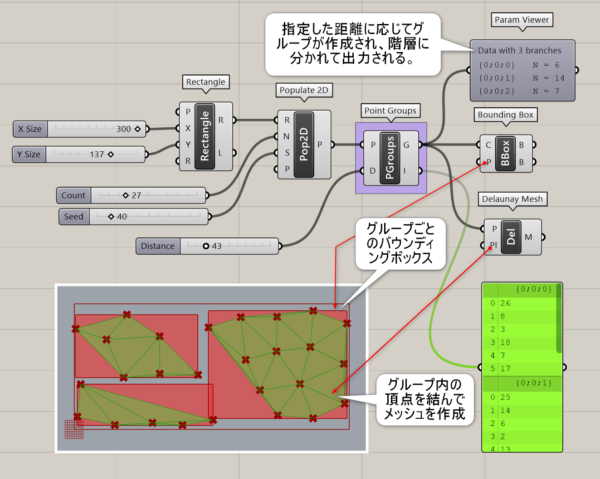
詳細1:複数の点(Points)を、指定した距離(Distance)以内のものをまとめて、同じ階層のデータとして出力する。図は、[Bounding Box]にてグループごとにバウンディングボックスを作成した例と、[Delaunay Mesh]にてグループ内の頂点間を結んでメッシュを作成した例。
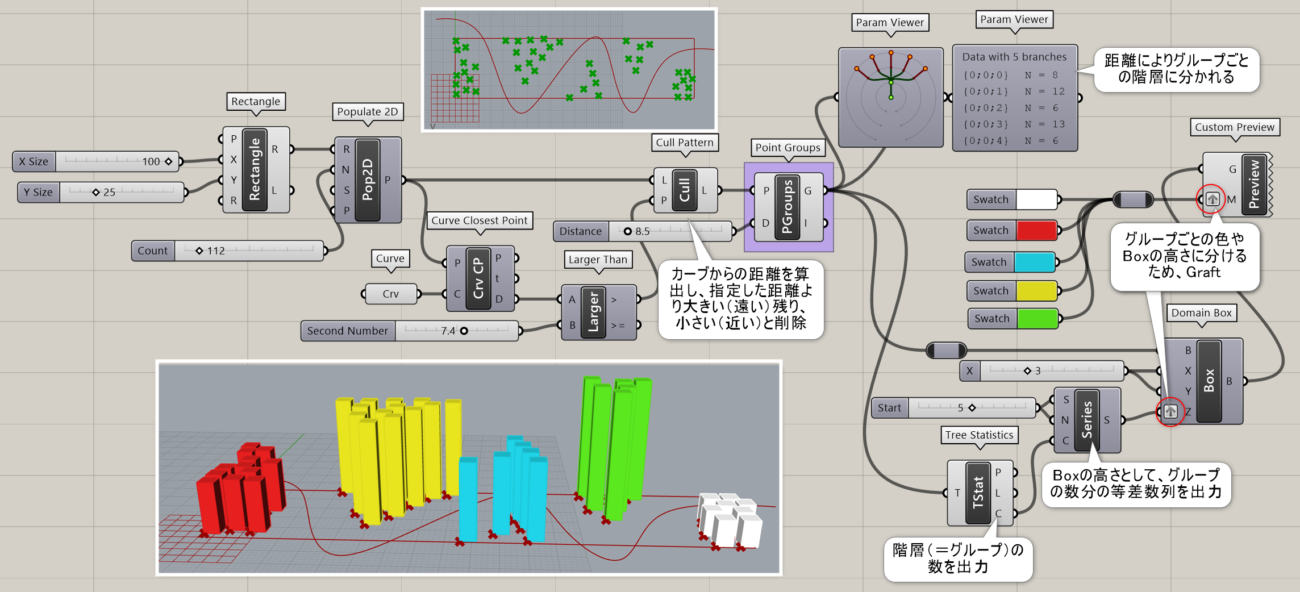
詳細2:[Populate 2D]で作成したポイント群を、[Curve Closest Point]と[Larger Than][Cull Pattern]によってブロックに分け、[Point Groups]によって5つのグループに分けたものを色分けし、グループごとの高さを持つBoxを配置した例。
Project Point
B


Vector>Point
点(Point)を方向ベクトル(Direction)の向きでジオメトリ上に投影する。投影する箇所が複数ある場合は、一番近い位置に作成される。
詳細1:点(Point)を指定した方向ベクトル(Direction)の向きでジオメトリ上に投影する。投影する箇所が複数ある場合は、一番近い位置に作成される。
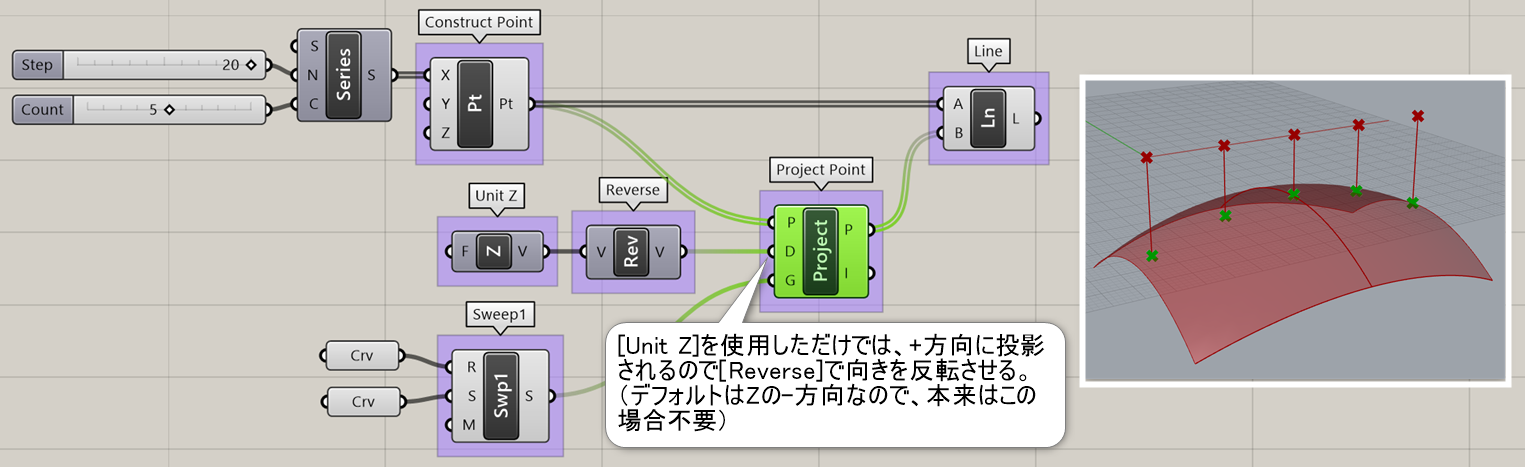
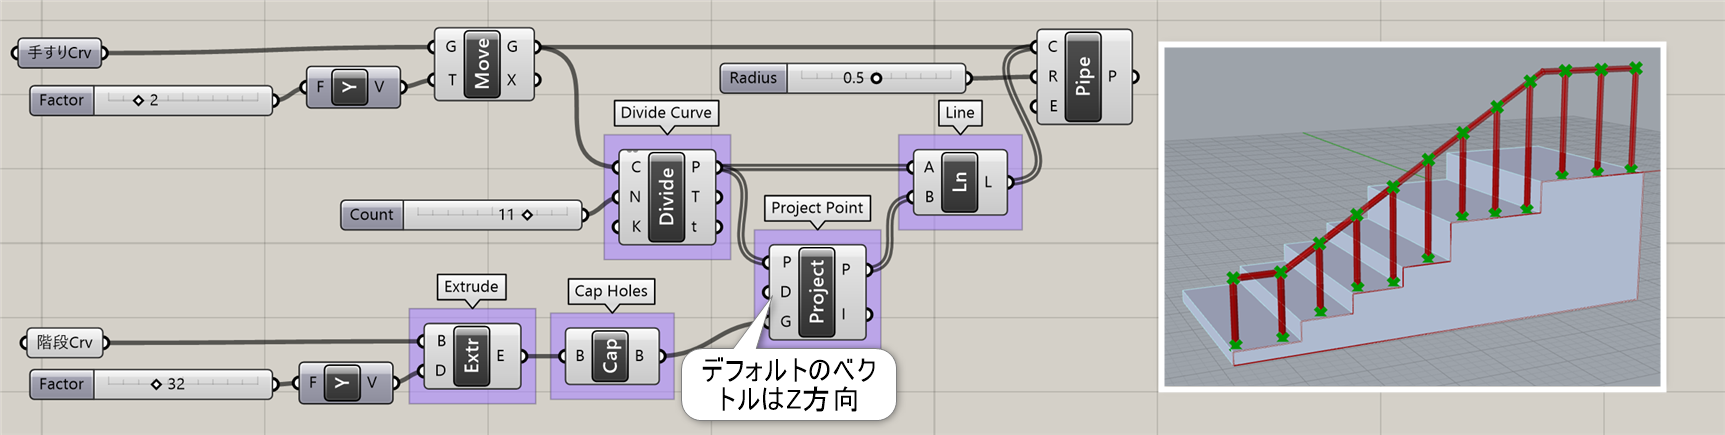
詳細2:手すりのカーブを分割したポイントから、階段のサーフェスまでZ方向にポイントを投影し、柱を作成した例。
Pull Point
B


Vector>Point
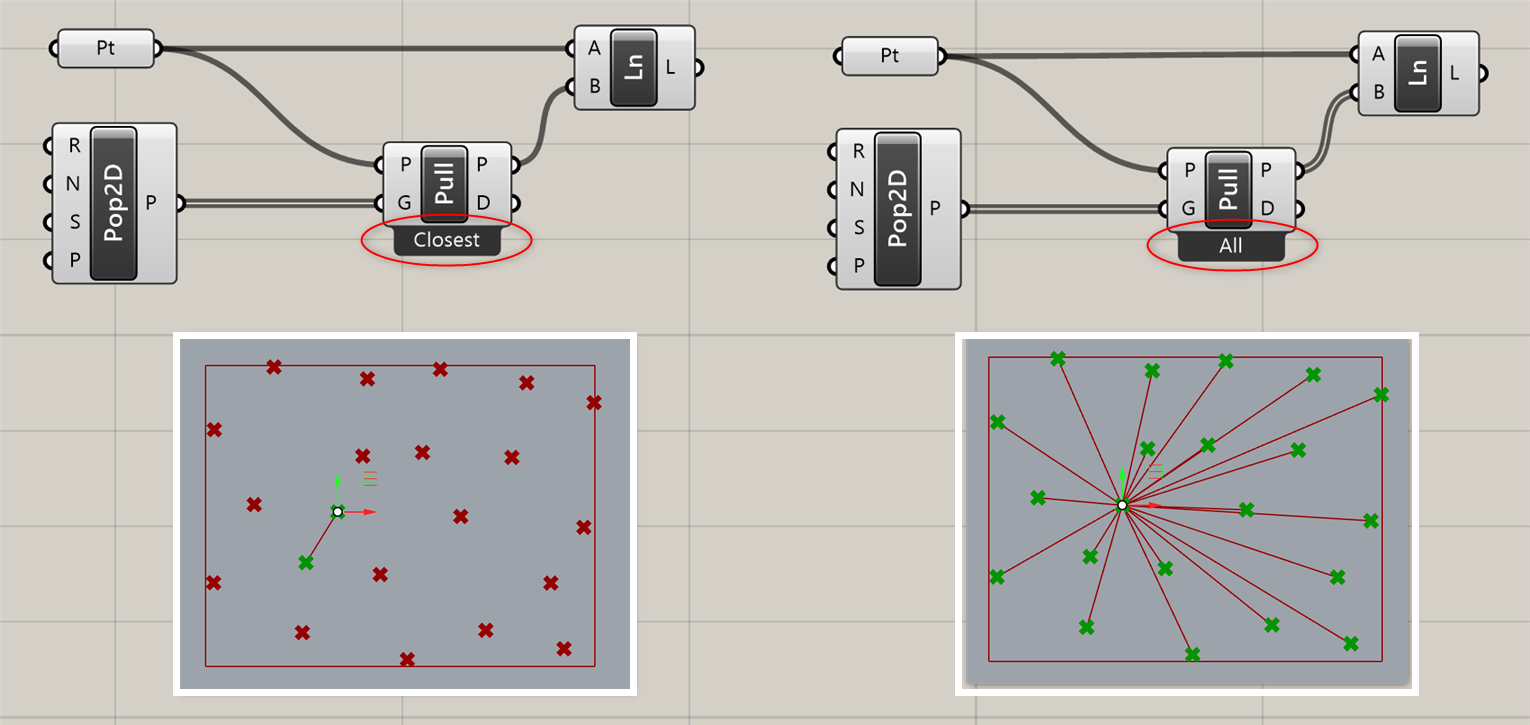
点(Point)をジオメトリに引き付けるように移動し、点(Point)と距離(Distance)を出力する。コンポーネントを右クリックすることで、複数ジオメトリが入力された時、最も近い点だけを出力するか、すべての点を出すかを変更できる。
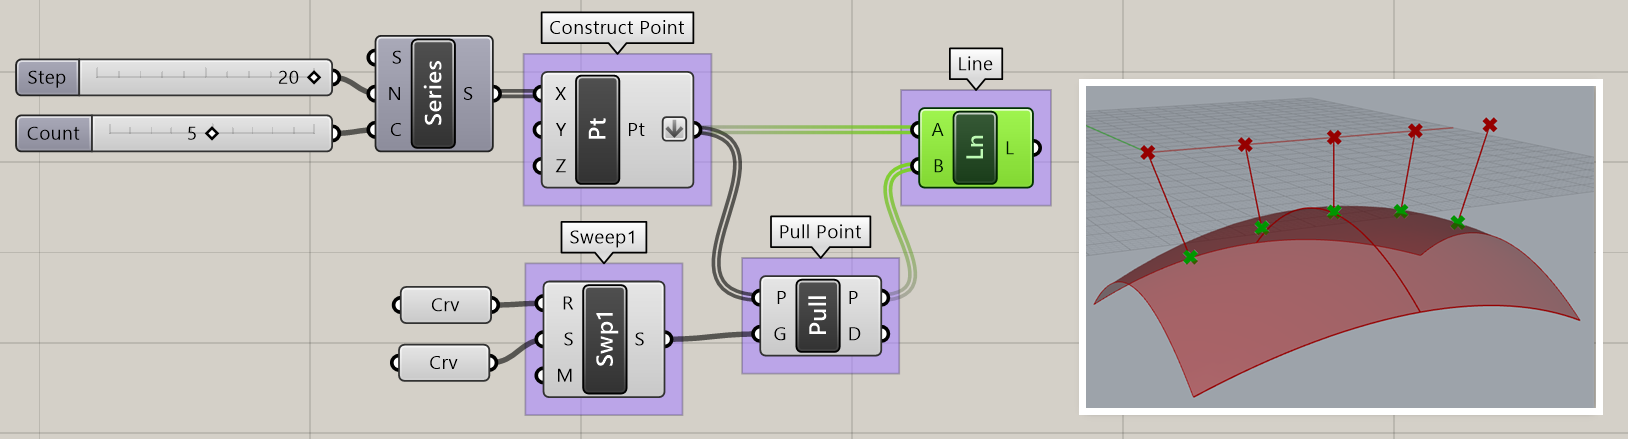
詳細1:点(Point)をジオメトリに引き付けるように移動し、点(Point)と距離(Distance)を出力する。[Project Point]と異なり、点はサーフェス上の最も近い位置に移動する。
詳細2:コンポーネントを右クリックして、複数ジオメトリが入力された時、最も近い点だけ(Closest)を出力するか、すべての点(All)を出力するかを切替えできる。
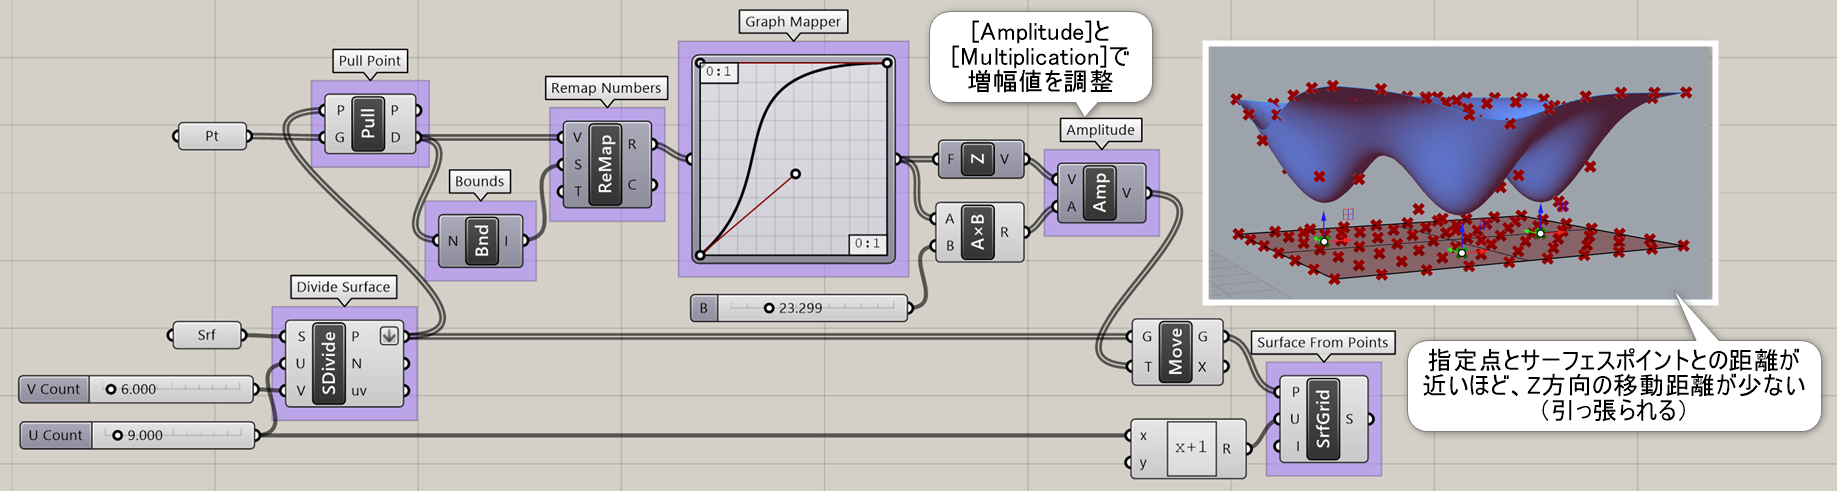
詳細3:[Pull Point]から出力されるDistanceを利用して、指定した3つの点との距離に応じてサーフェスポイントがZ方向に移動するように設定し、結果的に指定点にサーフェスが引っ張られるようにした例。
Sort Along Curve
B


Vector>Point
複数の点(Points)を入力した曲線(Curve)の順に並び替えて出力する。
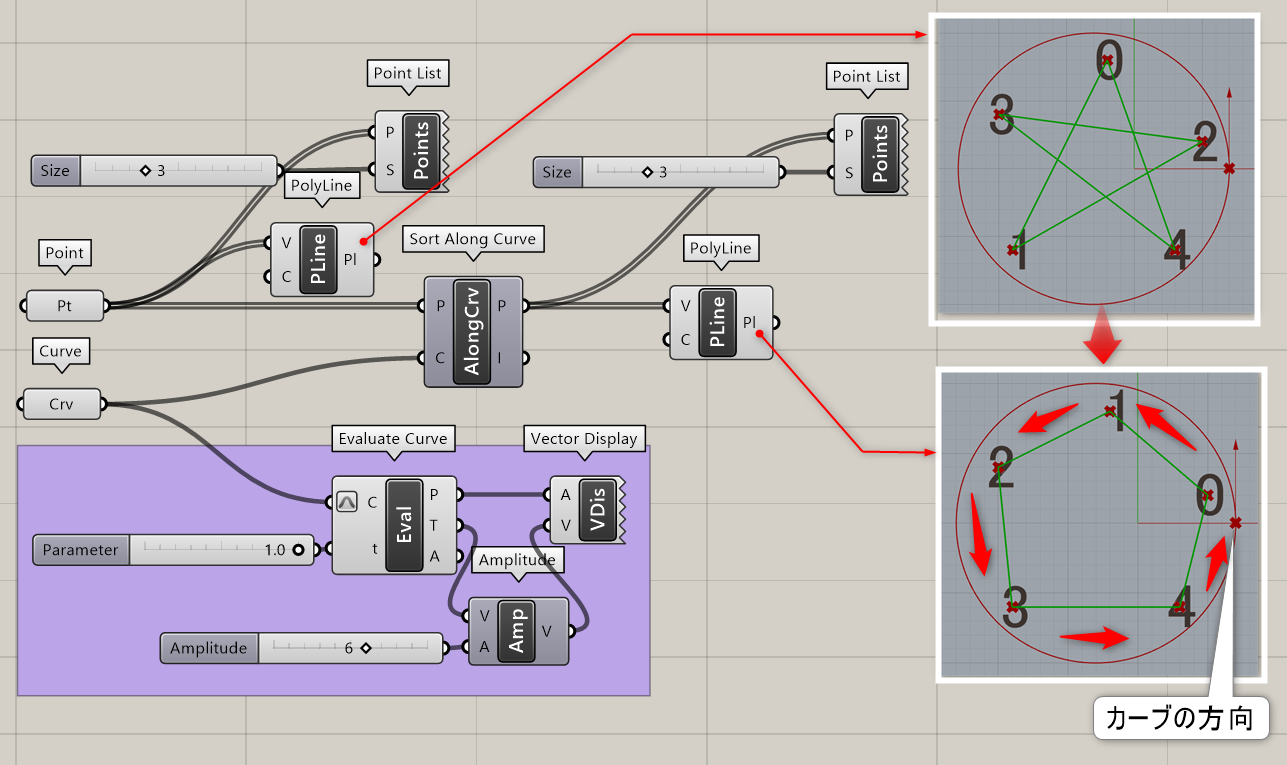
詳細1:複数の点(Points)を入力した曲線(Curve)の方向に並び替えて出力する。図は、星形の順にセットされたポイント群を、セットした円曲線の方向に並び替えてラインを引いた例。
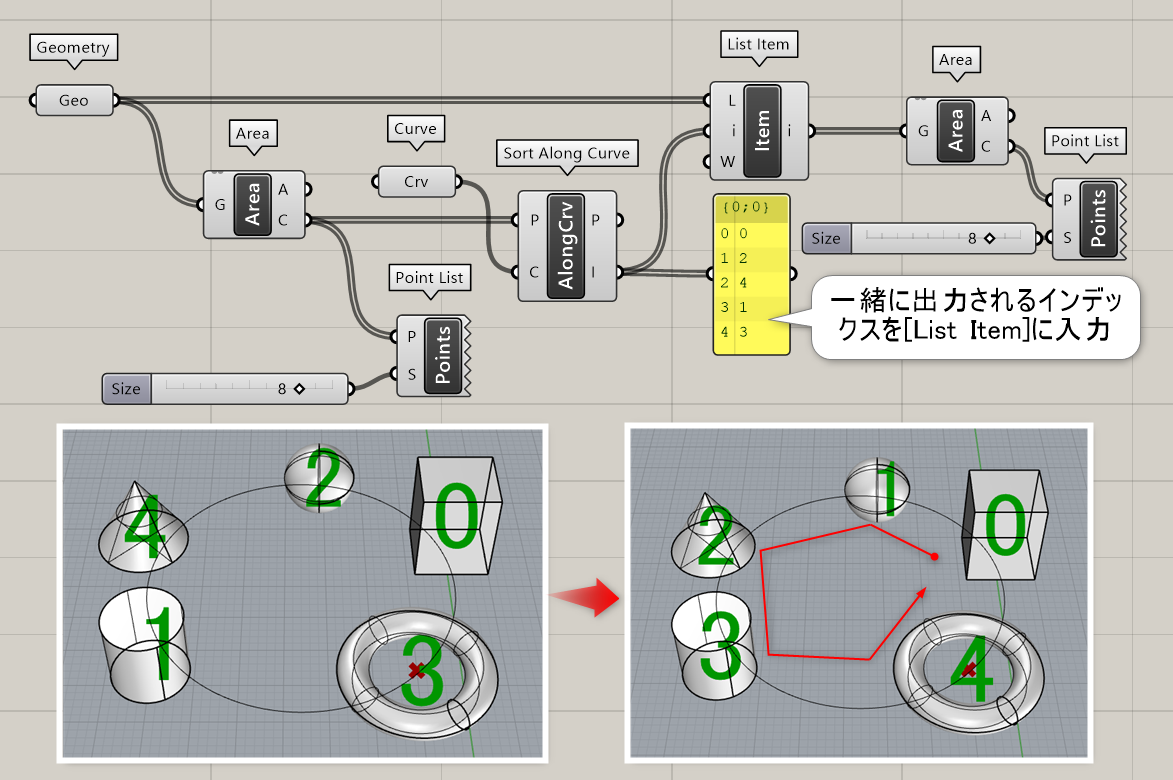
詳細2:並び替えたポイントと同時にインデックスも出力されるので、基準点([Area]から出力される中心点など)を使用してどのタイプのジオメトリでも並べ替えることができる。
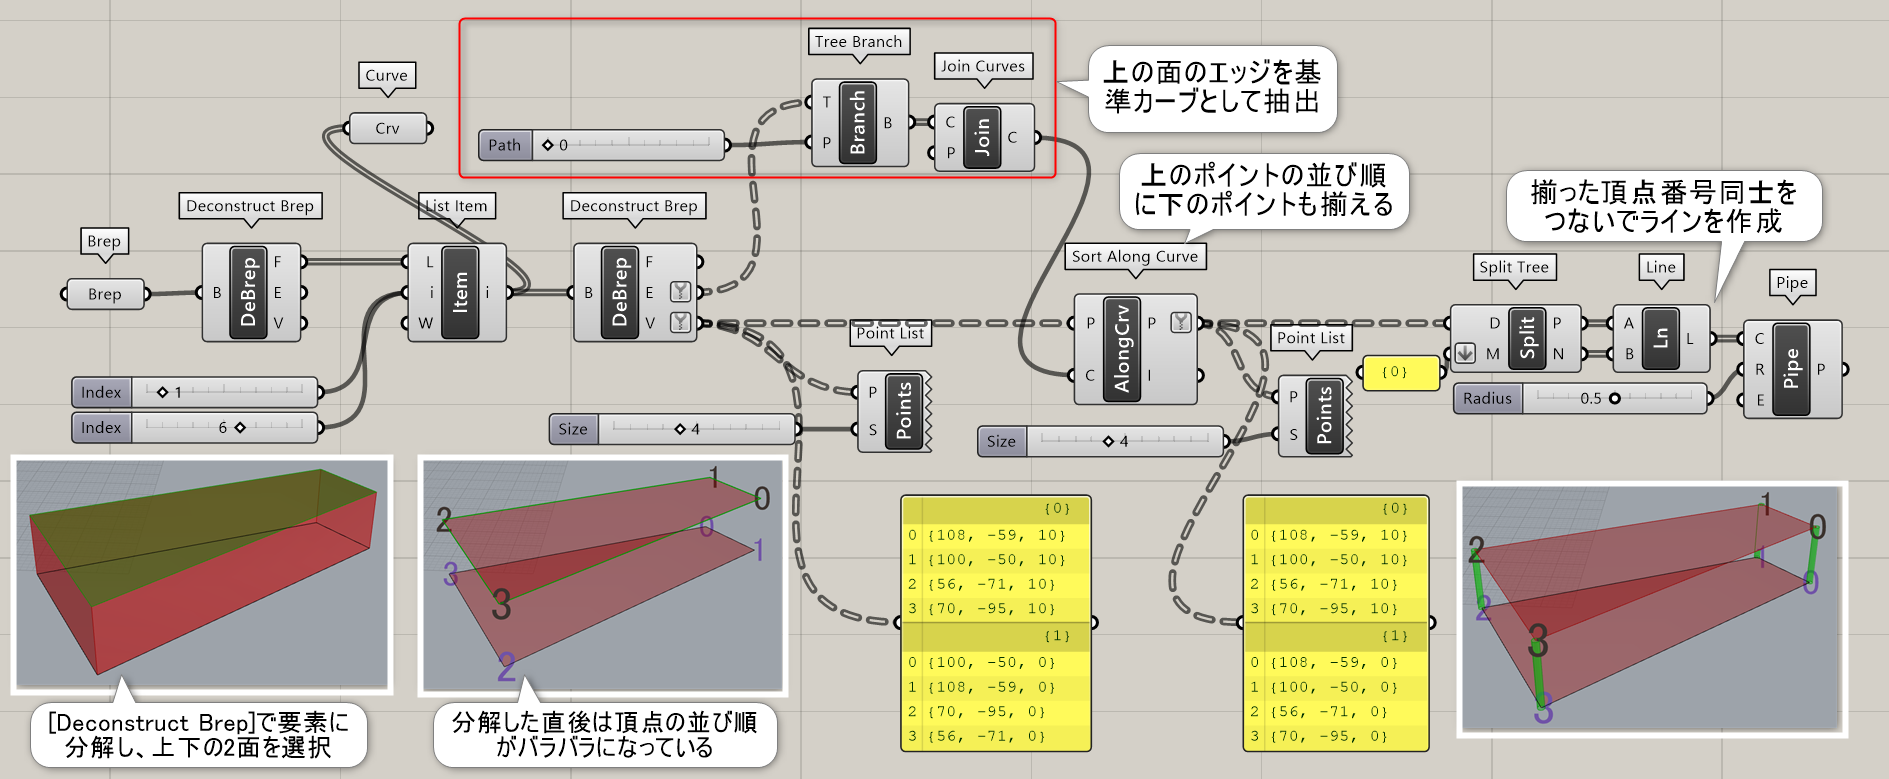
詳細3:分解したBrepオブジェクトの上下面の頂点がバラバラになっているのを、[Sort Along Curve]で並べ替え、上下にラインを引いた例。
Sort Points
B


Vector>Point
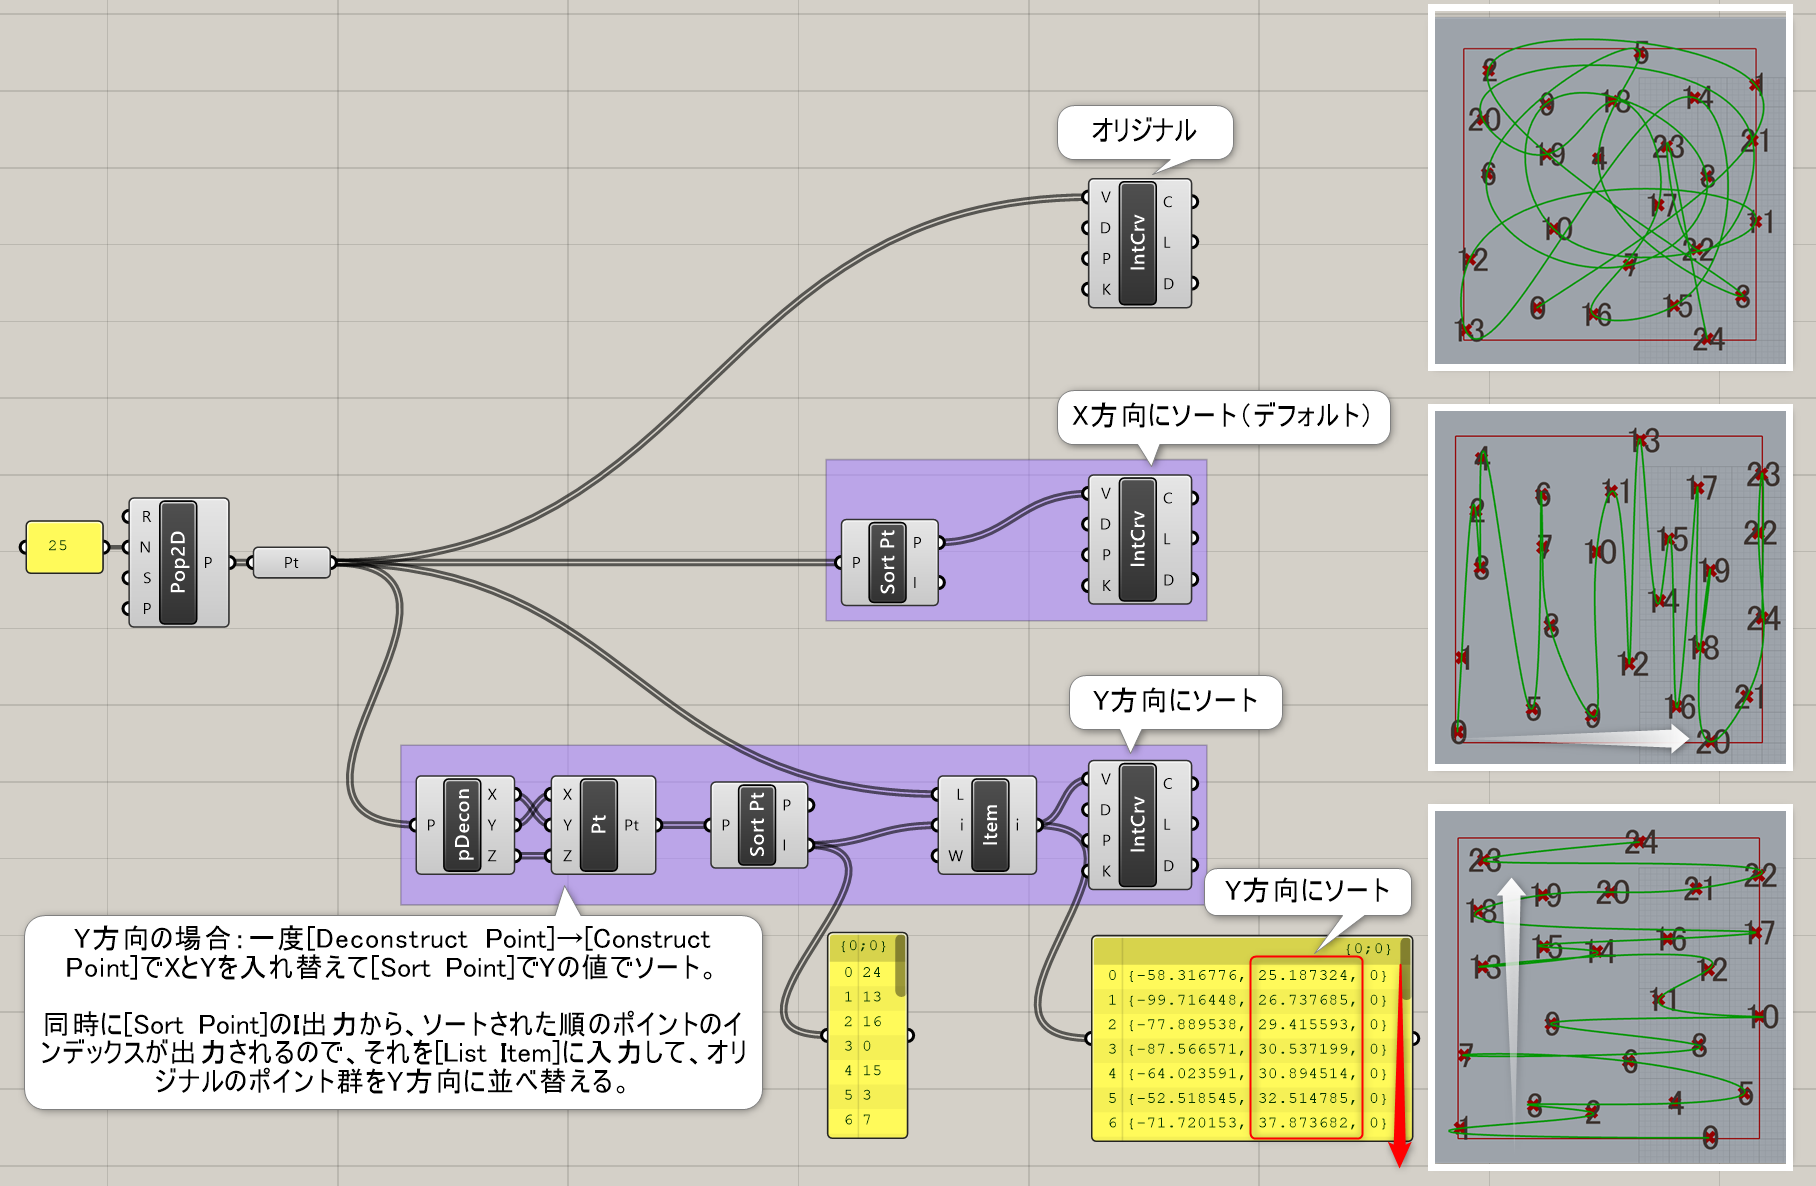
ユークリッド座標{最初にX,次にY,その次にZ}を見て、点のアイテムの順番を並べ直す。
詳細1:ユークリッド座標{最初にX,次にY,その次にZ}を見て、点のアイテムの順番を並べ直す。
先にX座標をソートするため、Y方向に並べ替えるには、一度ポイント座標を[Deconstract Point]で分解し、XとYを入れ替えてソートする事で対応できる。ソート後は、再度[Decontruct Point]と[Construct Point]でXYを入れ替え直すか、図のように[Sort Points]から出力されたインデックスを利用して、オリジナルのポイントを[List item]で並べ替えてY座標に戻す。
Point Cloud Attributes
C
Vector>Point
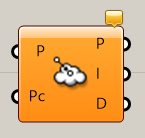
点群(Cloud)を入力し、各種値を設定、または確認できる。項目は、点の座標値(Locations)、ベクトル(Normals)、色(Coulours)、点ごとの設定値(Extra)、隠れているかどうか(Hidden)である。
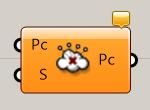
Point Cloud Closest Point
C
Vector>Point
Reduce Point Cloud
C
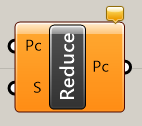
Vector>Point
Vector
Deconstruct Vector
C


Vector>Vector
ベクトルをXYZそれぞれの構成要素に分解する。XYZからはそれぞれの方向の移動量が出力される。
Vector XYZ
B


Vector>Vector
XYZの値をそれぞれ入力することで、ベクトルとその長さ(Length)を出力する。
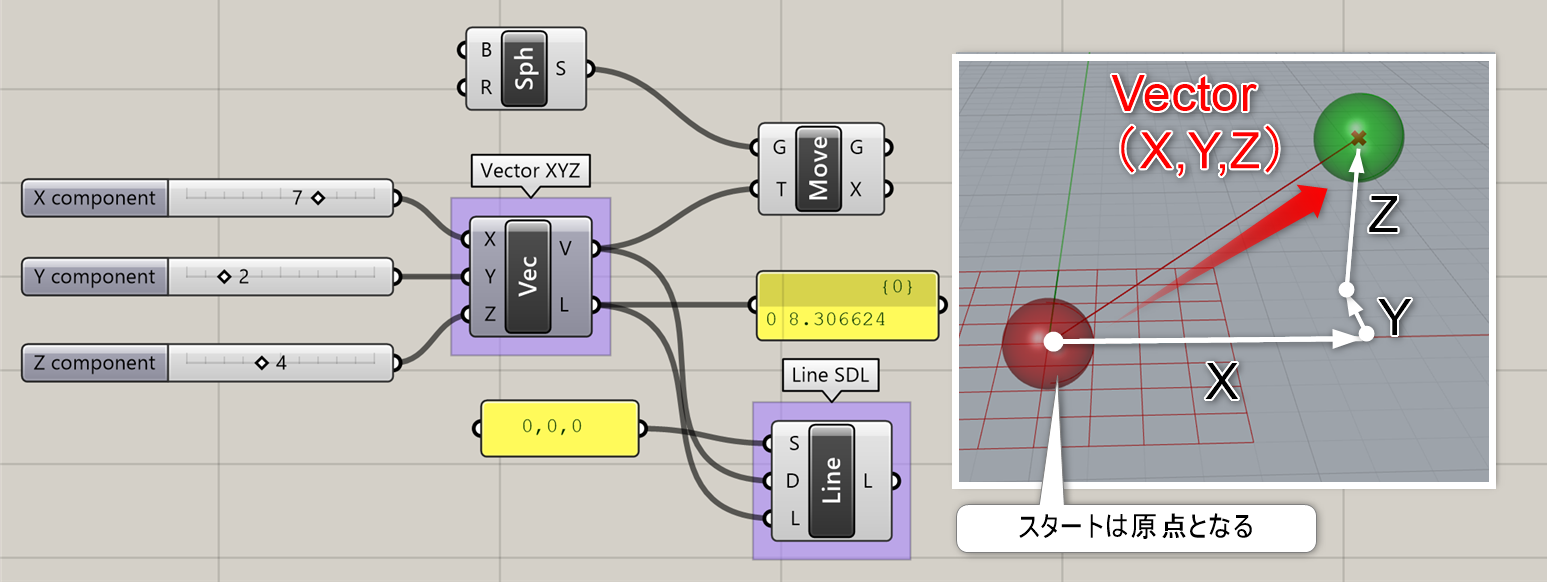
詳細1:XYZの座標(数値)をそれぞれ入力することで、原点からその座標点までのベクトル(方向)とその長さ(Length)を出力する。2点間の座標を指定する場合は、[Vector 2Pt]を使用。
図は、[Vector XYZ]から出力されるベクトルと長さを使用して、[Line SDL] でラインを引き、球をベクトルの先に移動(コピー)した例。
Unit Vector
B


Vector>Vector
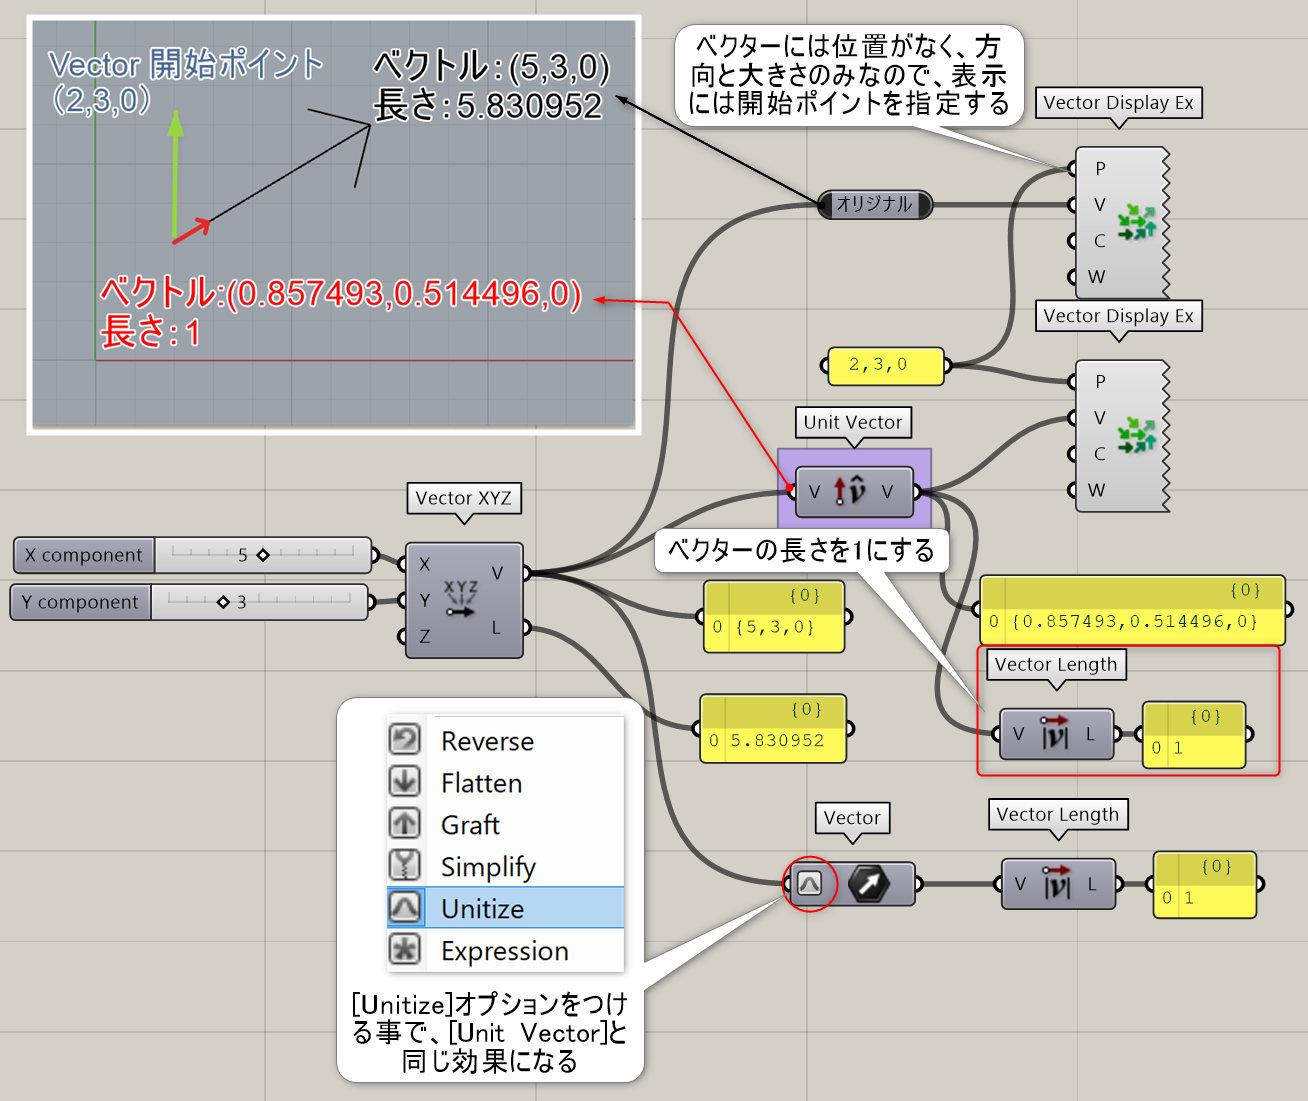
入力したベクトルを、長さが1の単位ベクトルに変換する。
詳細1:入力したベクトルを、長さが1の単位ベクトルに変換する。また、このコンポーネントは右クリックによるオプションから[Unitize]を適用した時と同義となる。サーフェスの法線や曲線の接線を取得するなど、ベクトルの大きさ(長さ)ではなく方向のみを考慮に入れる場合は、[Unit Vector]または[Unitize]による単位ベクトル化を行う手法が有効である。
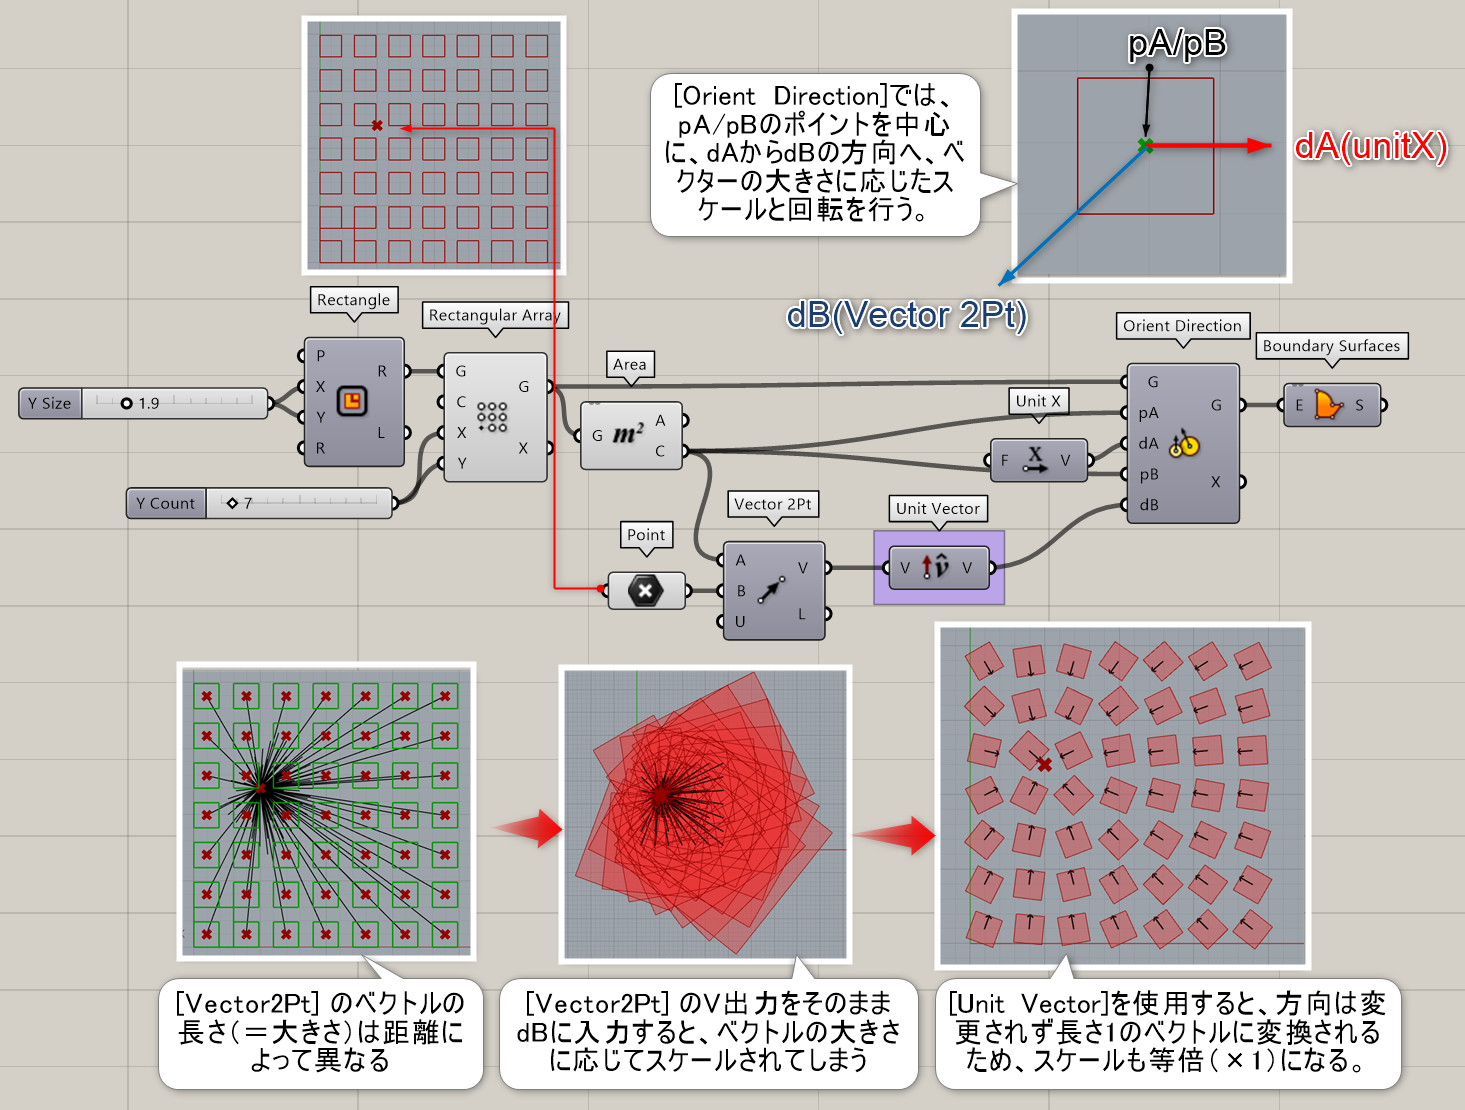
詳細2:[Rectangle]を指定したポイントに向けて[Orient Direction]によって回転・スケールさせる際に、[Unit Vector]によりベクトルの大きさ(長さ)を省き、方向のみを取得して回転させた例。
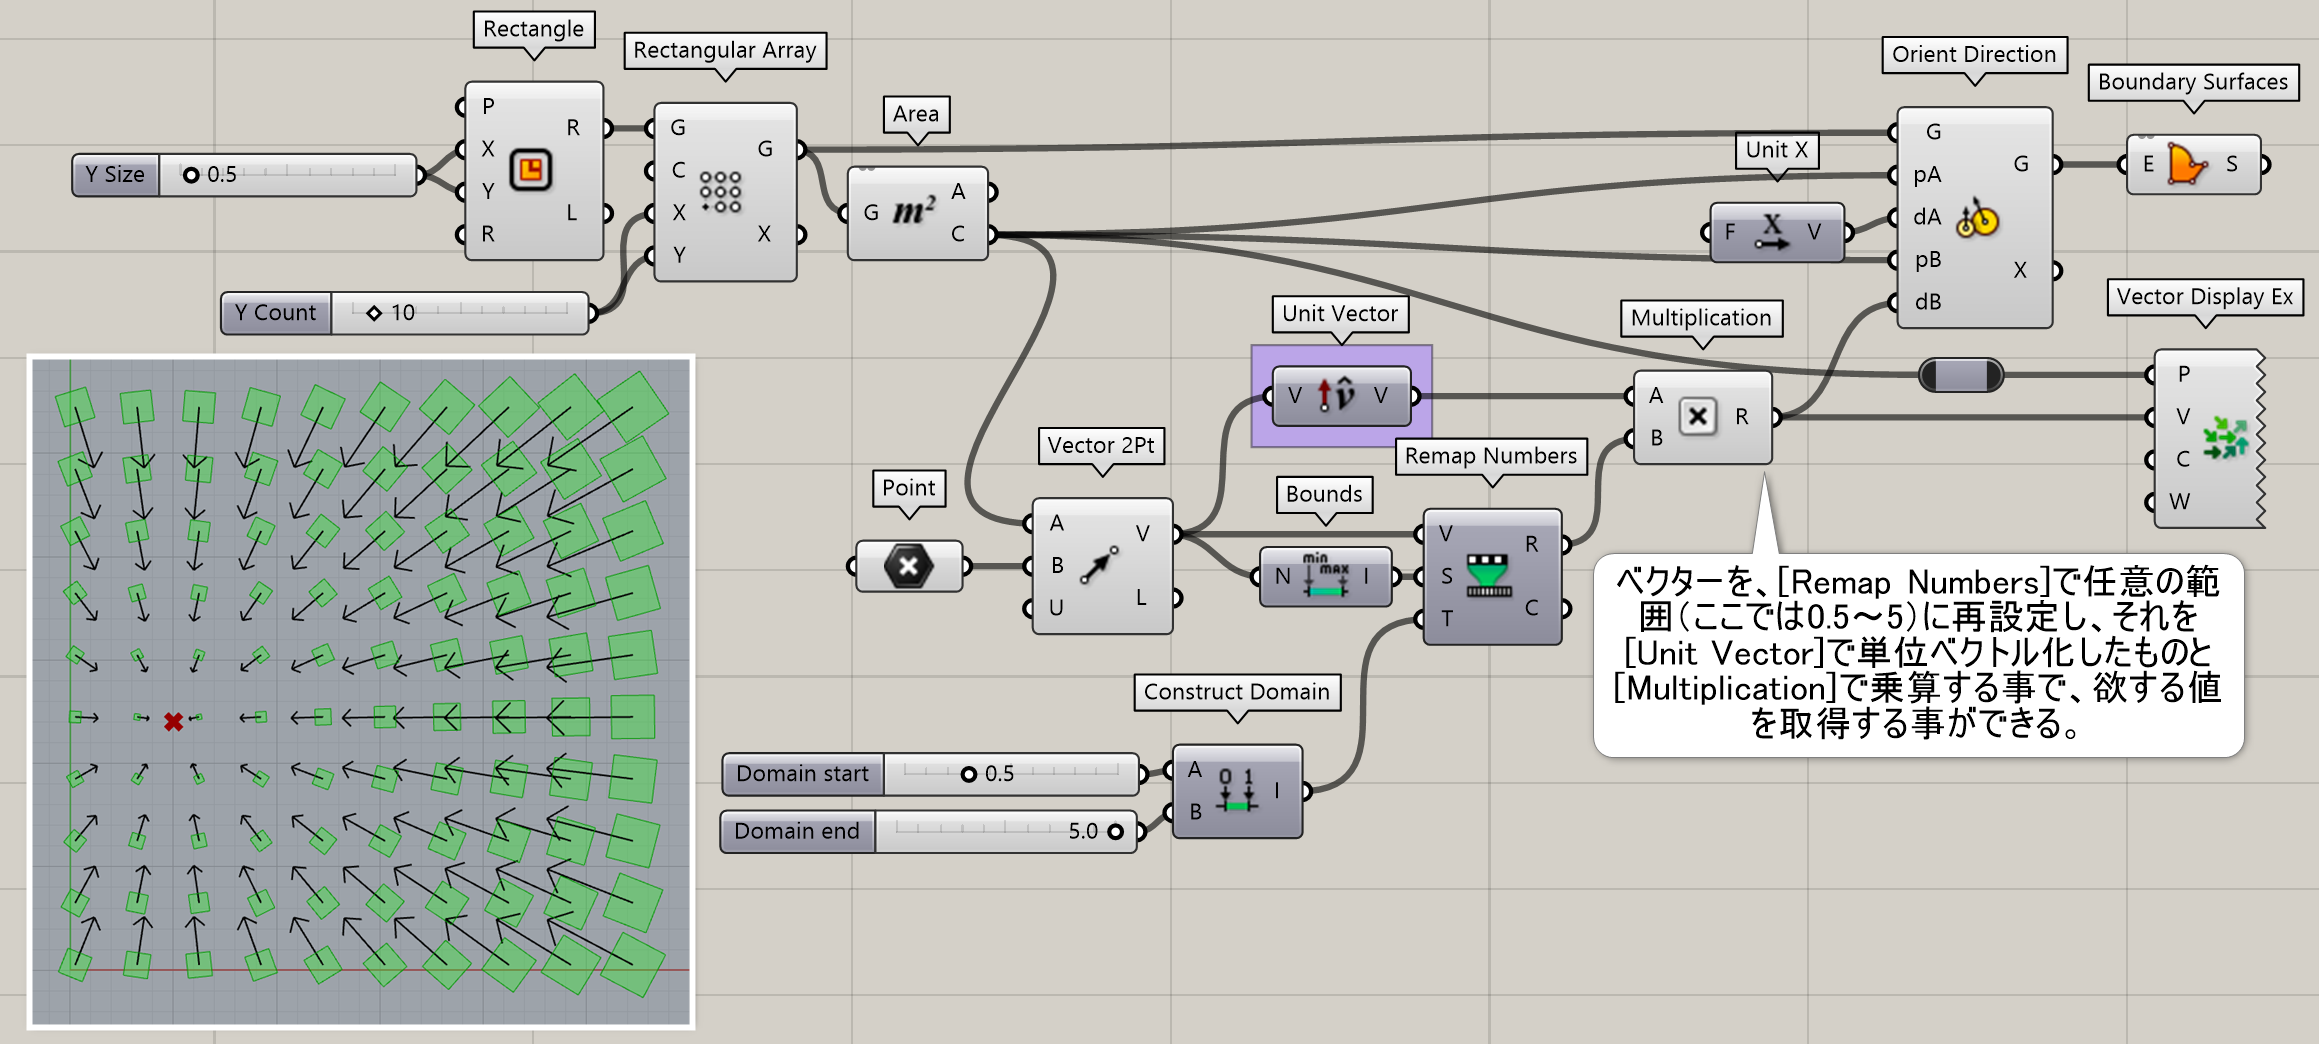
詳細3:様々な大きさ(長さ)のベクターを、[Remap Numbers]で任意の範囲(ここでは0.5~5)に再定義し、[Unit Vector]で単位ベクトル化したものと[Multiplication]で乗算する事で、任意の範囲内にスケール値を調整する事ができる。
Unit X
B


Vector>Vector
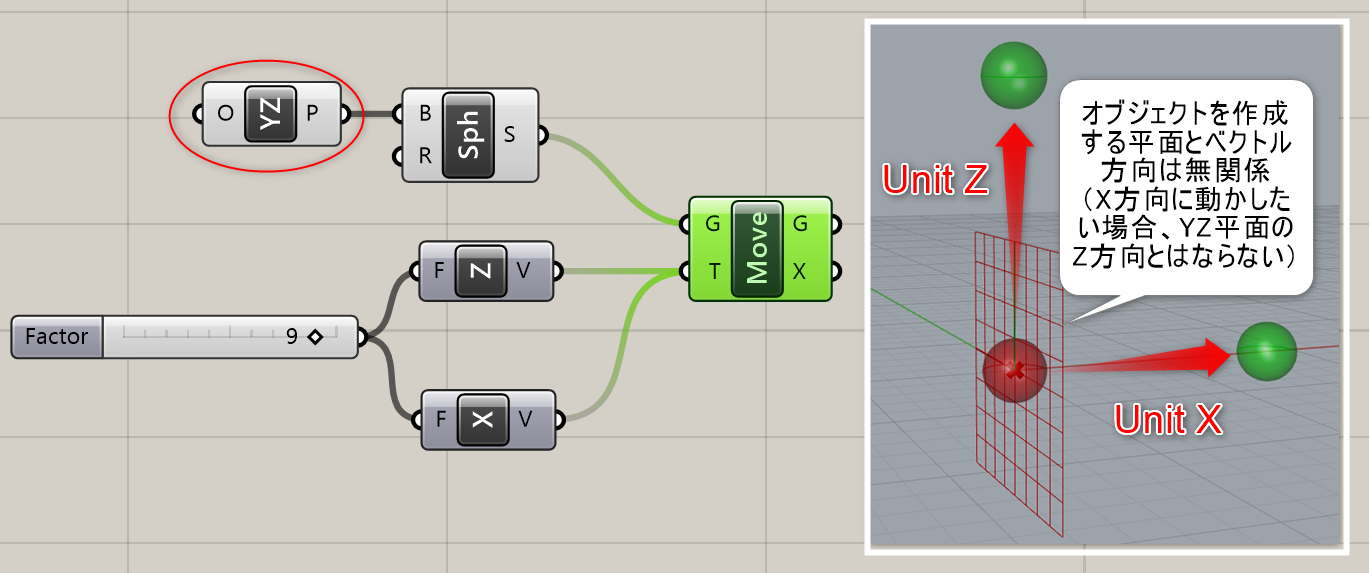
X軸方向のベクトルを作成する。数値(Factor)を入力すると、その長さを持ったベクトルを作成する。
詳細1:X軸方向のベクトルを作成する。数値(Factor)を入力すると、その長さを持ったベクトルを作成する。図は[Move]に[Unit X]で方向を与えた例。
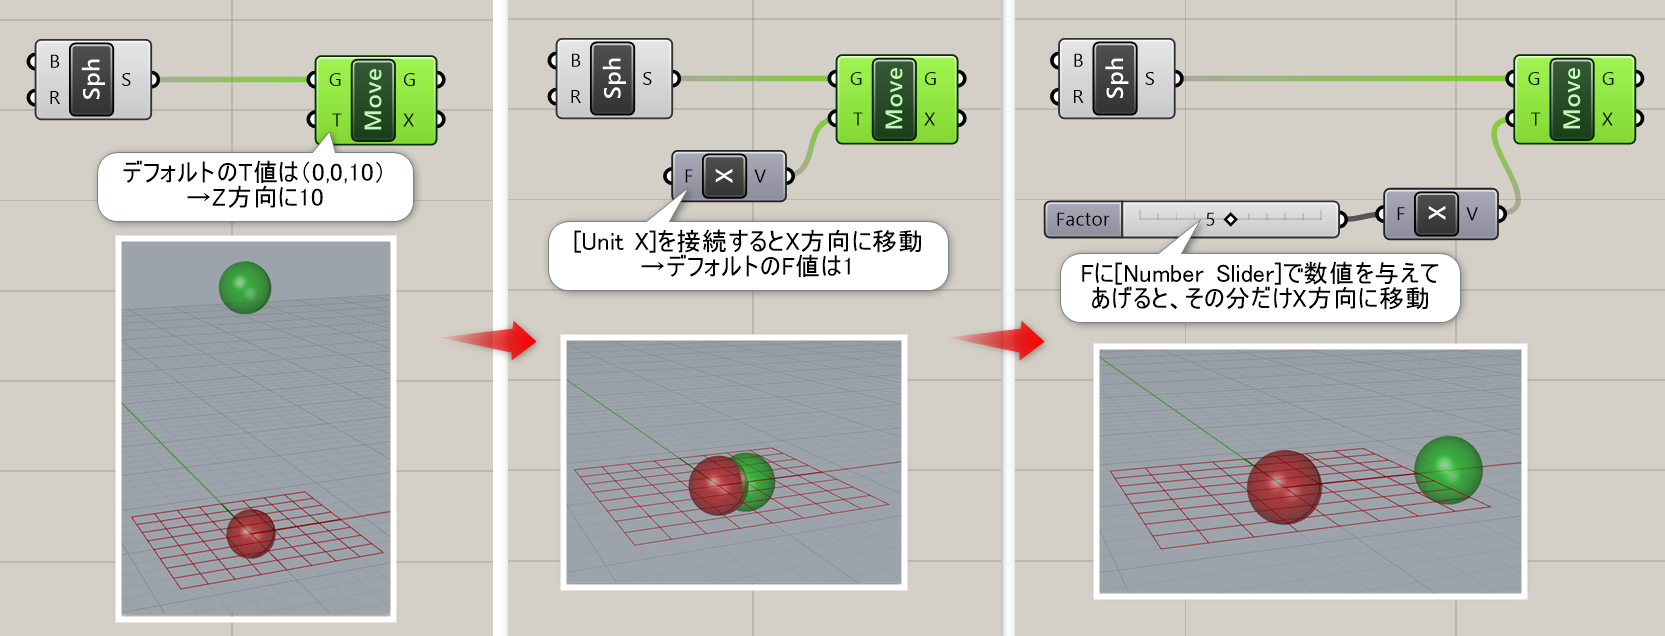
詳細2:オブジェクトの平面と移動方向のベクトルには関係はなく、単純に移動したい方向のベクトルを指定すれば良い。
Unit Y
B


Vector>Vector
Y軸方向のベクトルを作成する。数値(Factor)を入力すると、その長さを持ったベクトルを作成する。
詳細1:Y軸方向のベクトルを作成する。数値(Factor)を入力すると、その長さを持ったベクトルを作成する。図は、ポイントを[Unit Y]でY方向にずらし、そこからY方向へラインを作成した例。

Unit Z
B

Vector>Vector
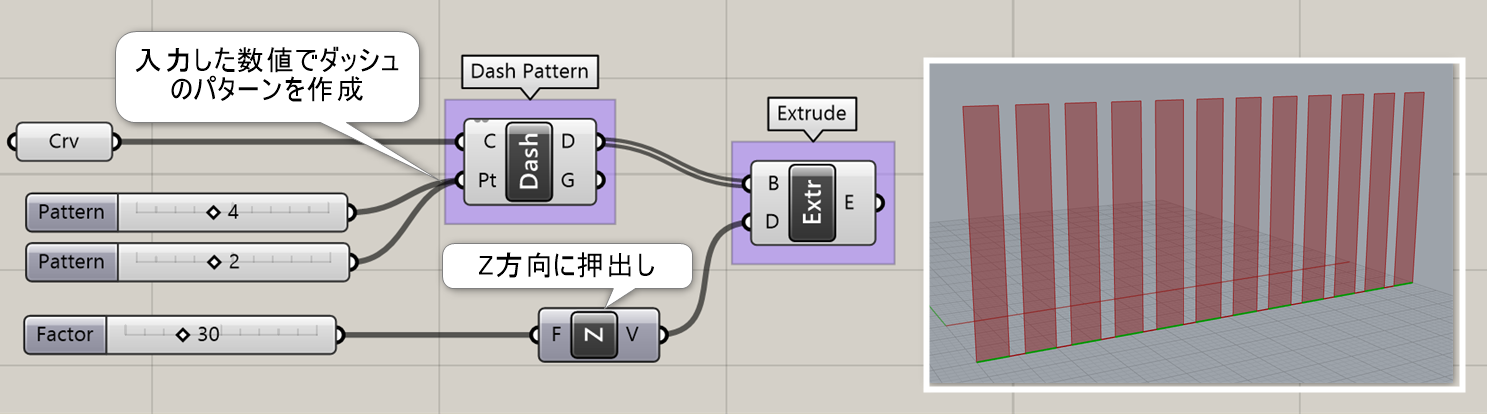
Z軸方向のベクトルを作成する。数値(Factor)を入力すると、その長さを持ったベクトルを作成する。
詳細1:Z軸方向のベクトルを作成する。数値(Factor)を入力すると、その長さを持ったベクトルを作成する。図は、[Dash Pattern]を使用して作成したラインを[Unit Z]で押し出した例。
Amplitude
A


Vector>Vector
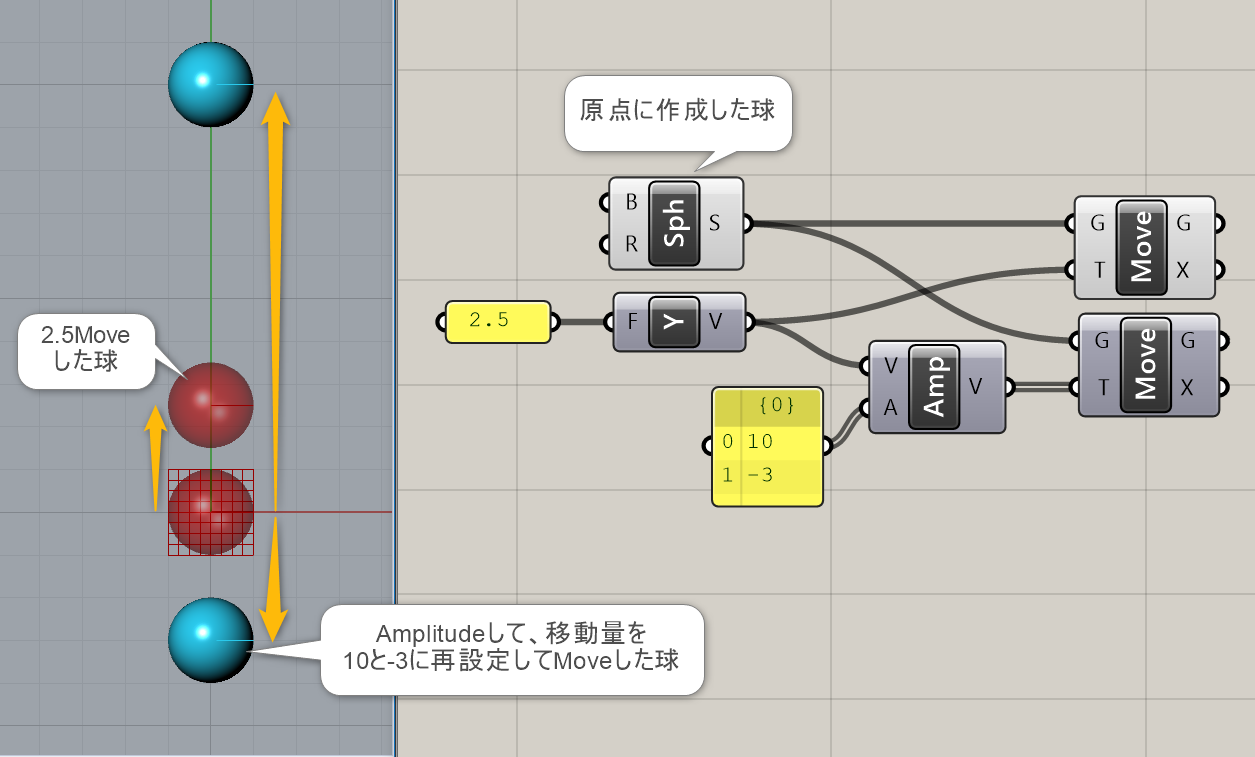
入力したベクトルの長さを指定した長さ(Amplitude)になるよう、再設定する。
詳細1:ベクトルの大きさ(長さ)を100に設定した例。
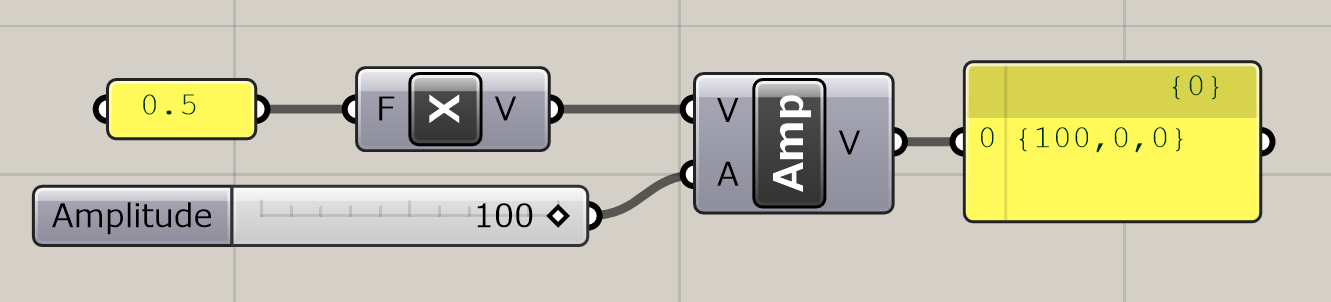
詳細2:入力されたベクトルを方向は維持したまま長さを変更した例。正の値を入れた場合は向きは同じ、負の値を入れた場合は向きが反転したうえで長さを再設定したベクトルが作成される。
Angle
B


Vector>Vector
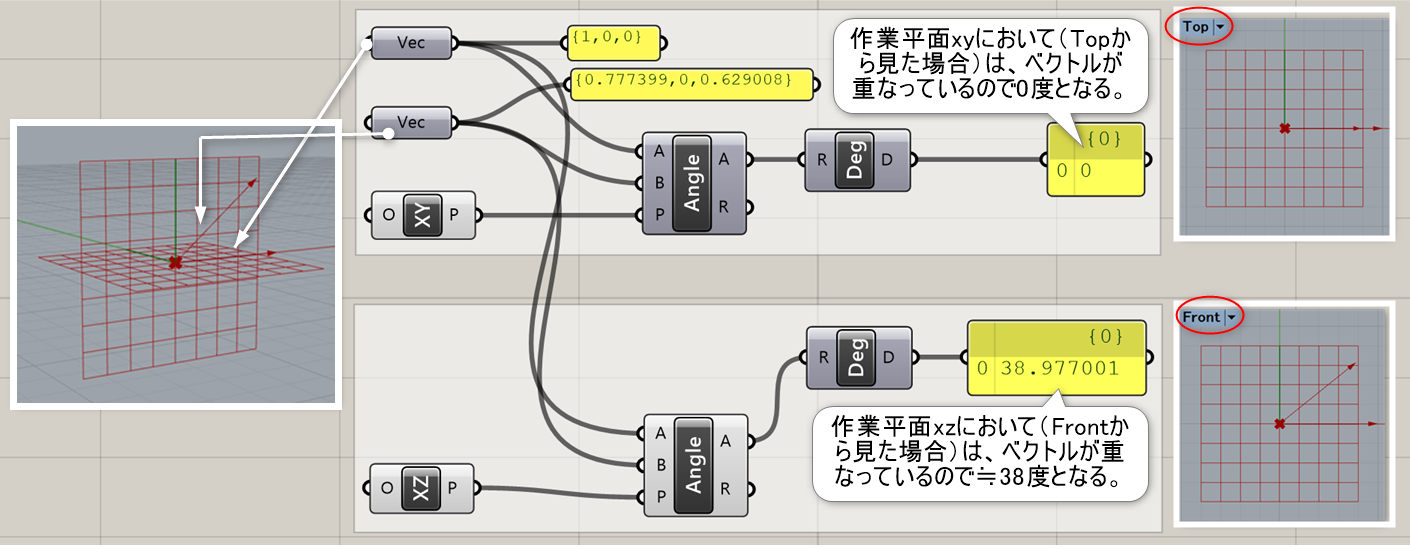
AとBの2つのベクトルを、指定した平面(Plane)内での角度を計算する。
詳細1:AとBの2つのベクトルを、指定した平面(Plane)内での角度を計算する。図は、指定平面を切り替えてAngleを取得した例。
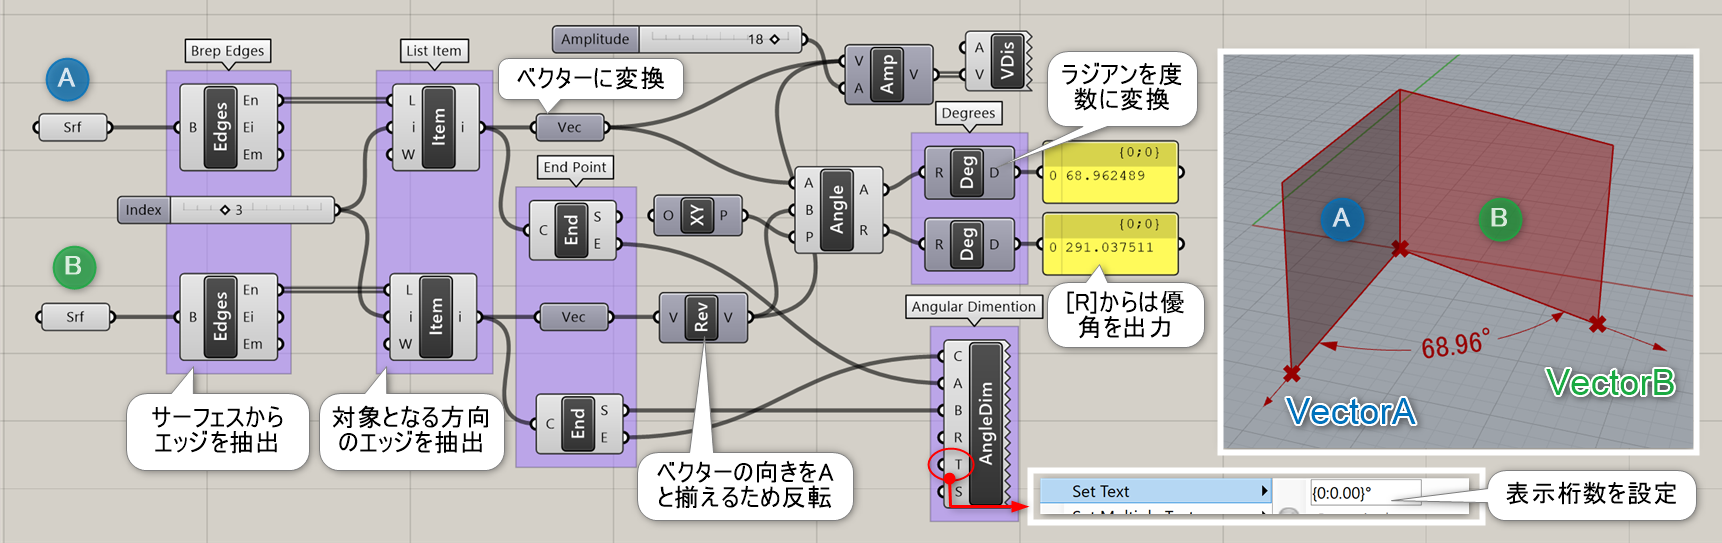
詳細2:2つのサーフェスからベクターを抽出しサーフェス間の角度を出力、それを[Angular Dimention]で表示した例。
Cross Product
C


Vector>Vector
AとBの2つのベクトルの外積となるベクトルを作成する。UnitにTrueを入れると、長さが1の単位ベクトルとして作成する。
Dot Product
C


Vector>Vector
AとBの2つのベクトルの内積を計算する。UnitにTrueを入れると、長さが1の単位ベクトルとして作成する。
Reverse
B


Vector>Vector
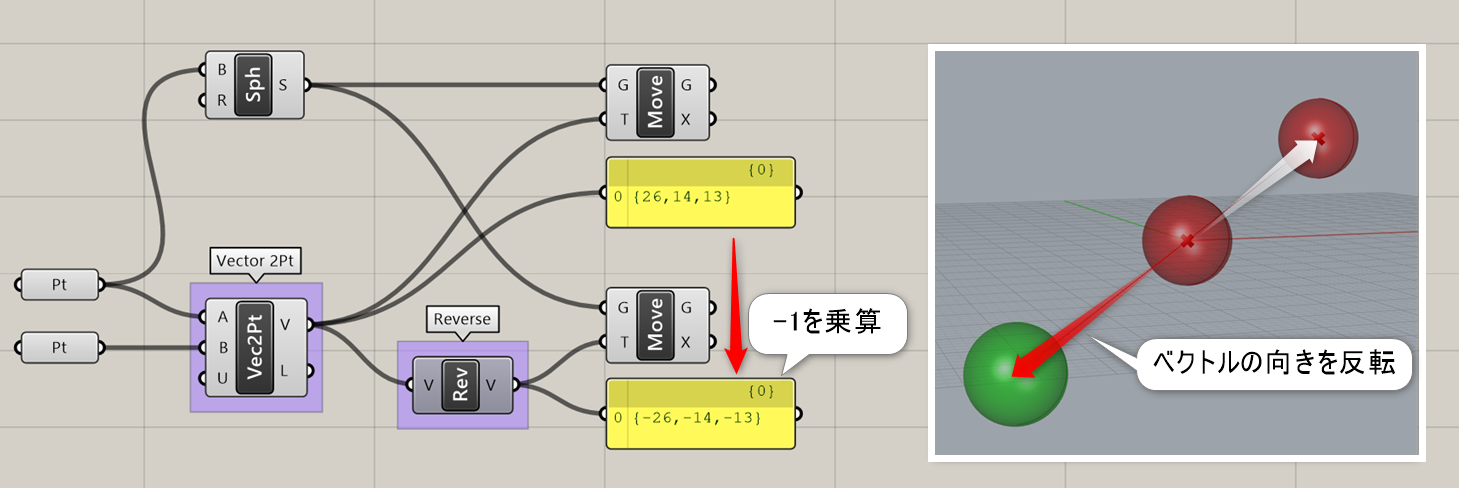
ベクトルの向きを反対にする(-1を乗算する)。
詳細1:ベクトルの向きを反対にする(-1を乗算する)。
(ジオメトリを回転させる)
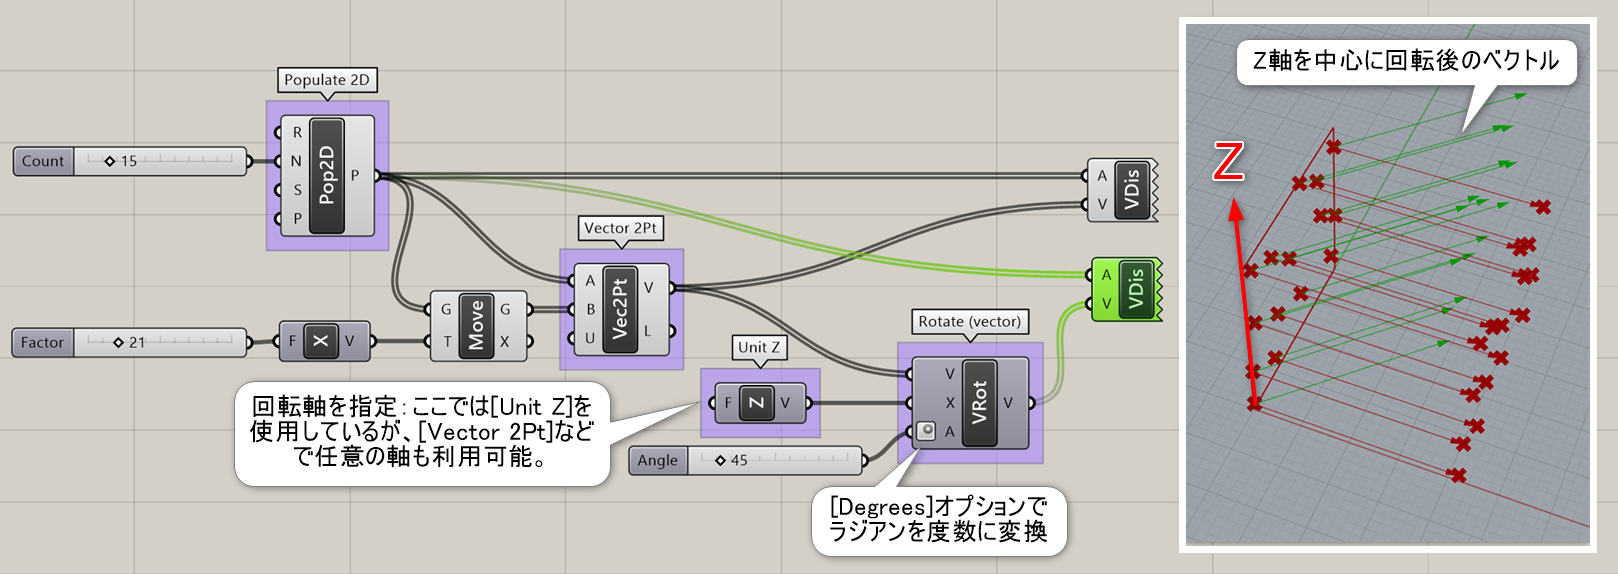
Rotate
B


Vector>Vector
ベクトルを軸(Axis)の周りで指定した角度(Angle)だけ、回転する。
詳細1:ベクトルを指定した軸(Axis)の周りで指定した角度(Angle)だけ、回転する。同じ名前のコンポーネント(ジオメトリを回転させる)があるので、注意。図は、X軸方向に作成したベクトルを、Z軸を中心に45度回転させた例。
Vector 2Pt
A


Vector>Vector
AとBの2点間を繋ぐベクトルを作成する。UnitにTrueを入れると、長さが1の単位ベクトルとして作成する。
詳細1:ポイントA(始点)/B(終点)の2点間のベクトルを生成する。AとBを入れ替えると、ベクトルの向きが逆になる。
そのままでは表示されないので、確認する場合には[Vector Display]コンポーネントを使用する。

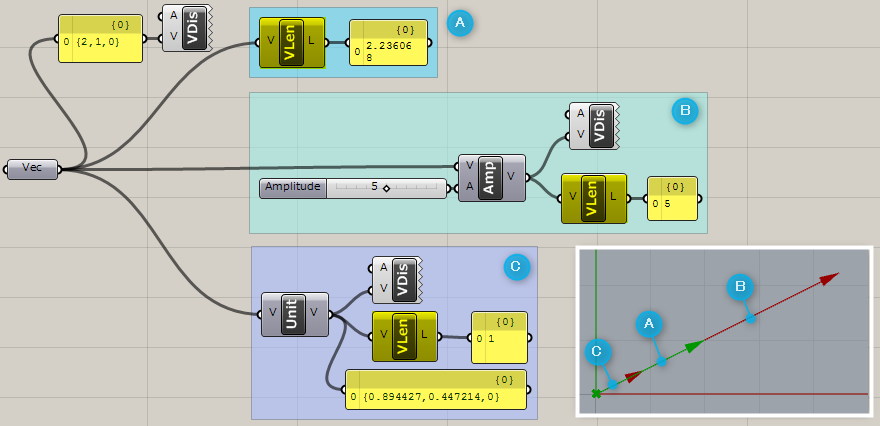
Vector Length
A


Vector>Vector
ベクトルの長さ(大きさ)を計算し、値を出力する。
詳細1:ベクトルの大きさ(長さ)を計算し、値を出力する。図はベクトルのいろいろな大きさを表示した例。
A:そのままベクトルの大きさを取得
B:[Amplitude]コンポーネントでベクトルの大きさを変更後、[Vector Length]コンポーネントで長さを取得
C:[Unit Vector]コンポーネントでベクターの大きさを1にし、(正規化)[Vector Length]コンポーネントで長さを取得